The post Danish Chicken and Asparagus Tartlets (Tarteletter) appeared first on Nordic Food & Living.
]]>
Today, I would like to share another Danish recipe. In Denmark we refers to this recipe as 'Hens in Tartlets' or sometimes simply just 'tartlets'. Hens in tartlets is an old and very traditional Danish recipe. Even though, this is an old dish it is still very popular and is typically served at buffets at restaurants around in Denmark, at Christmas dinners or maybe just at home, a Saturday evening, when you are hungry for traditional Danish food. They are sometimes uses as a starter because of their relatively small size and 'lightness'. However, they are also sometimes served as the main course typically together with some other food.
The Tartelets
The traditional way of serving this chicken and asparagus sauce is in the small crisp bread cups called Tartlets. Danish Tartlets are a very common thing in Denmark and can be bought in most super markets and grocery stores. They are very cheap and typically comes in packs of 10-15 Tartlets.
Unfortunately, I am quite sure these crisp Tartlets are a Danish thing and I think they can be very difficult to buy outside Denmark. However, I think you can get them from some bakeries or maybe a Nordic food store if you have one of these in your area. If you know a good store, outside Denmark, which sells these Tartlets or maybe just something similar, I am sure other readers of my blog would love to read about this in the comment section below.
Traditional Hens Meat
In the traditional recipe for Danish Tartlets is it actually not chicken breast filet that is used as the meet. The problem with the chicken filet we can buy nowadays is that the chicken is raised in record time - sometimes as low as 30-40 days are used to raise a chicken from the cracking of the egg to the butchering. Besides the fast growth, the chicken filet is also typically pumped with saltwater. These two factors results in some chicken meat that can sometimes be a little doll in the taste. In the original recipe the meat comes from a whole hen which has not been fast raised. In the old days in Denmark, it was the hens, which were too old to lay eggs that were used in the recipe for Tartlets. The meat on old hens is too tough for frying but it is still full of great taste and is therefore perfect for this recipe where the meat is cooked in water.
Whether you are using the old and traditional way with hens meat or the quick version using chicken filets, I normally estimates about 60 grams (2 oz) of meat per person.
Fresh Asparagus or Caned
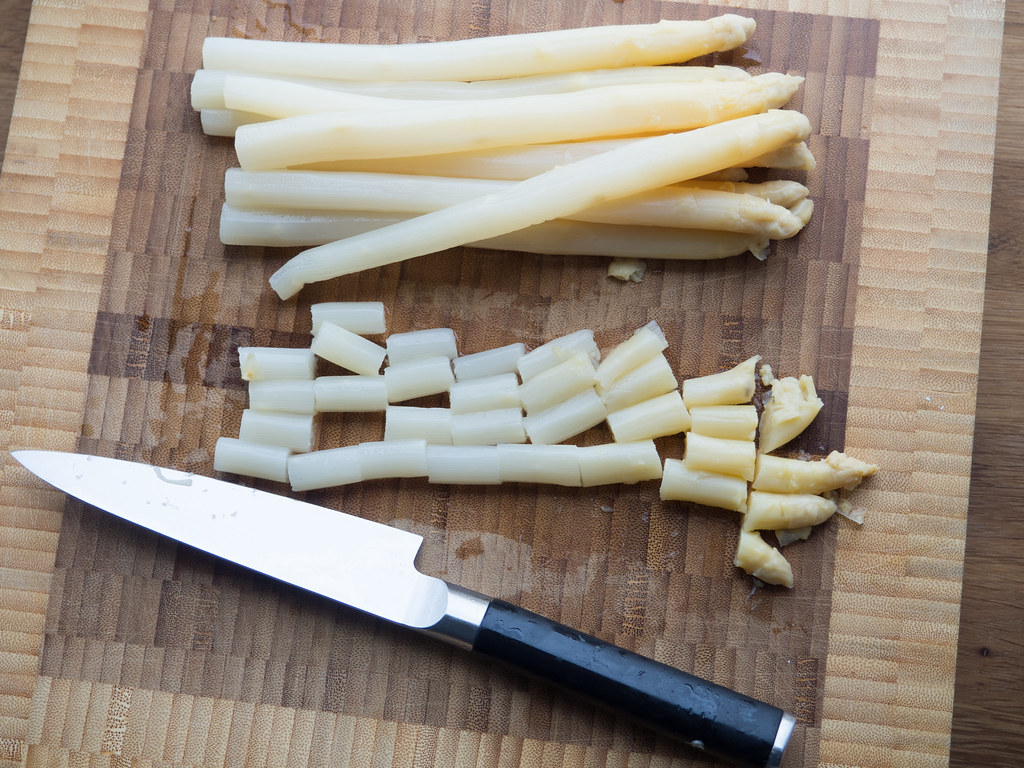
In Denmark, it is very difficult to find fresh white asparagus when they are off-season. In the off-season, I always uses the caned asparagus, which I personally think is a great alternative to the fresh ones. However, if you can find the fresh asparagus I will of course recommend them to get the best taste.
Instructions
The chicken meat:
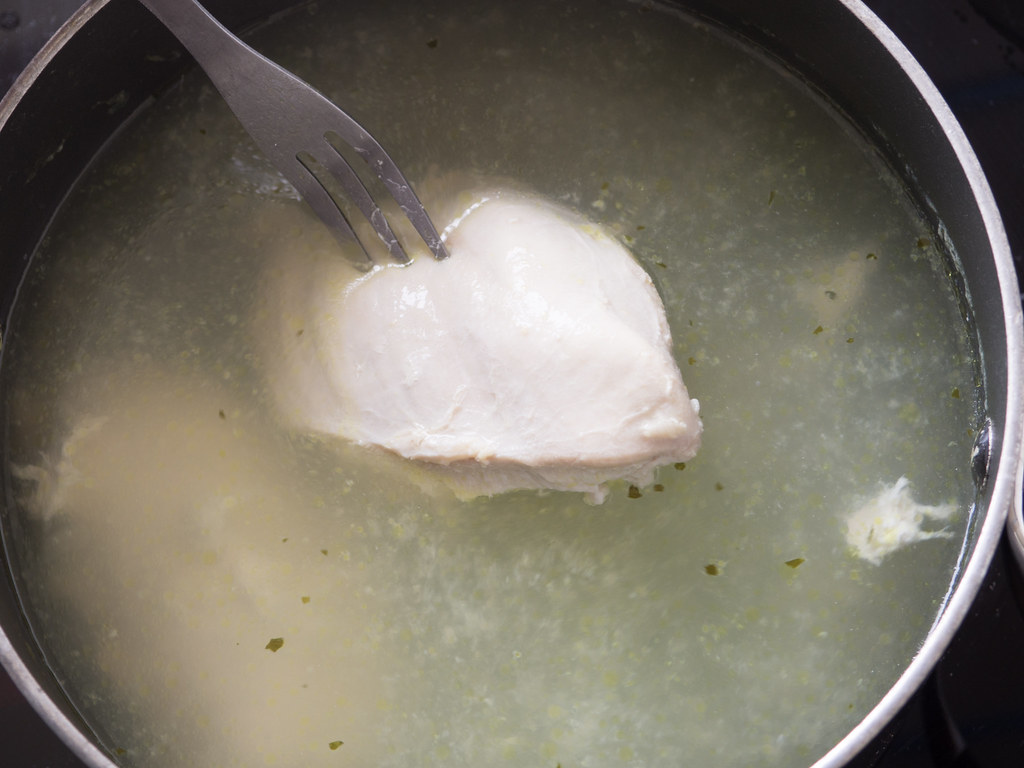
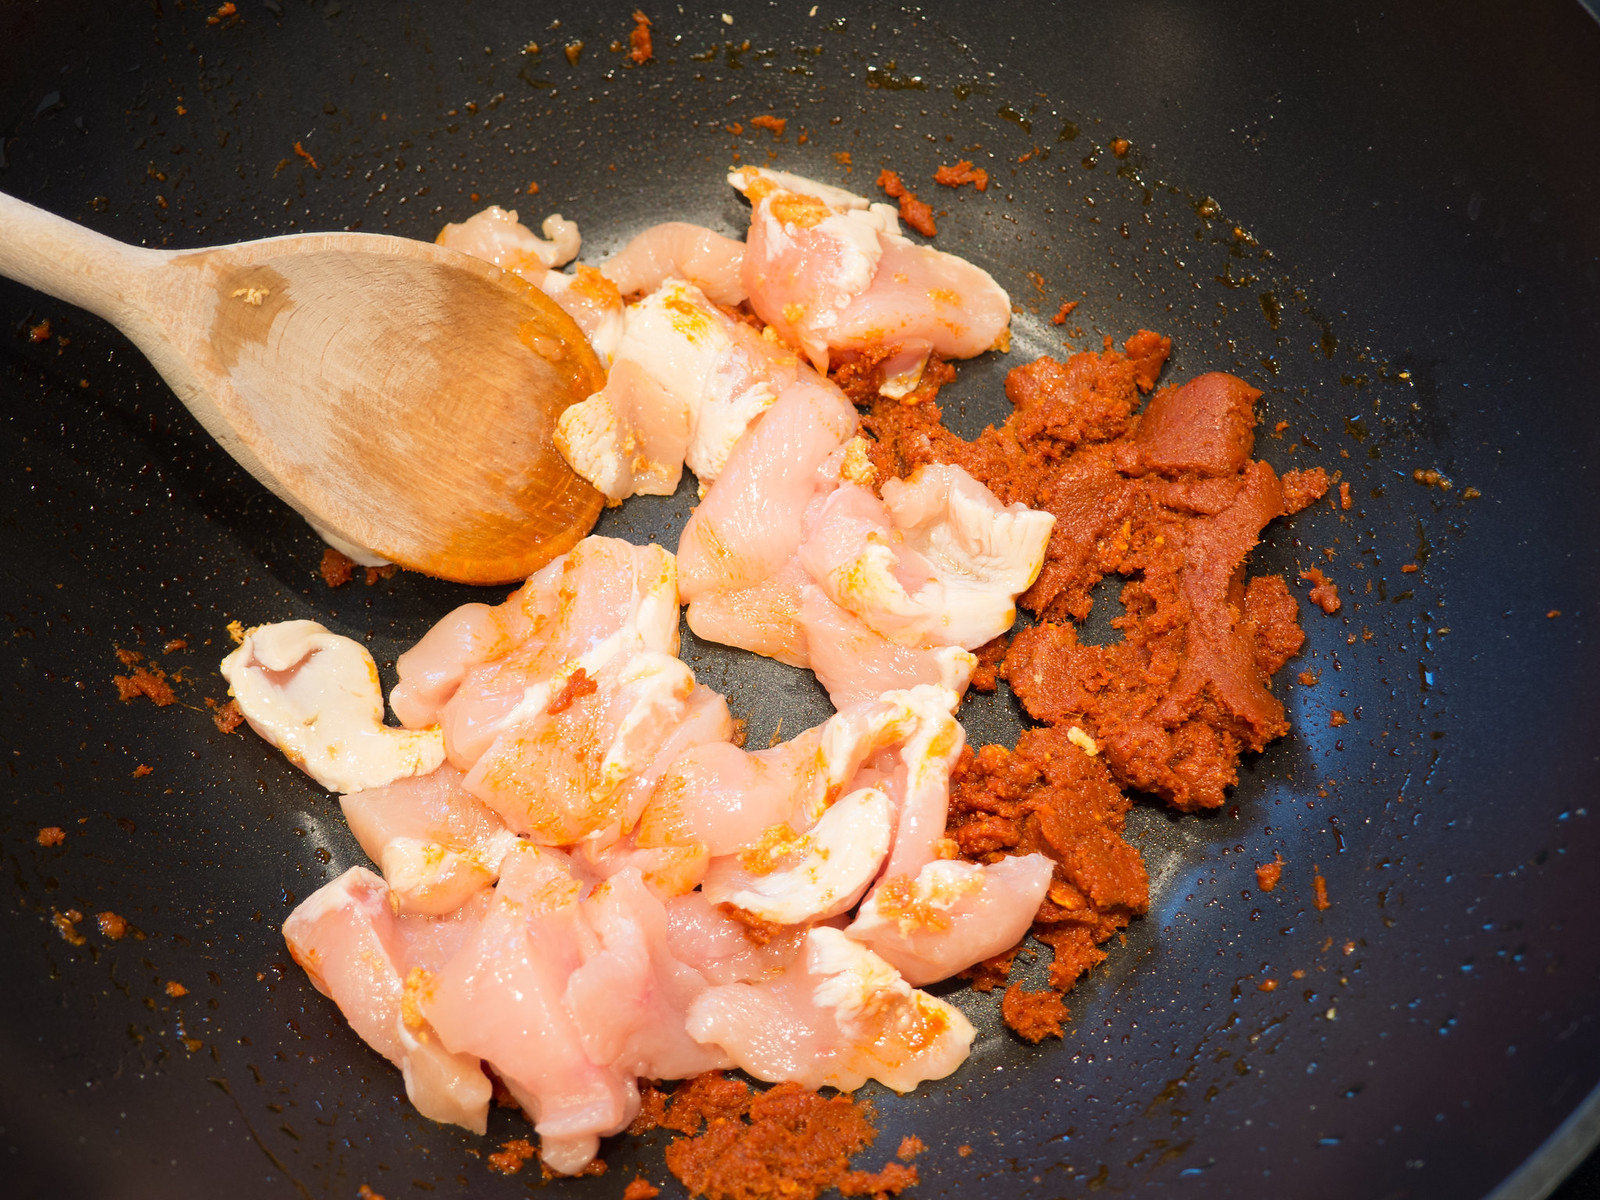
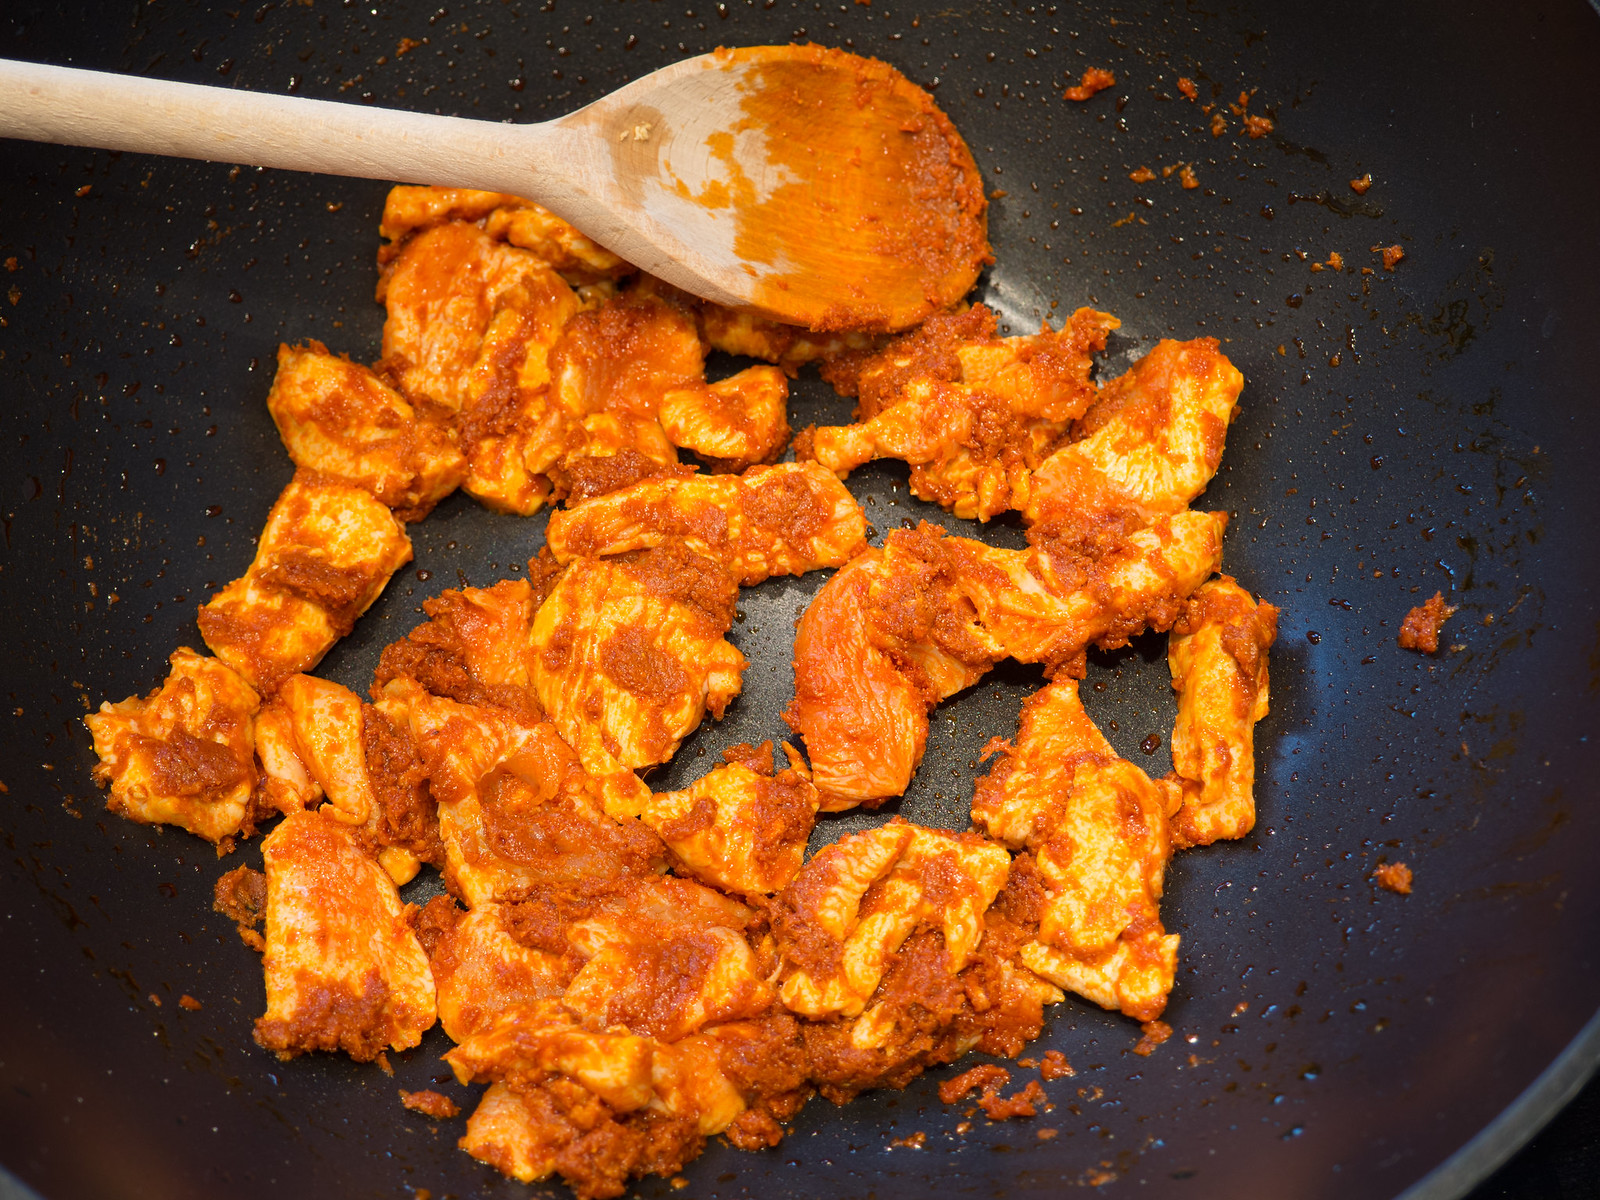
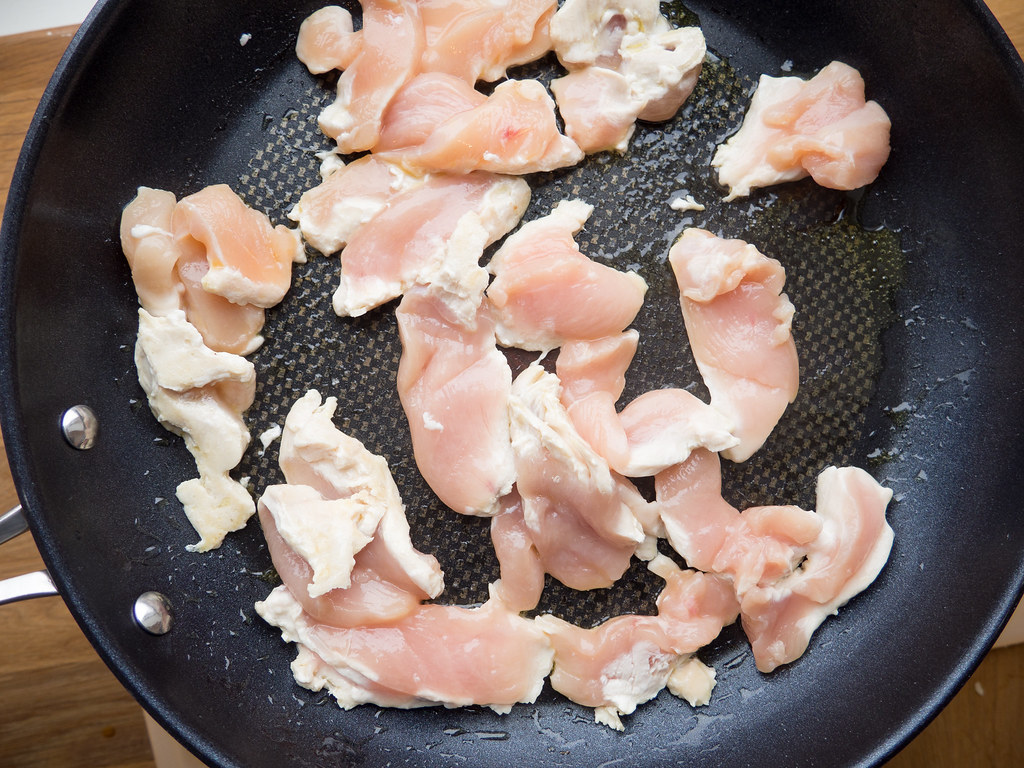
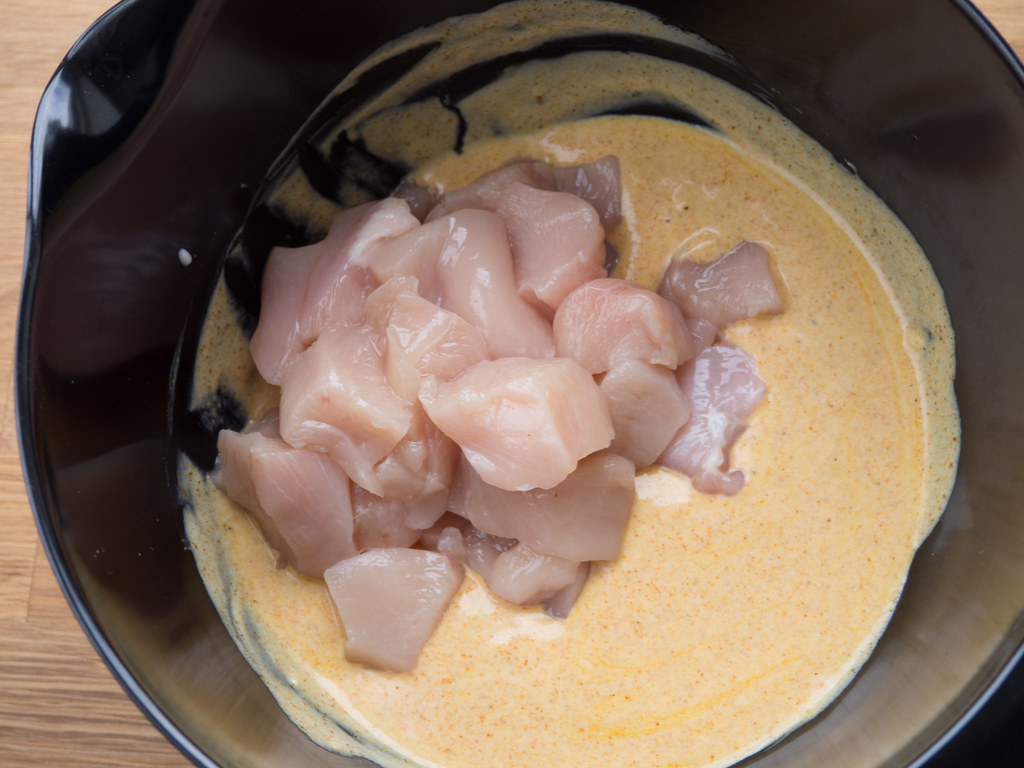
In a sauce pan; bring about 1,5 liter (1/2 gal) of water to boil. Add some chicken stock and the chicken filet. Cook the chicken filet for about 20 minutes. The chicken most be cooked all the way through but not over-cooked. When done, dice up the chicken in small pieces of about 7x7 mm (1/3x1/3 inch). Save the water used to cook the chicken.
The White Sauce:
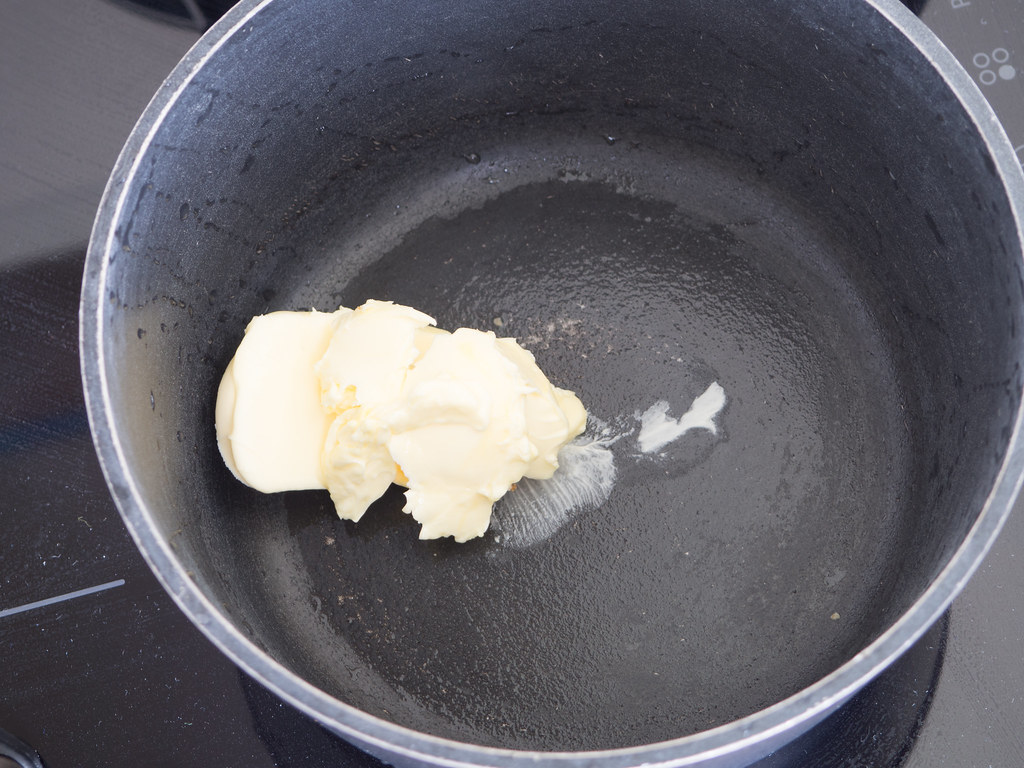
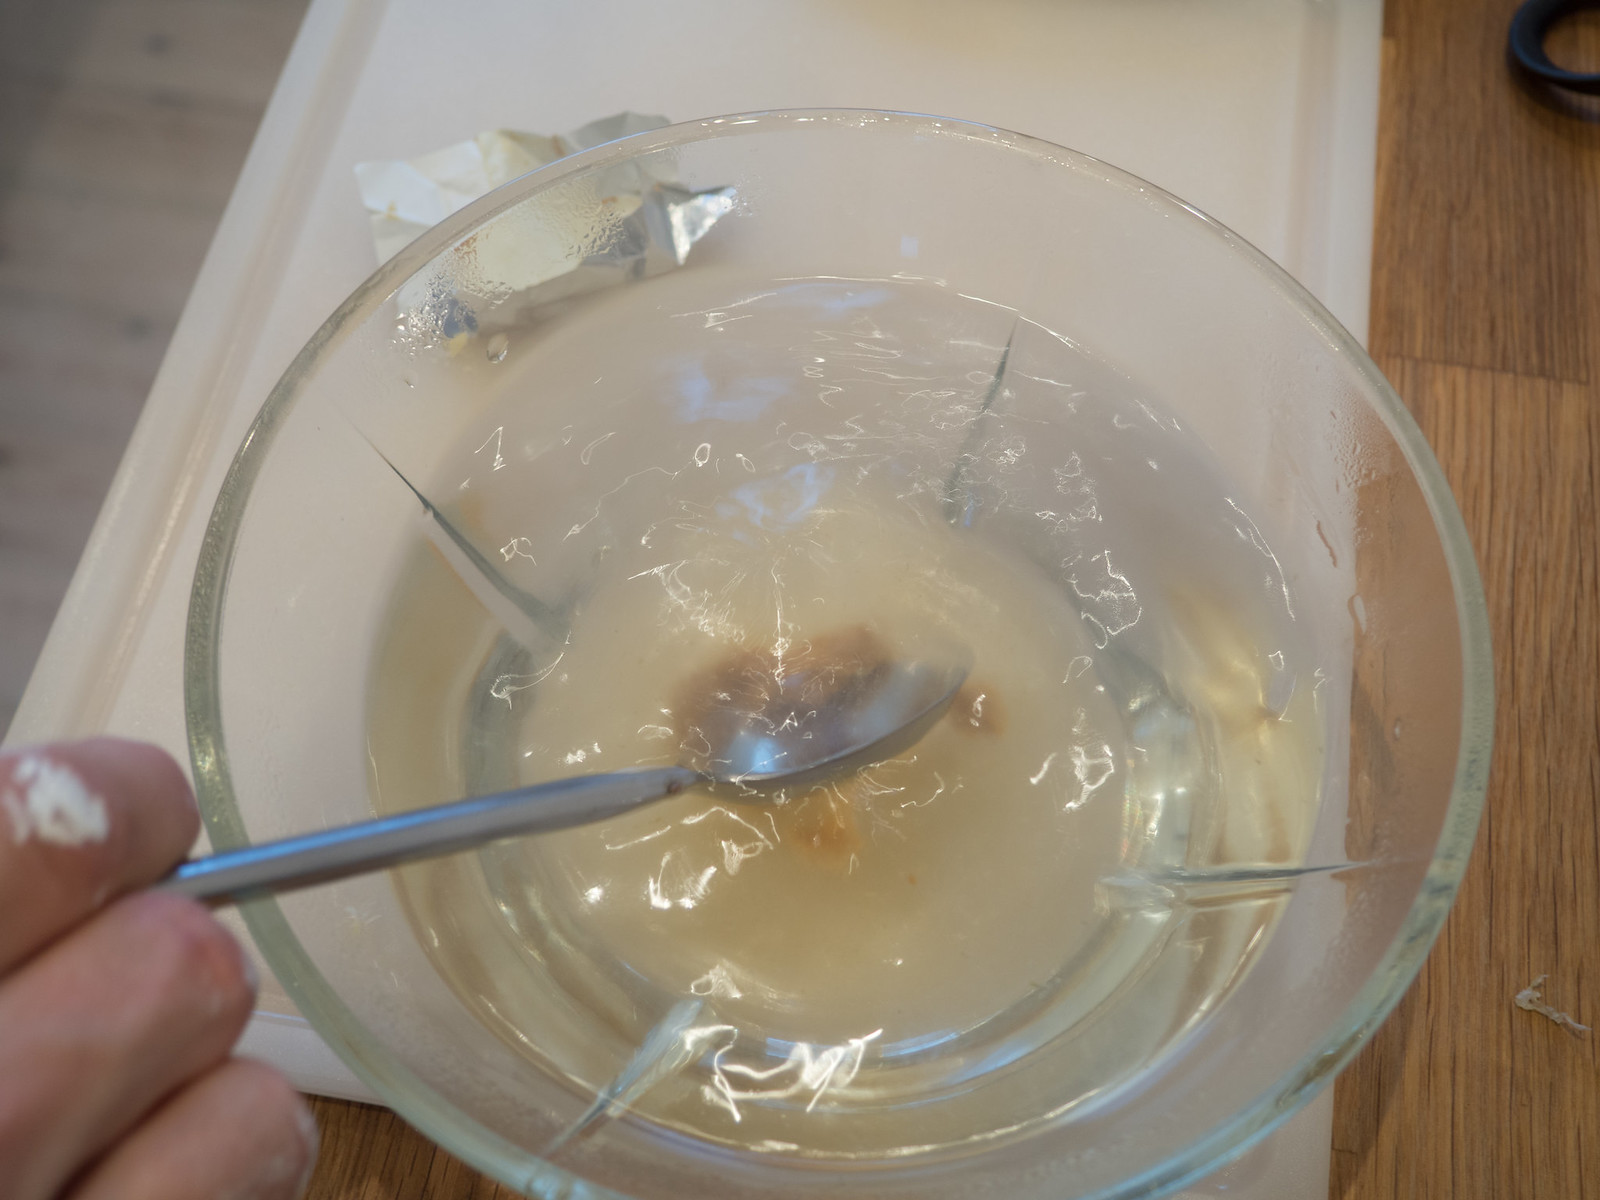
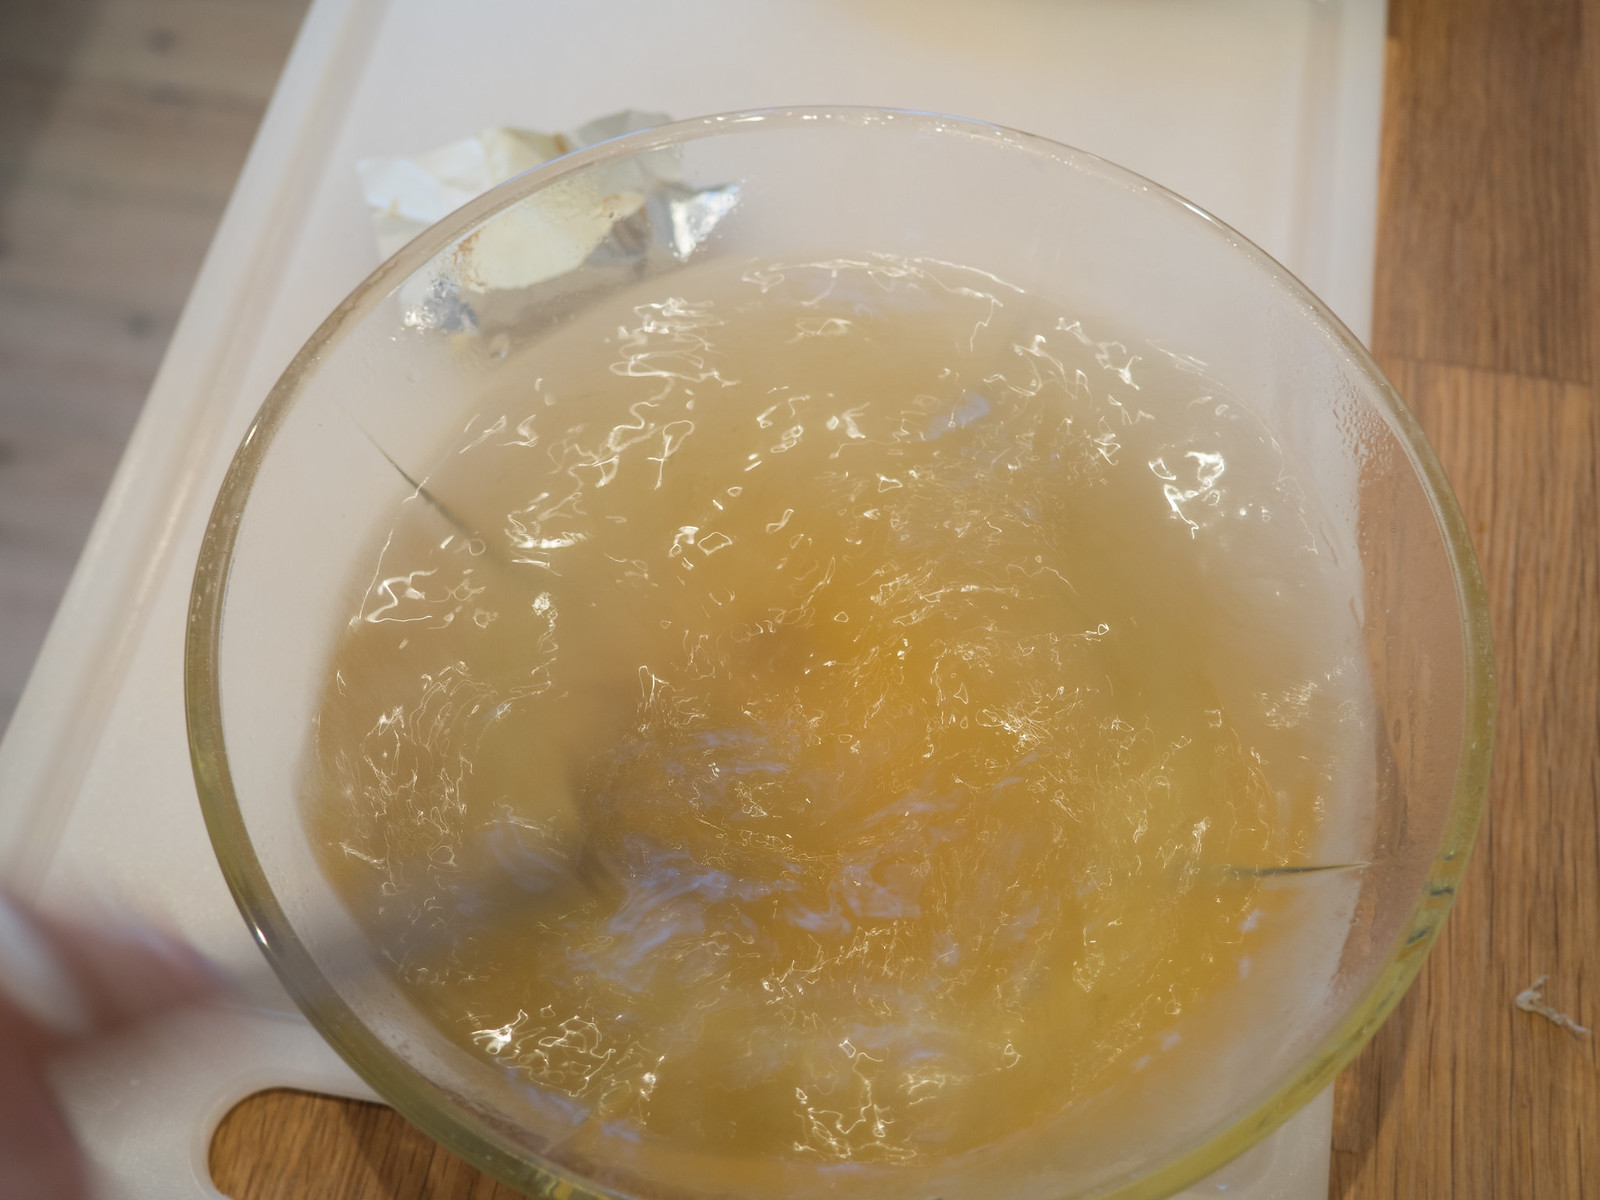
The white sauce is made from the few ingredients; butter, all-purpose flour, milk and then some of the water used to cook the chicken or the asparagus. Especially, the last part is important to get the best taste. The water used to cook the chicken is full of great taste and is perfect as a base for this sauce. Alternatively, you can use the water from the cooking if the asparagus.
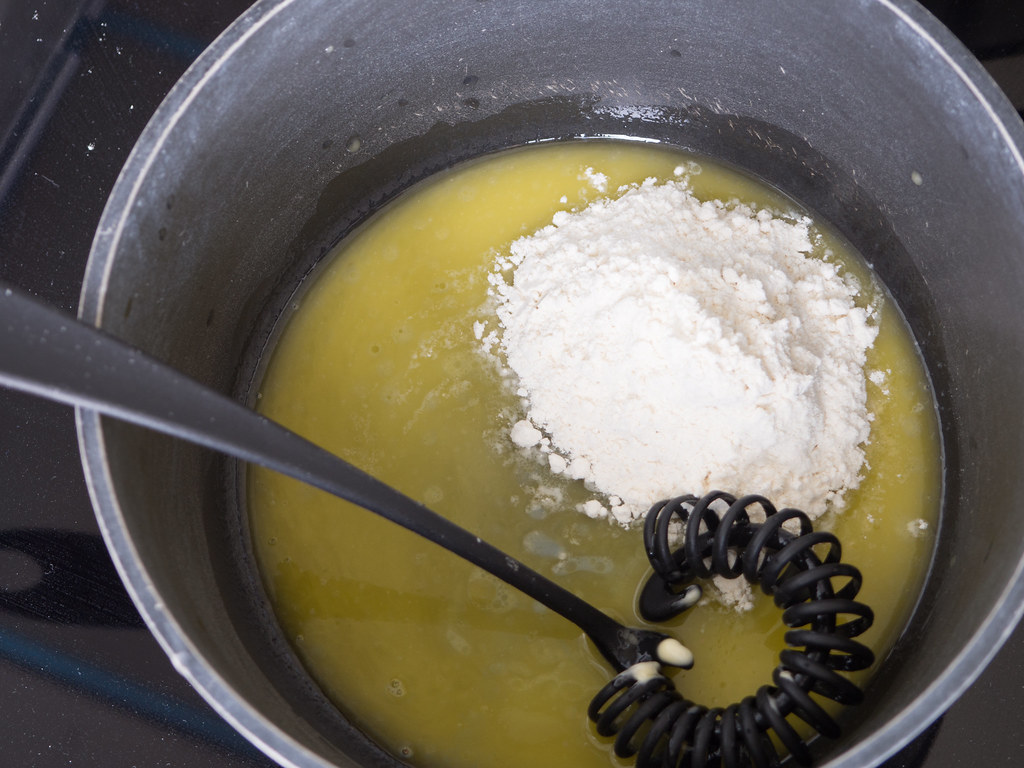
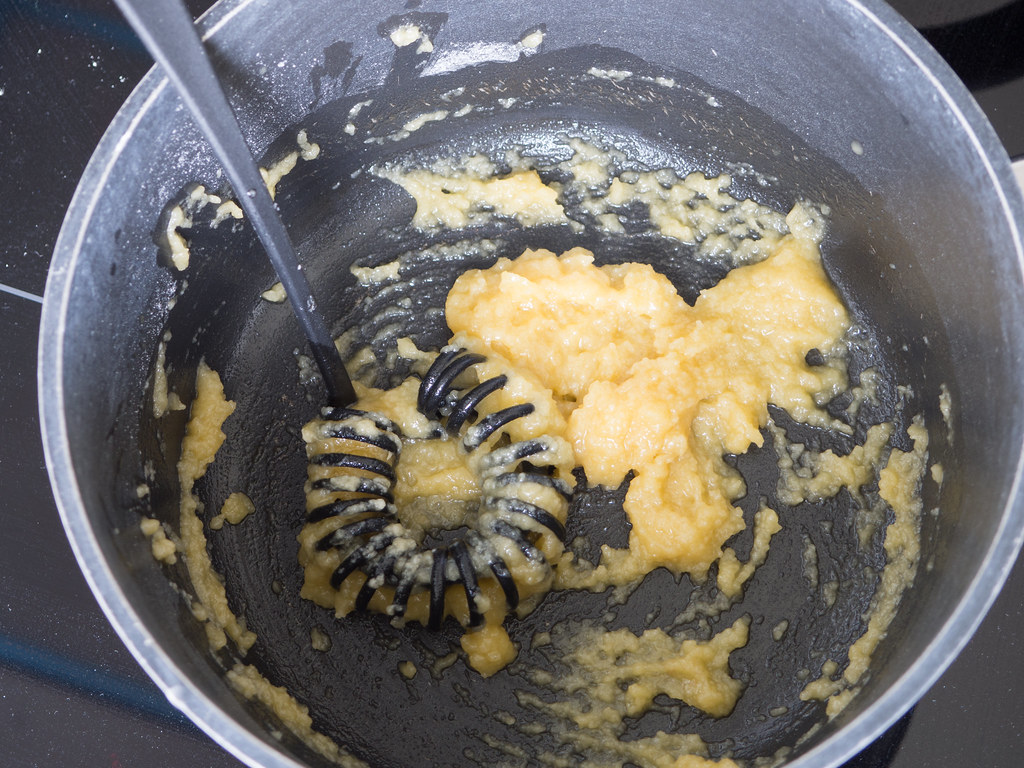
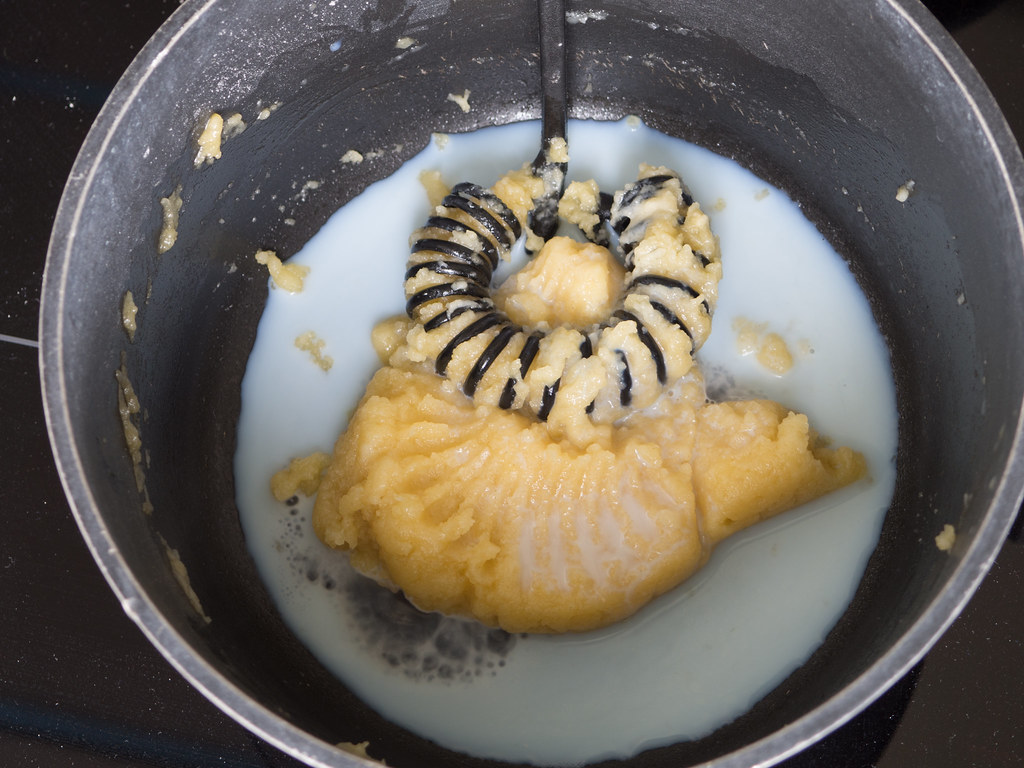
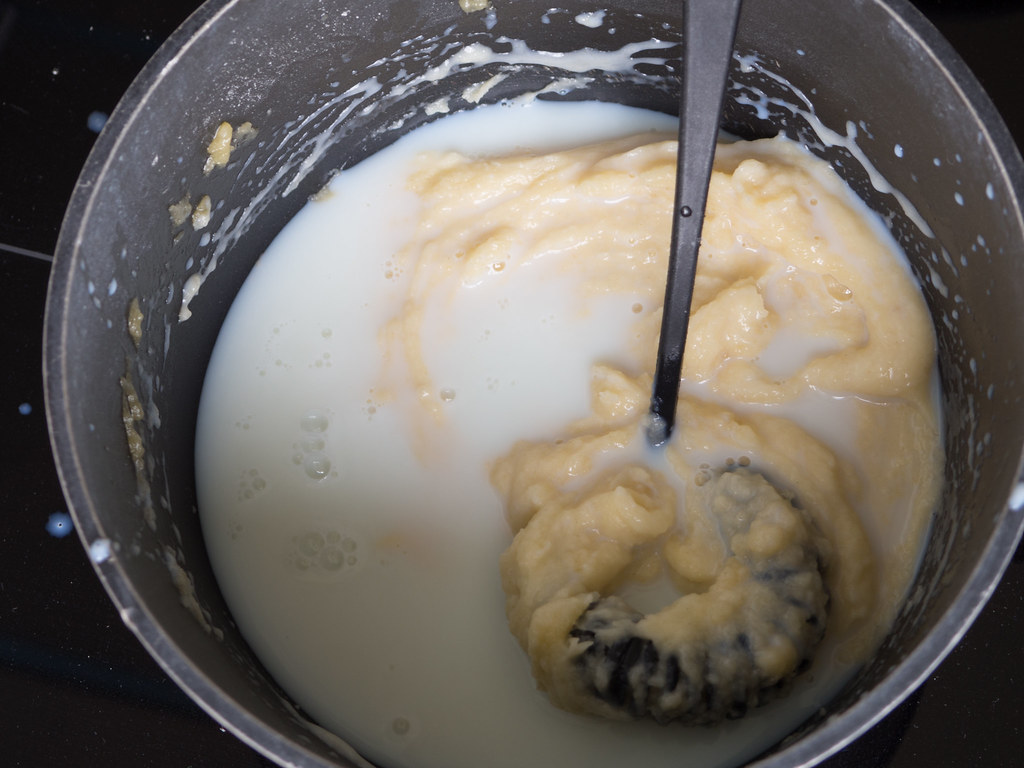
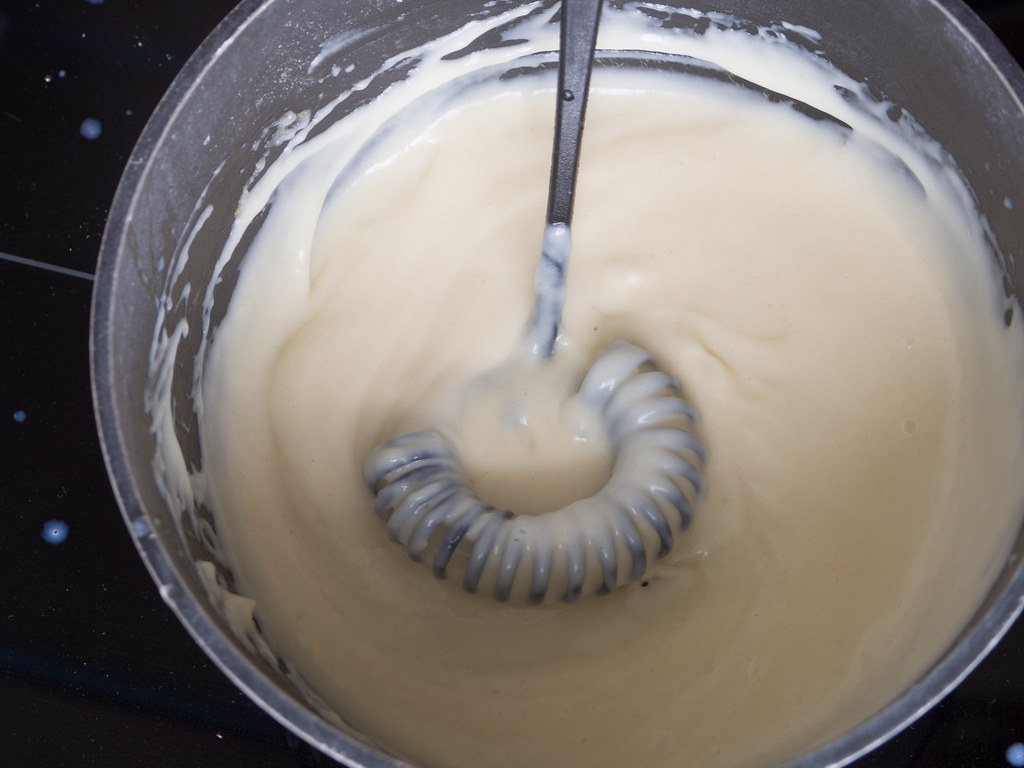
You start by melting the butter in a saucepan, and then you step-wise add the all-purpose flour while whisking the butter into the flour. Once all the butter and flour is mixed into one stick butter-flour ball then you add the milk and the cooking water from the chicken step-wise, again, while whisking. It is important that you whisk a lot to get rid of the flour lumps.
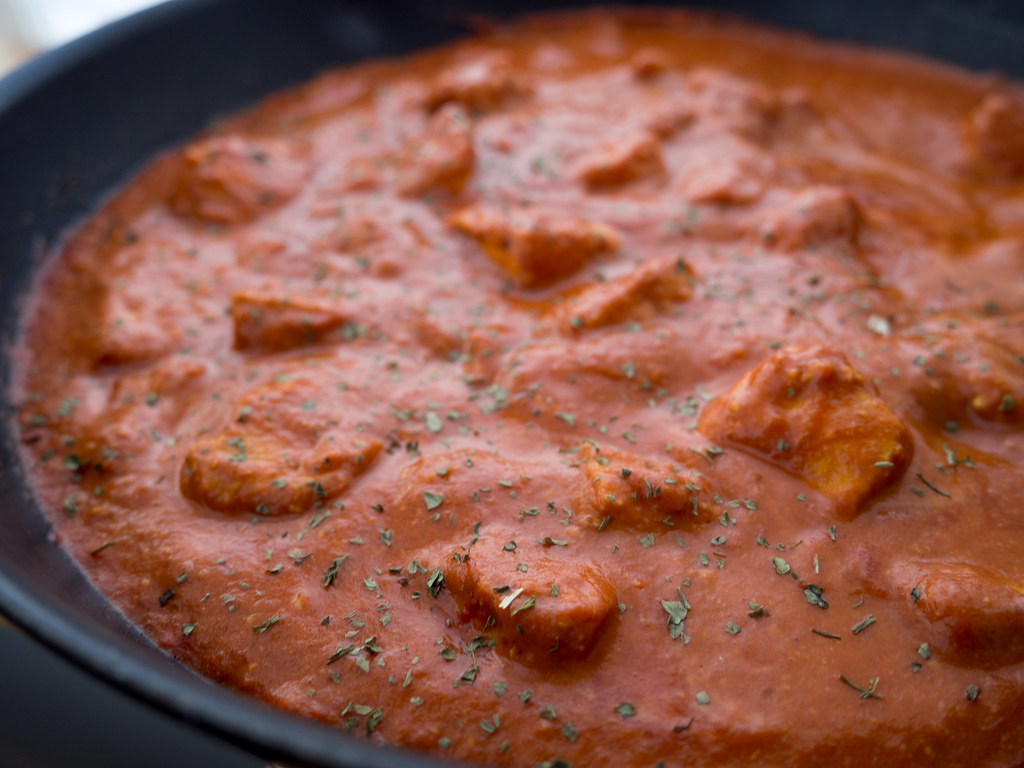
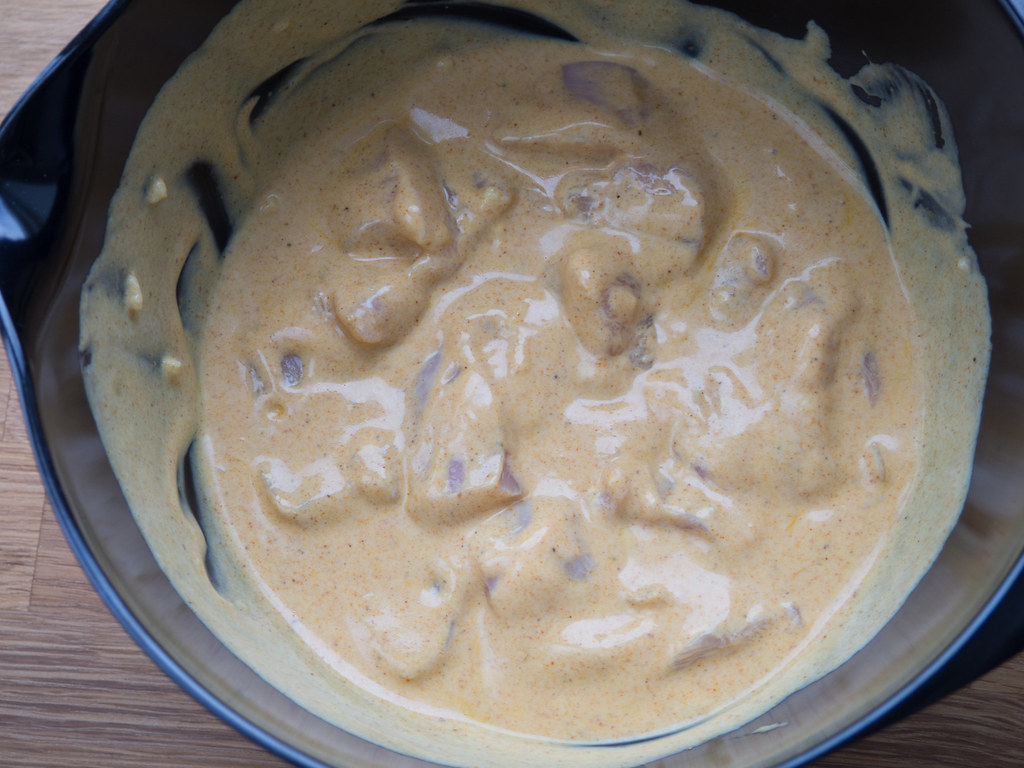
Let the sauce simmer for about 5-10 minutes or until the consistency is nice and thick. The thickness of the sauce should be relatively thick and not too liquid. When the sauce is almost ready add the cooked chicken and the prepared asparagus and heat everything up.
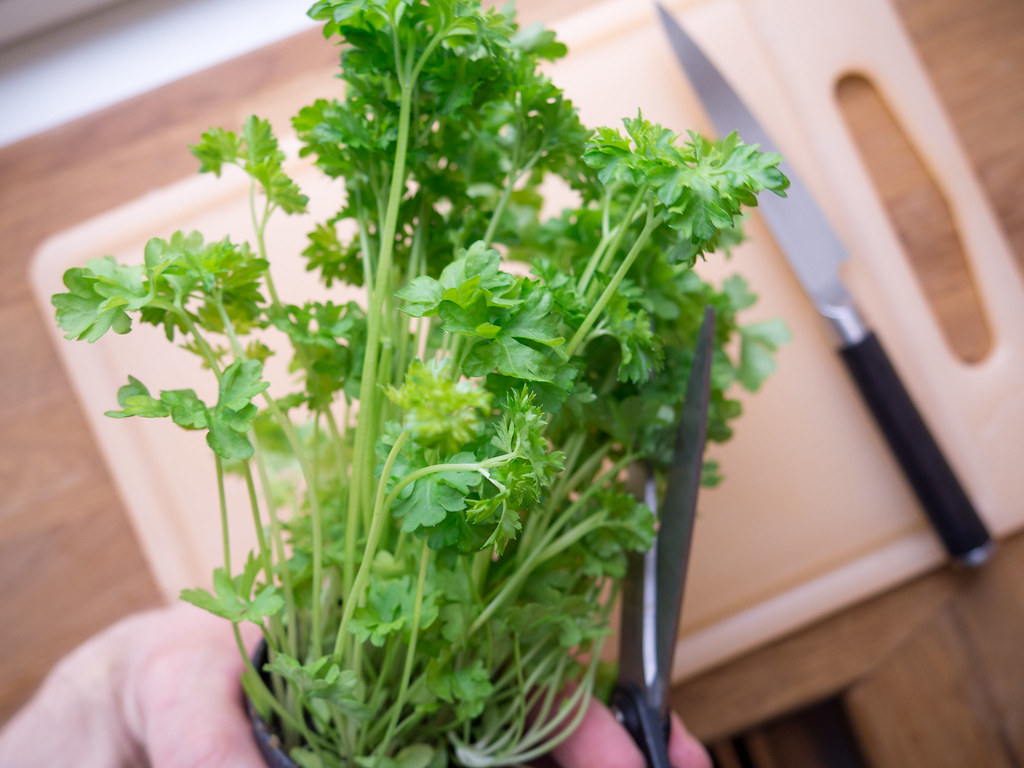
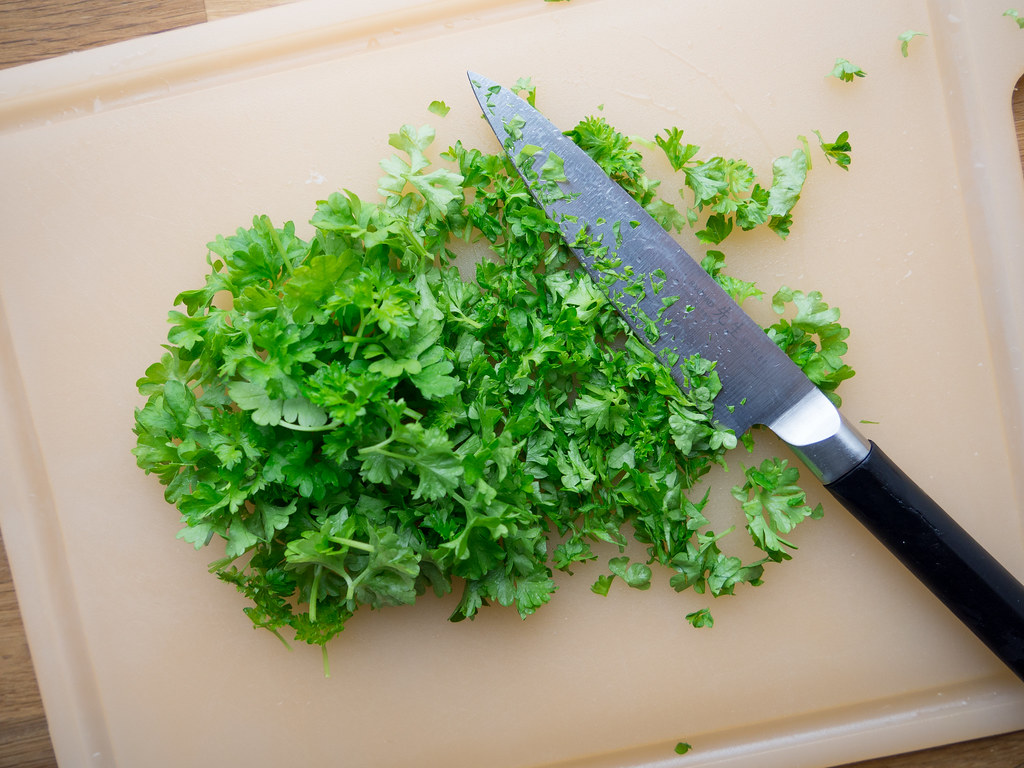
Warm the tartlets in an oven for a couple of minutes. Fill each tartelet with the white chicken and asparagus sauce. Decorate the top of the tartlets with freshly chopped parsley.
Danish Chicken and Asparagus Tartlets
3-4 people
Preparation time: 40 minutes
Total Time: 40 minutes
Danish title: Tarteletter
Cuisine: Danish
Category: dinner
Ingredients:
1.5 l (1/2 gal) water
chicken stock powder
350 g (12 oz) chicken breast
150 g (5 oz) white asparagus
40 g (1 1/2 oz) butter
5 tbsp all-purpose flour
2 dl (4/5 cup) milk
2 dl (4/5 cup) water (from the cooking of the chicken)
salt and pepper to taste
Instructions:
1. Start by bringing about 1.5 (2/5 gal) of water to boil. Dissolve the chicken stock in the water.
2. Add the chicken breast filets to the water and let them cook for about 20 minutes. They must be done in the middle but try not to over-cook them.
3. When the chicken is done; cut the chicken into smaller pieces about 7x7 mm (1/3x1/3 inch). Remember to save the water used to cook this chicken.
4. If you uses fresh white asparagus; clean them and boil them to tender in water - you can also just caned asparagus. Cut the cooked asparagus into smaller pieces with a length of about 2 cm (4/5 inch).
5. Continue by preparing the white thick sauce. In a saucepan; add the butter and slowly melt it.
6. Add the all-purpose flour to the butter. Whisk everything into a nice butter-flour mixture.
7. Step-wise add the milk and the water (only 2 dl or 4/5 cup) used to cook the chicken. Whisk continuously until all flour lumps are dissolved.
8. Let the sauce simmer for 5-10 minutes or until it has a good and thick consistency.
9. Add the prepared chicken and asparagus pieces. Let it heat up in the white sauce.
10. Warm the tartlet cups and fill them with the chicken and asparagus sauce. Decorate the top with chopped fresh parsley.


The post Danish Chicken and Asparagus Tartlets (Tarteletter) appeared first on Nordic Food & Living.
]]>The post Chiang Mai Curry Noodles (Kao Soi) appeared first on Nordic Food & Living.
]]>
This recipe I am sharing here on this page is actually as far away from the traditional Nordic kitchen as it can possibly get. However, this recipe for a chicken red chili curry is just fantastic - the taste is very rich and it just has the right amount of spicy flavor from the red curry paste. This is overall a super delicious dish. Besides being very delicious, it is also very simple to make. I uses this recipe when I want to prepare some fast but also when I want a good looking and tasteful dish - perfect when you are having guests over for dinner.
Chiang Mai Curry Noodles (Kao Soi)
The name of this dish is called Chiang Mai Curry Noodles (Kao Soi) and it is originally from the northern part of Thailand. Chiang Mai is the name of a city located in a mountain area. The 'Kao Soi' translated means 'a meal for one’, which is typically served in a larger bowl.
Personally, I do not eat that much Thai food but when I do, this is absolutely my favorite Thai dish. I have never visit Thailand but this dish want to make me pack my suitcase right away and take the first Thailand bound plane.
I learned about this dish the first time, when it was served for me at a fantastic Thai restaurant located in Copenhagen. This restaurant is called Wokshop and has several branches located different places throughout Copenhagen and the suburbs.
Instructions:
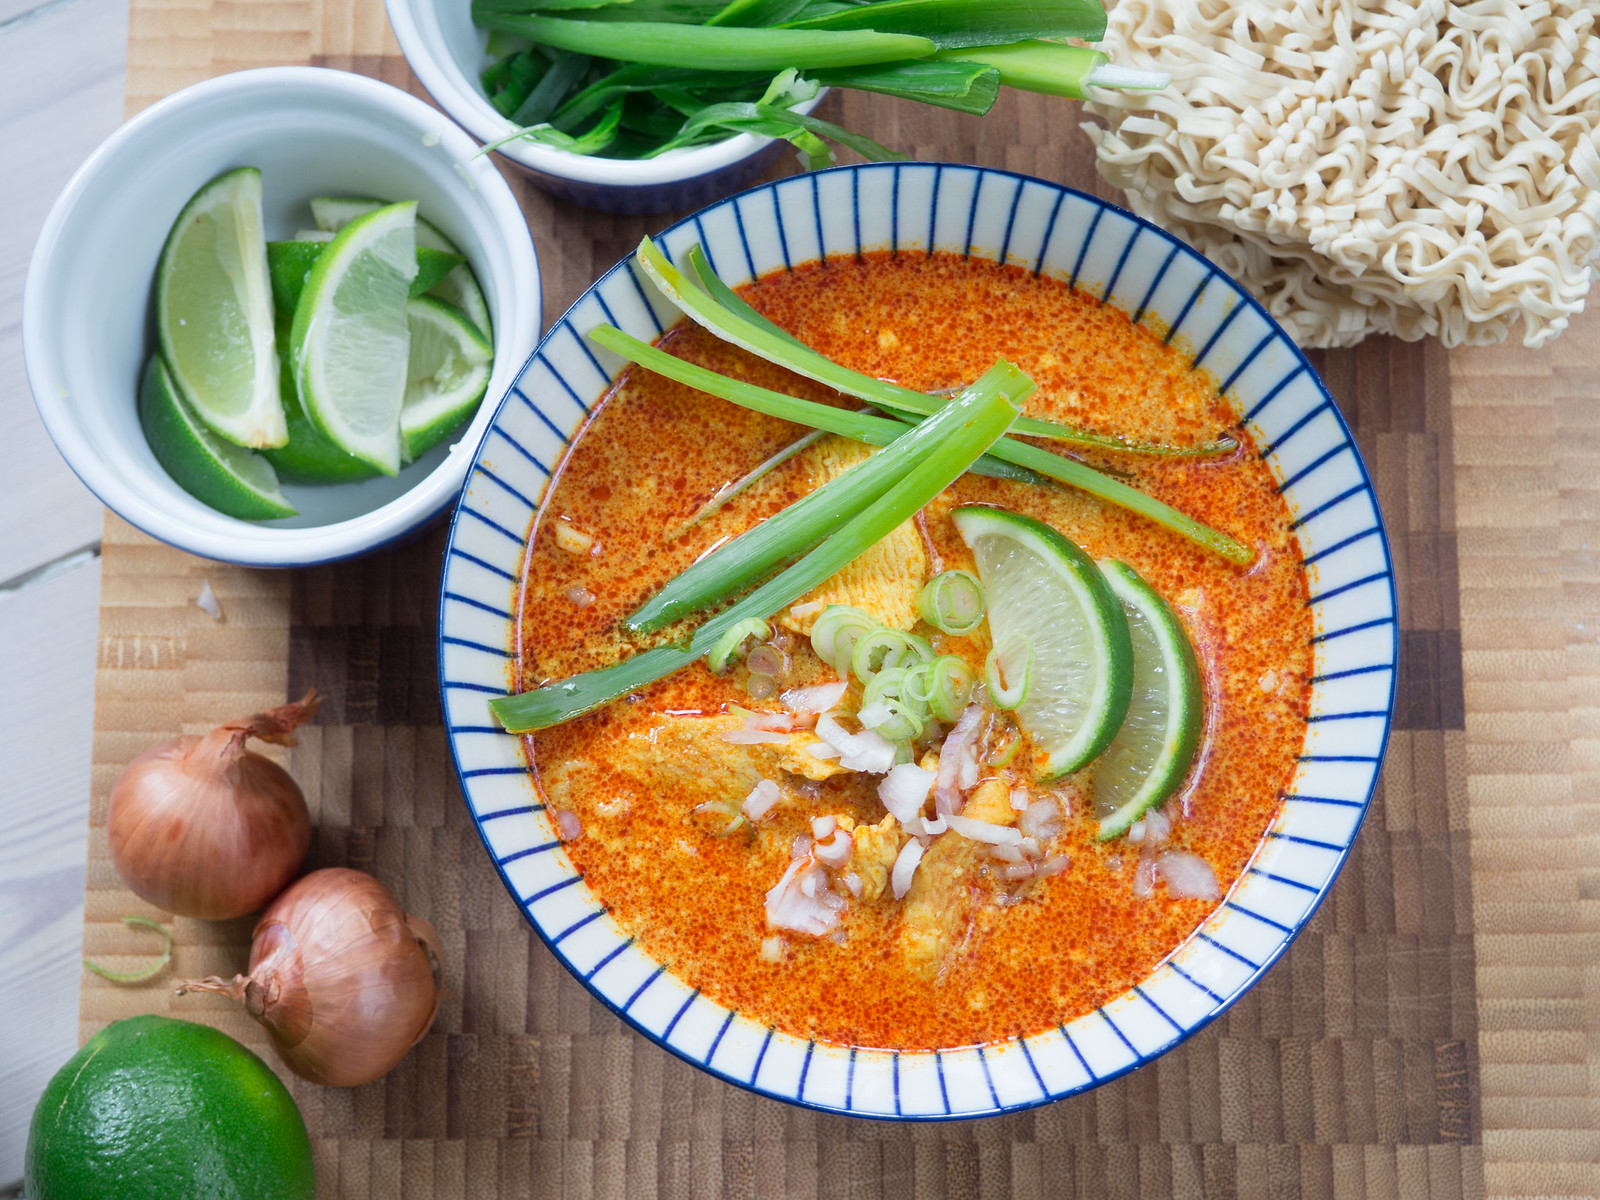
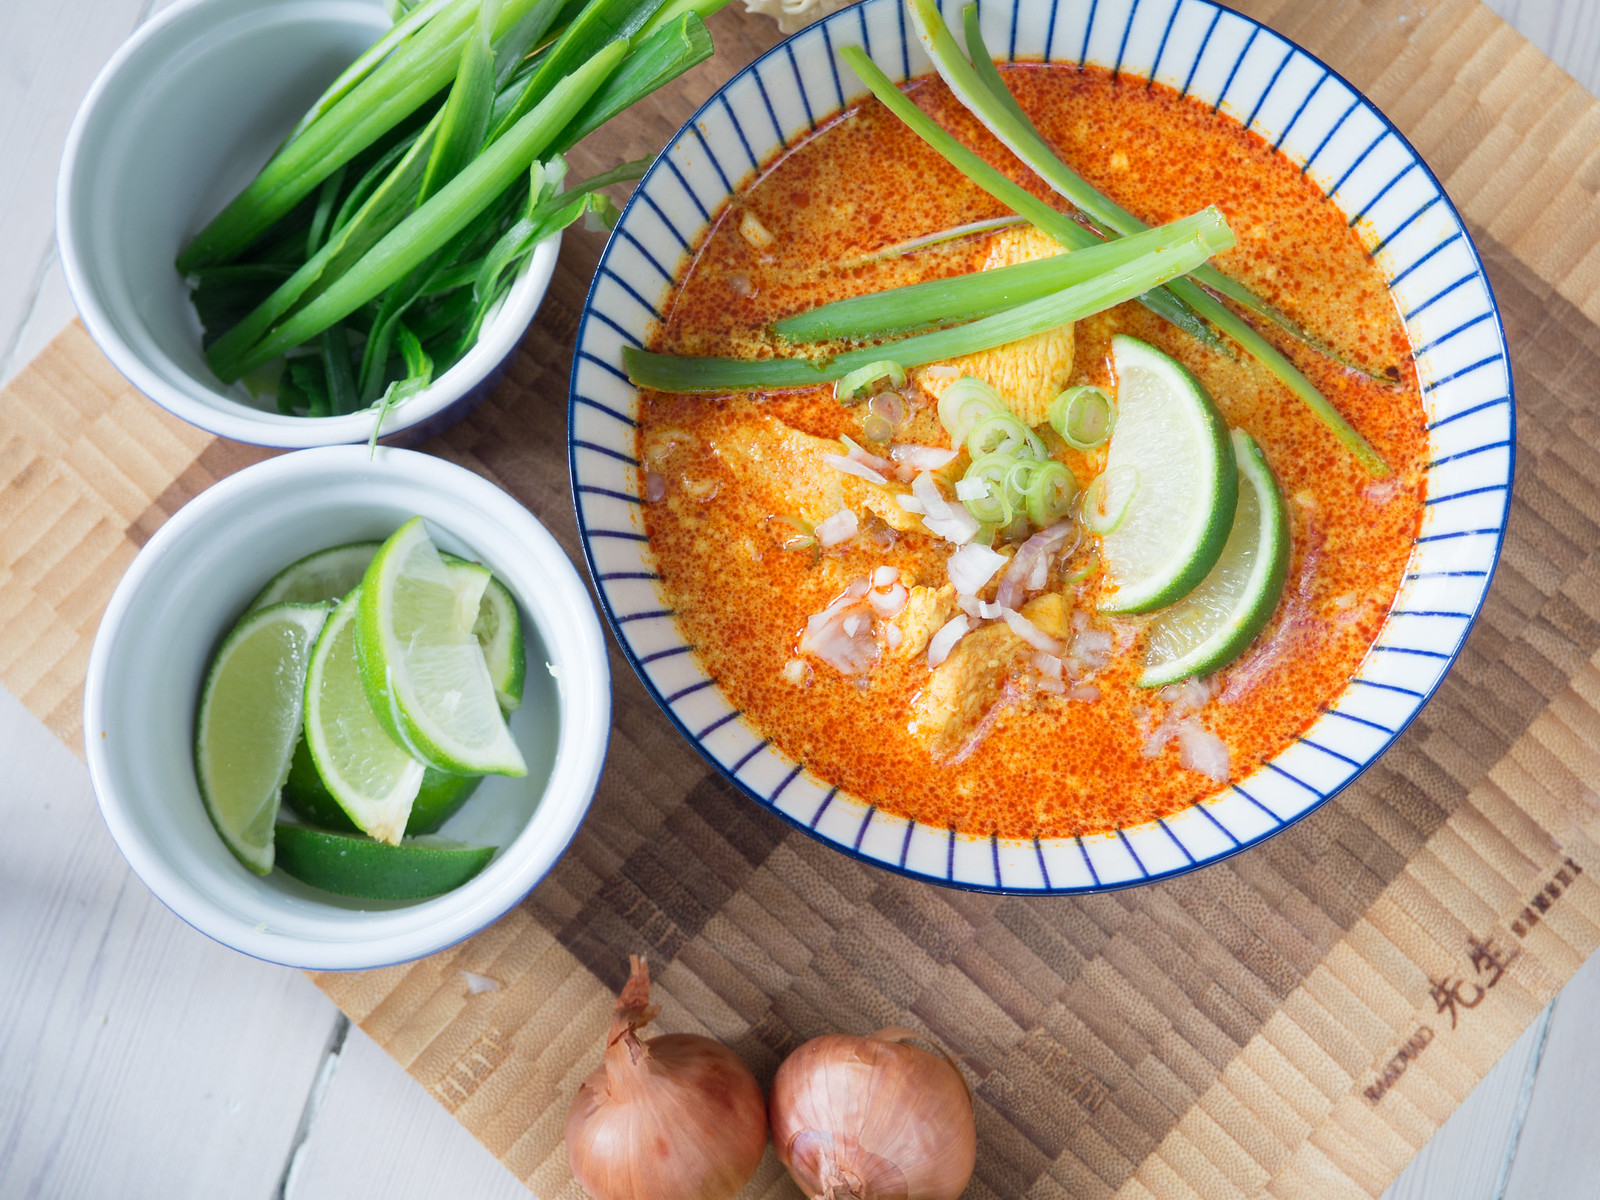
As said above, this dish is actually easy to prepare once you have the right ingredients. You start by gently frying the garlic, red curry paste and the chicken. Then you add some chicken broth, coconut milk, Turmeric, soya sauce and salt. Let everything simmer for about 10-15 minutes while you prepare some noodles, which will be served together with the curry. After the small cooking time the curry is ready to be served. I normally serve this curry in a deep dinner bowl topped with finely chopped shallots, spring onions and lime wedges, which are to be used according to each person's personally preferences. It is that easy to make this great dish.
I would be happy to hear from you in the comment section if you also like this dish as I do or maybe if you have a great tip how to improve the recipe.
Chiang Mai Curry Noodles (Kao Soi)
3-4 people
Preparation time: 30 minutes
Total Time: 40 minutes
Danish title: Gul Kylling karry fra Chiang Mai
Cuisine: Thailand
Category: dinner
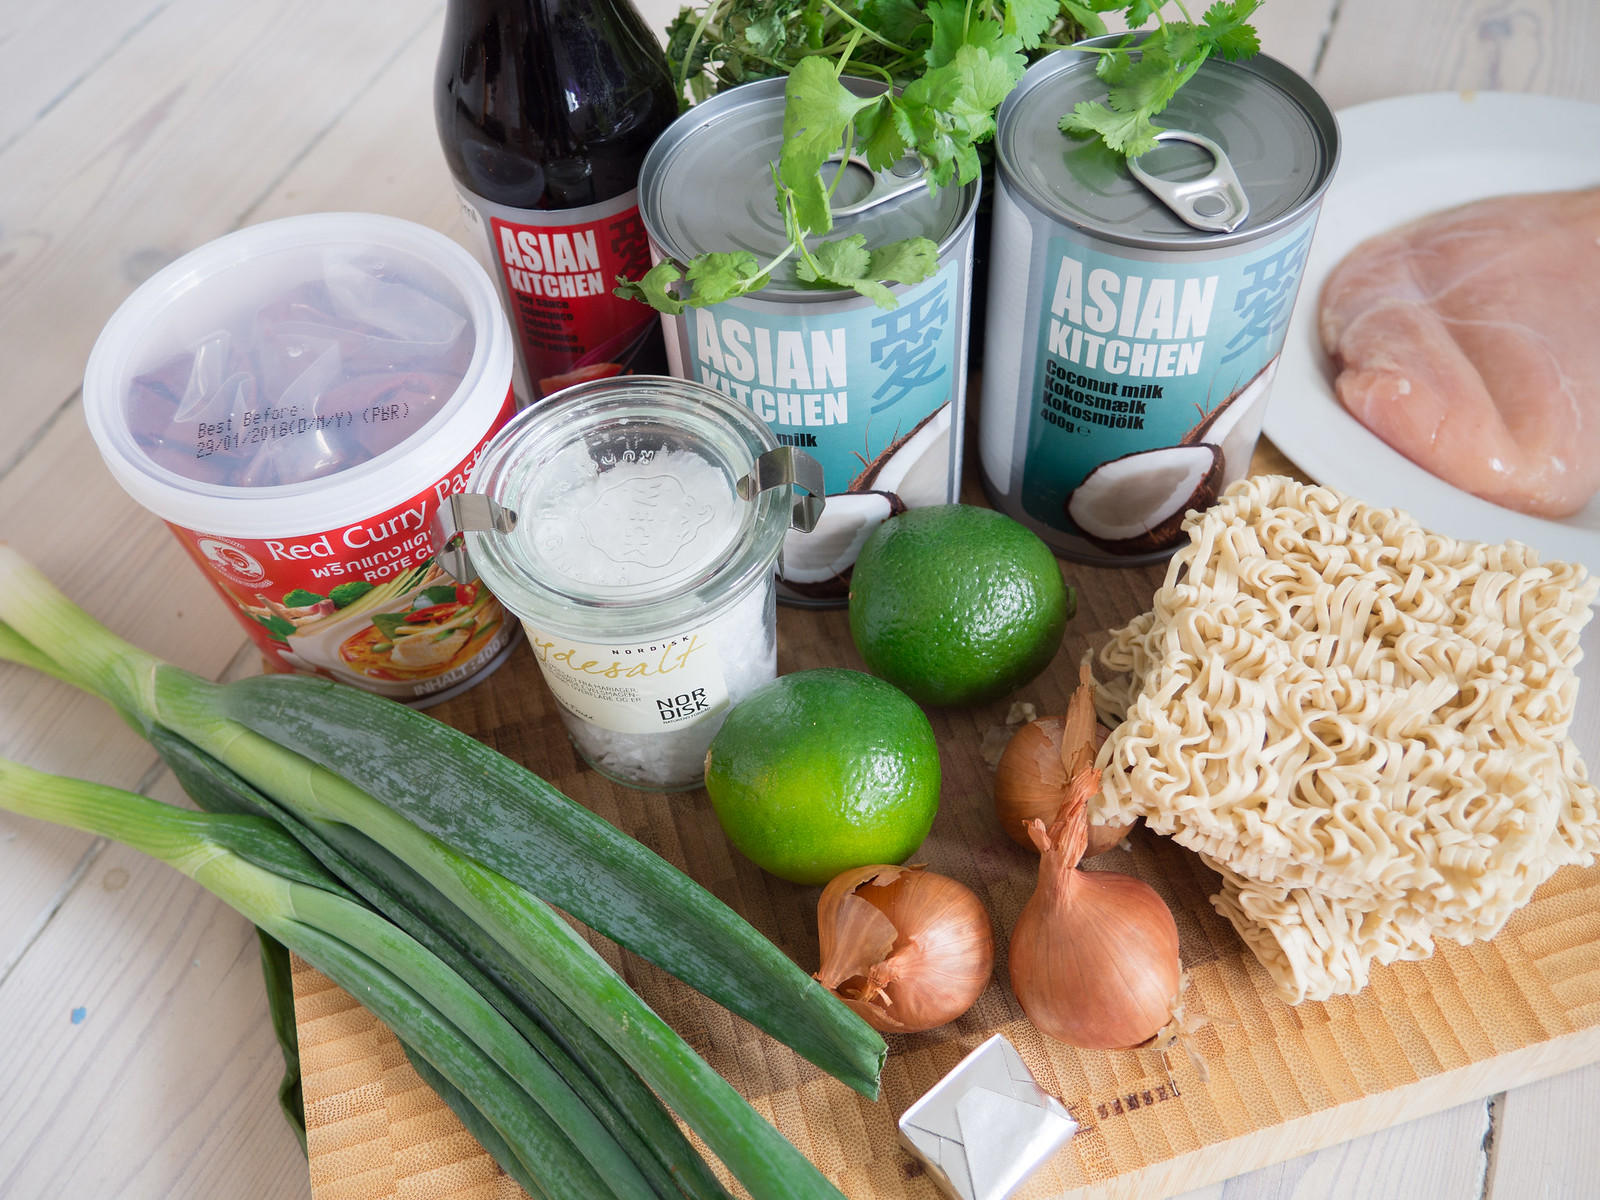
Ingredients:
The Hot Curry
2 tbsp oil
2 clove of garlic, finely chopped
2 tbsp red curry paste (1 tbsp if you prefer a milder version)
350 g (3/4 lb) chicken breast (or other boneless chicken)
5 dl (2 cups) coconut milk (unsweetened)
4 dl (1 3/4 cups) chicken broth
2 tsp ground turmeric (aka Gurkemeje)
2 tbsp soy sauce
1 tsp sugar
1 tsp salt
1 lime (freshly squeezed juice)
Topping
500 g (1 lb) Chinese noodles
2-3 chopped shallot
1 dl (1/3 cup) freshly chopped cilantro
1 dl (1/3 cup) chopped spring onions/green onions
Instructions:
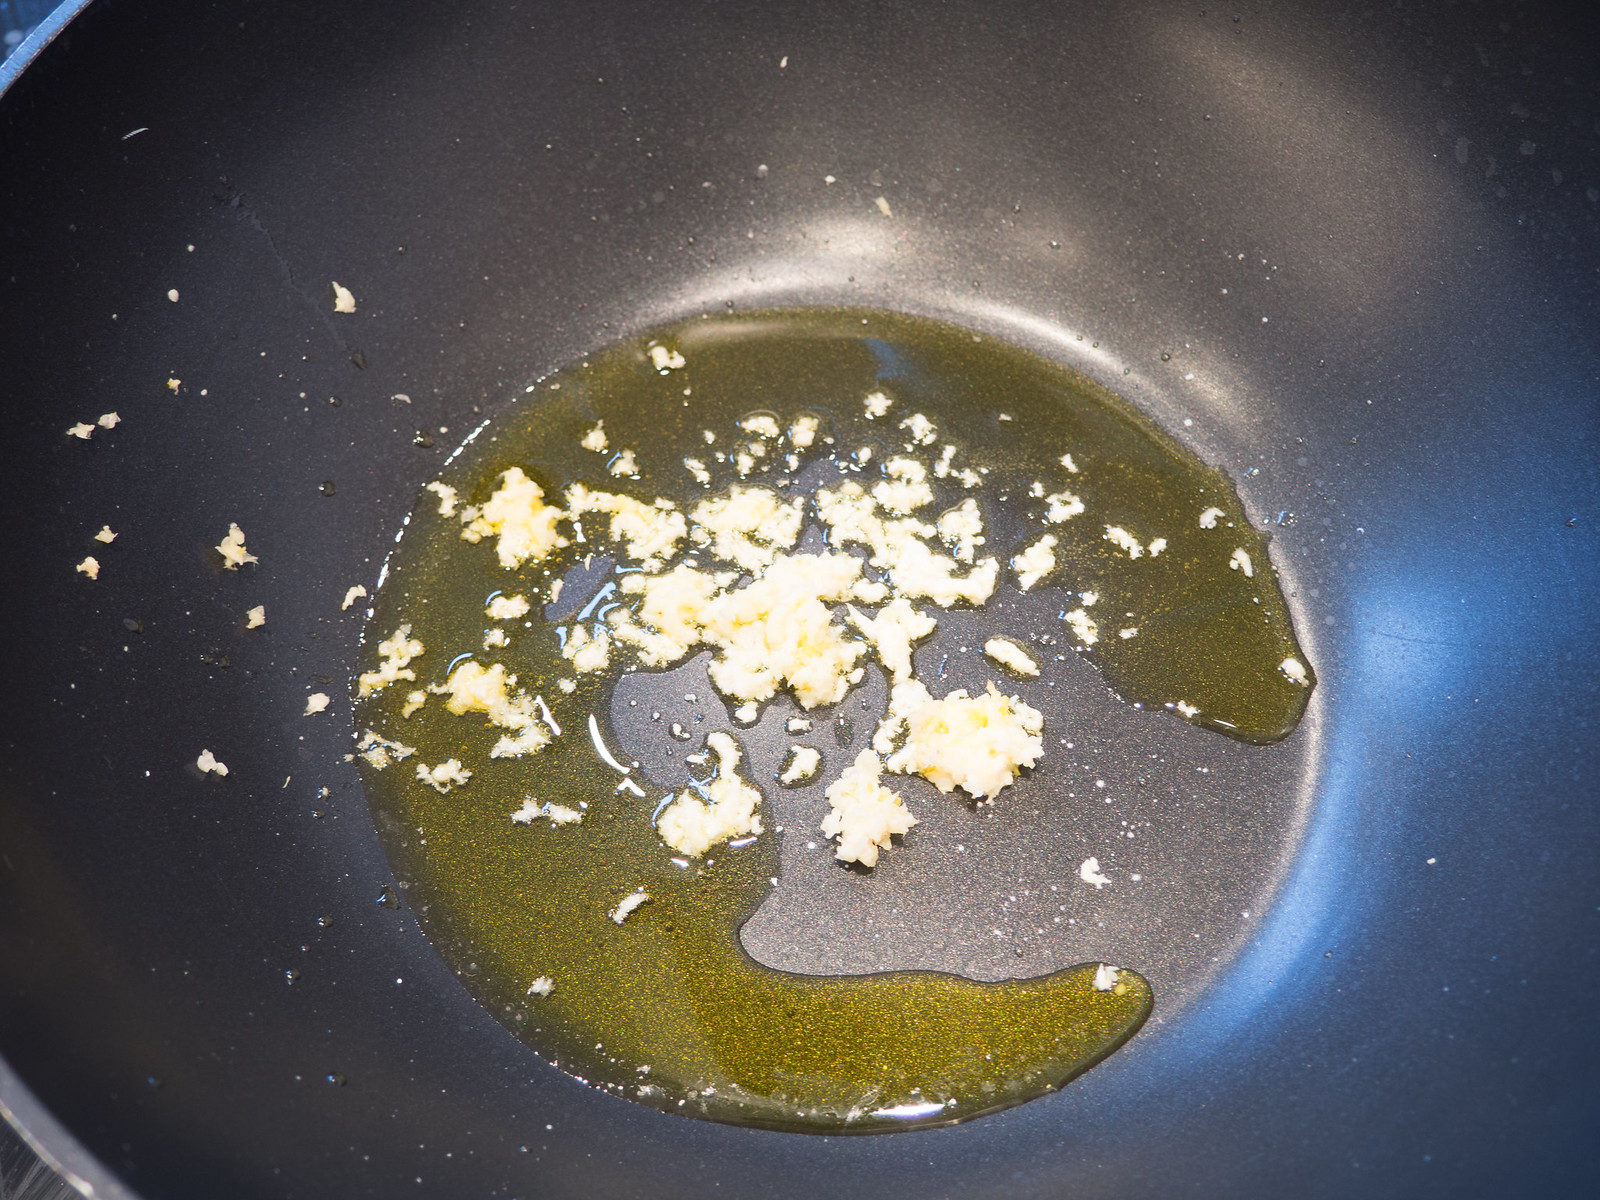
1. In a saucepan or wok pan; heat up the vegetable oil and add the finely chopped garlic. Fry the garlic for about 1-2 minutes.
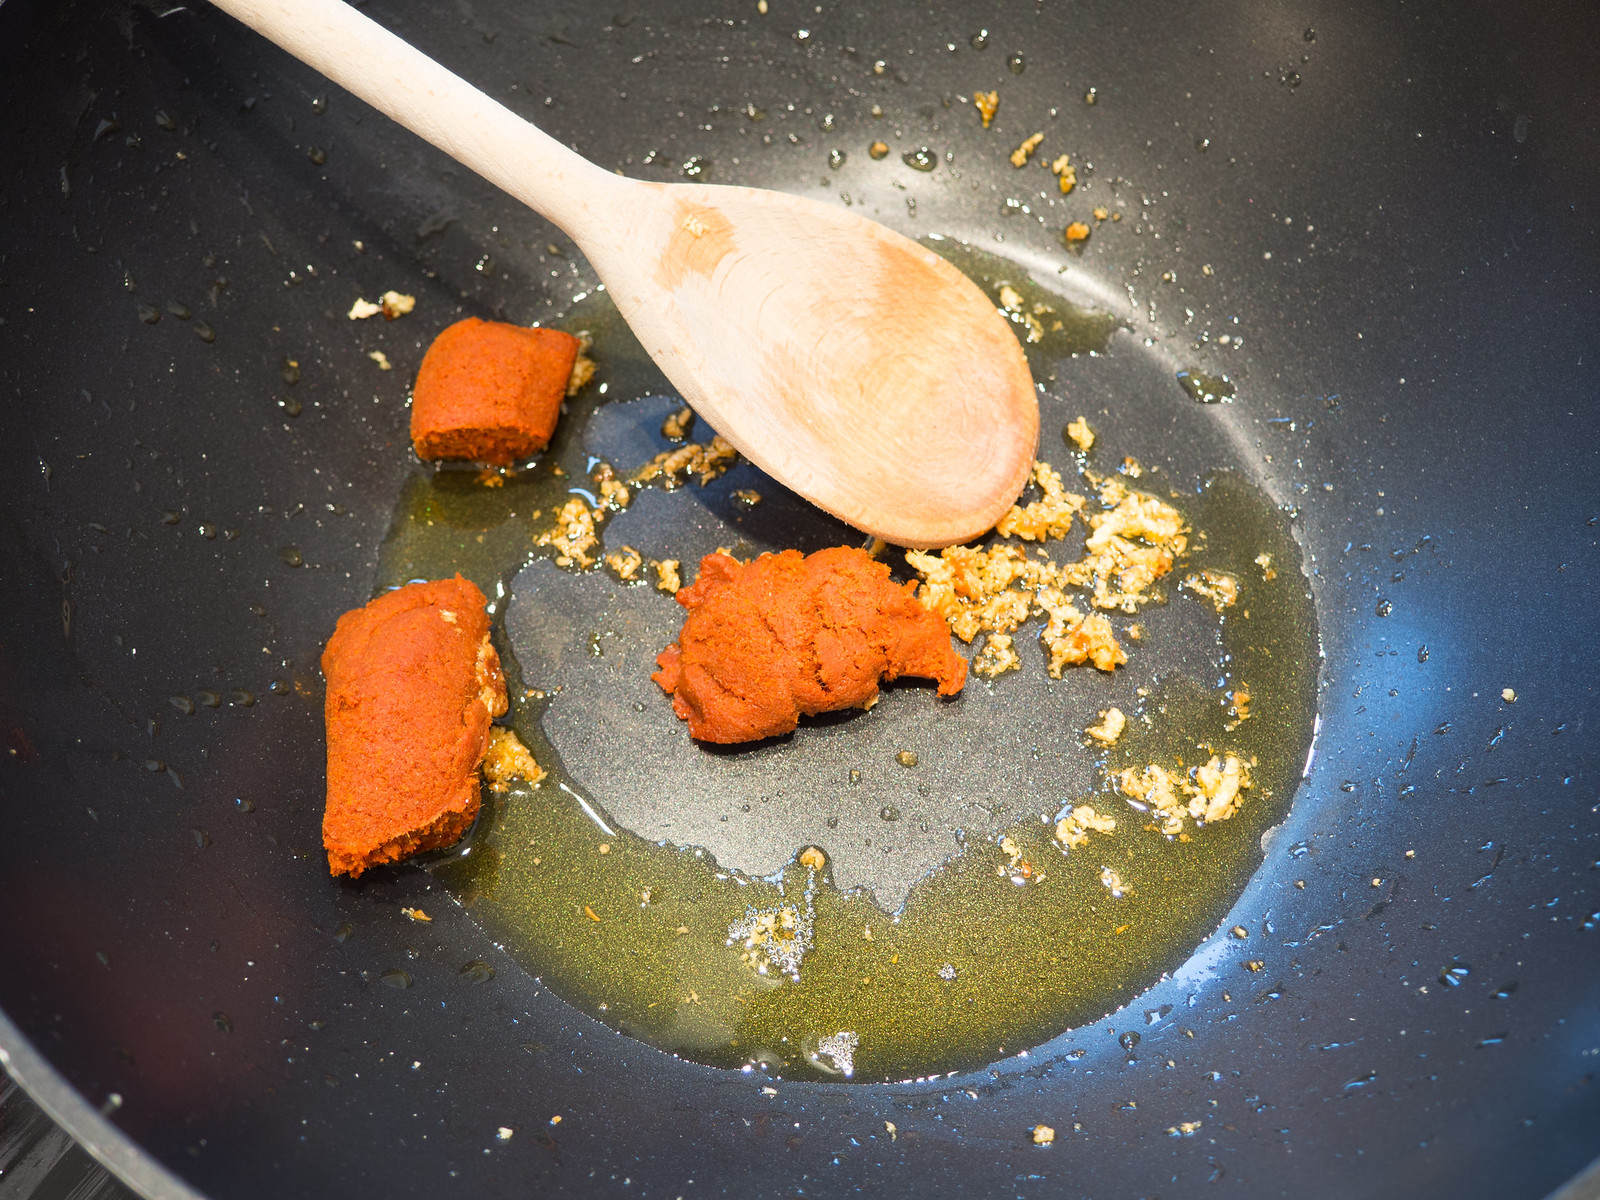
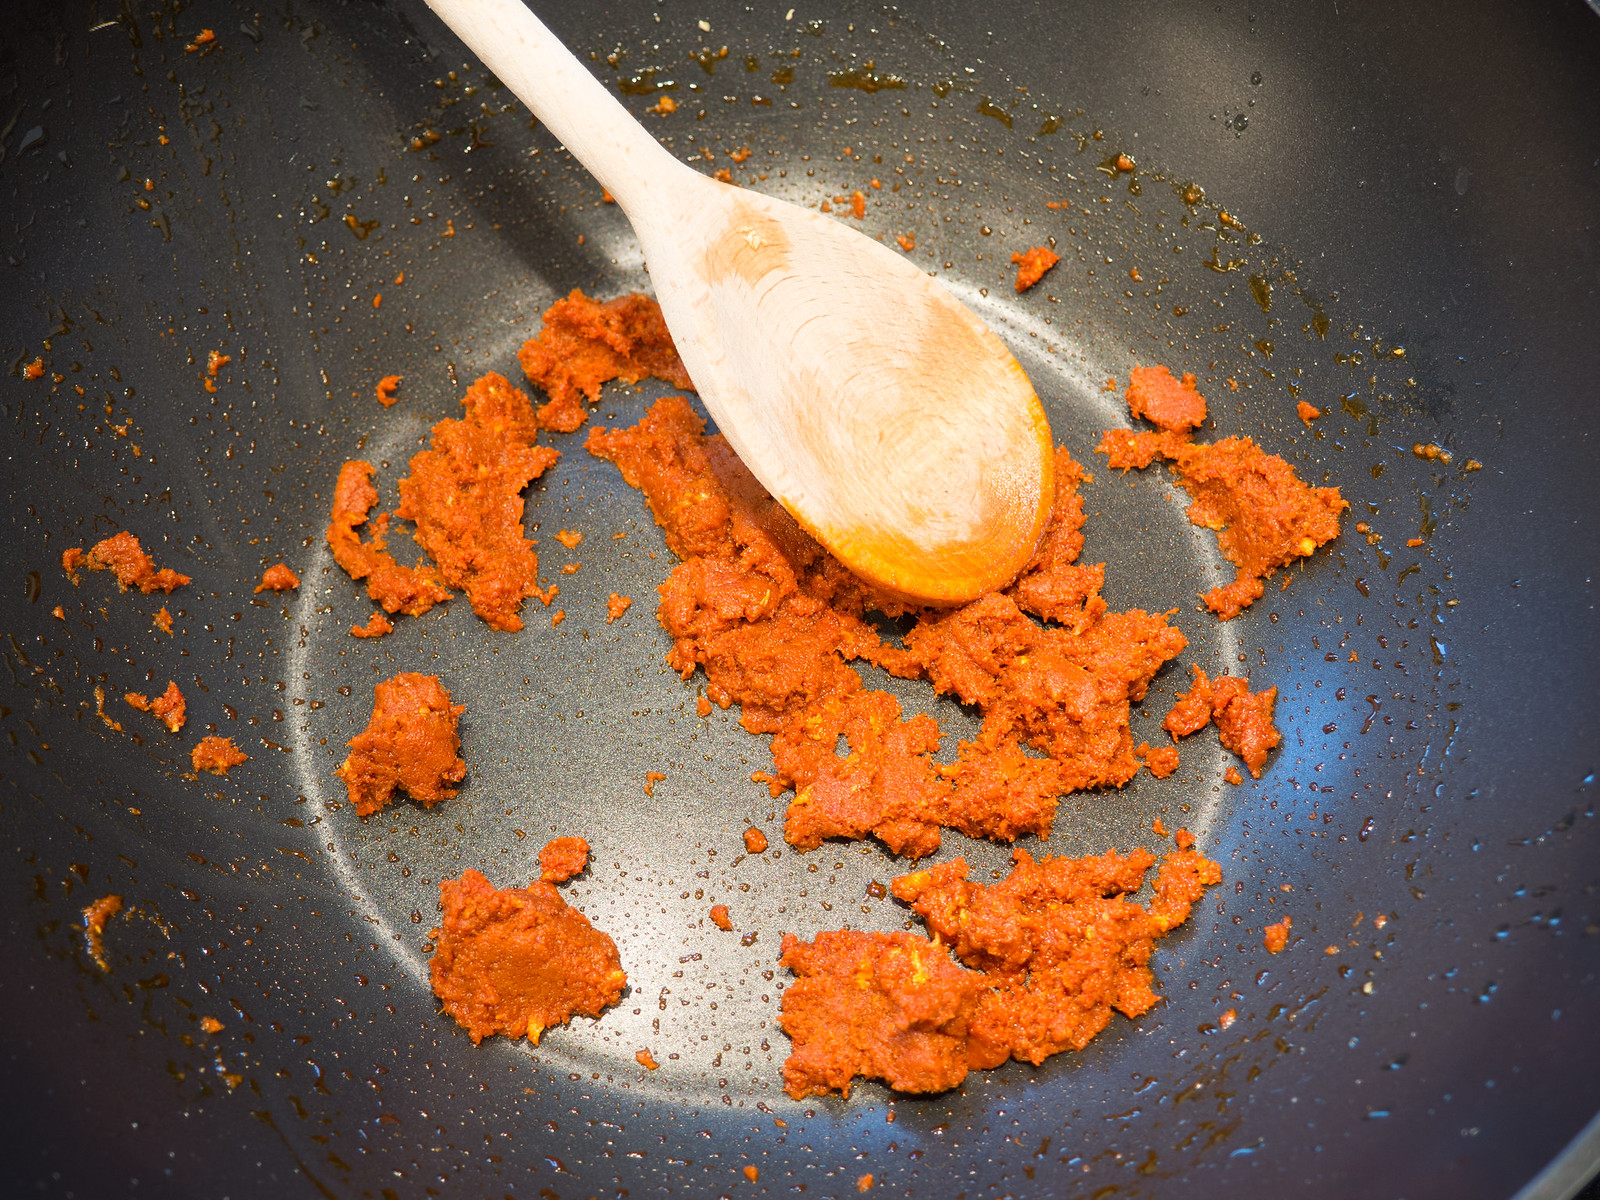
2. Add the red curry paste, stir and mash it together with the oil. Fry for about one minutes.
3. Cut the chicken breast into bite sized pieces and add it to the saucepan. Fry the chicken for about 1-2 minutes until it starts to be brown.
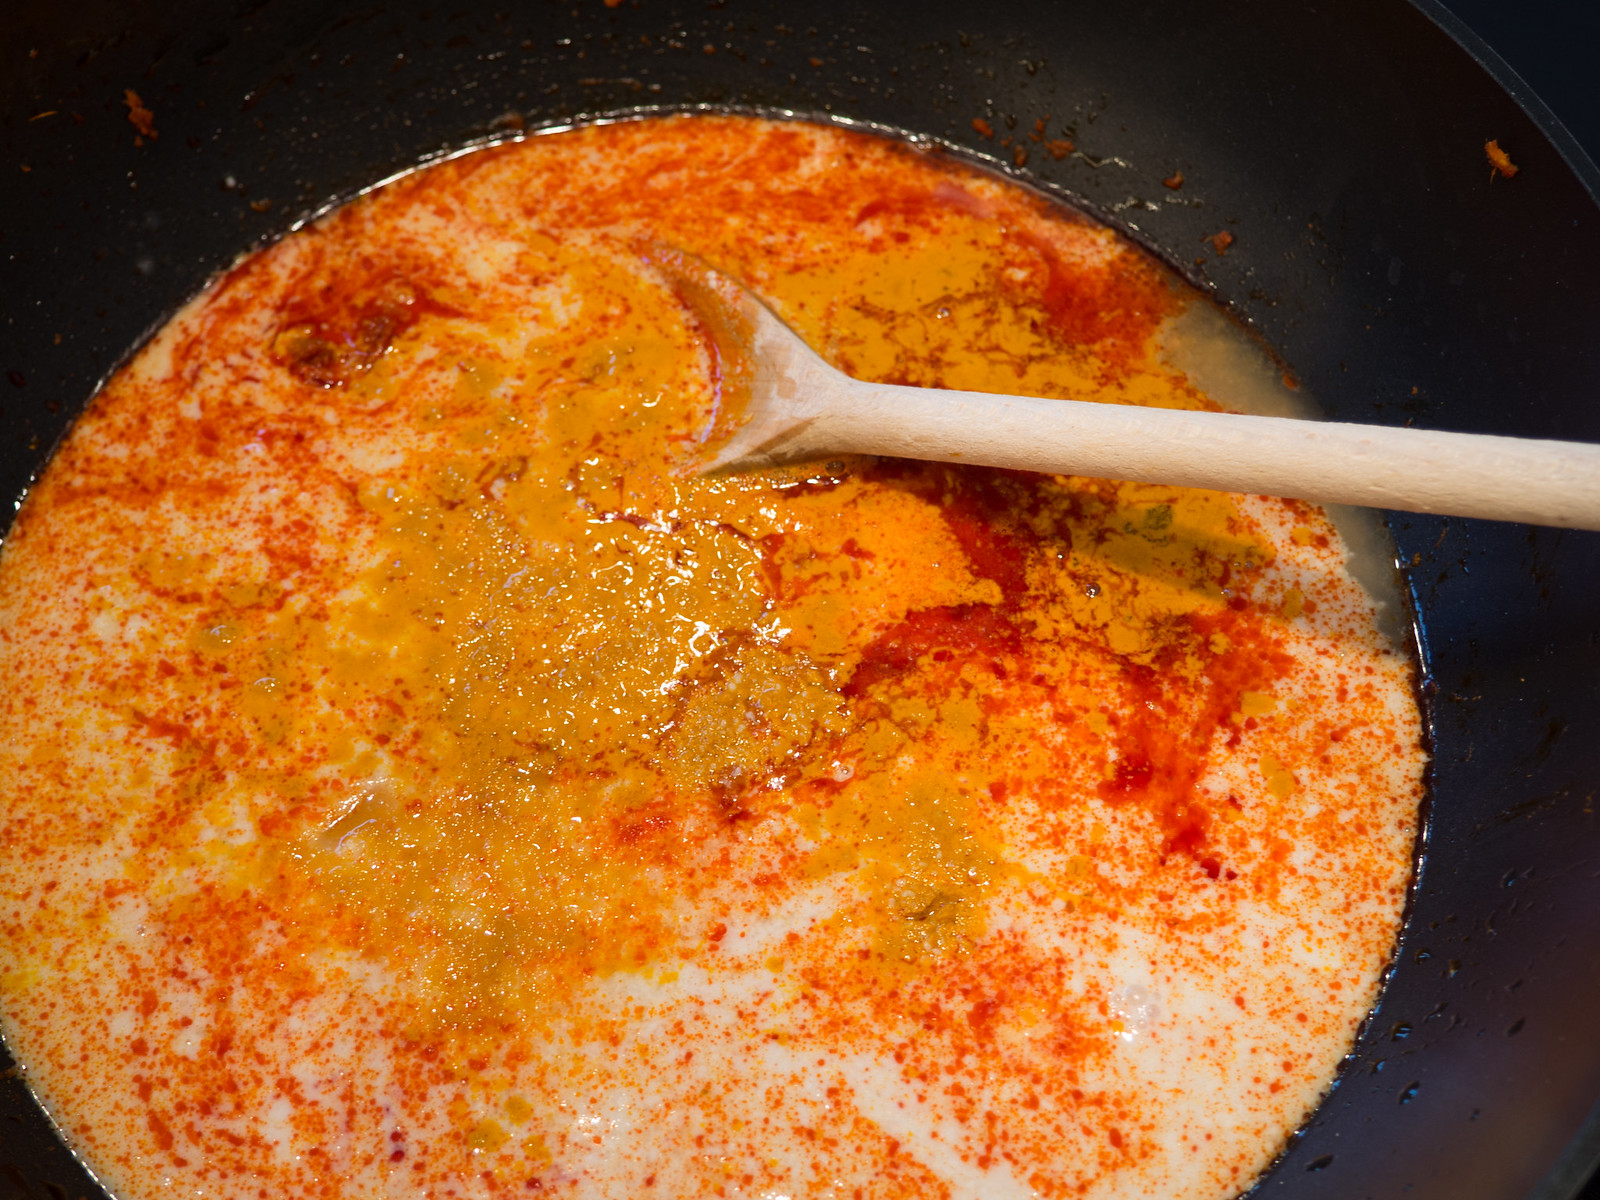
4. Add the coconut milk, chicken broth, soy sauce, sugar, salt, and turmeric powder. Stir well and bring everything to a gentle boil. Then turn down the heat and let it simmer for about 10 minutes.
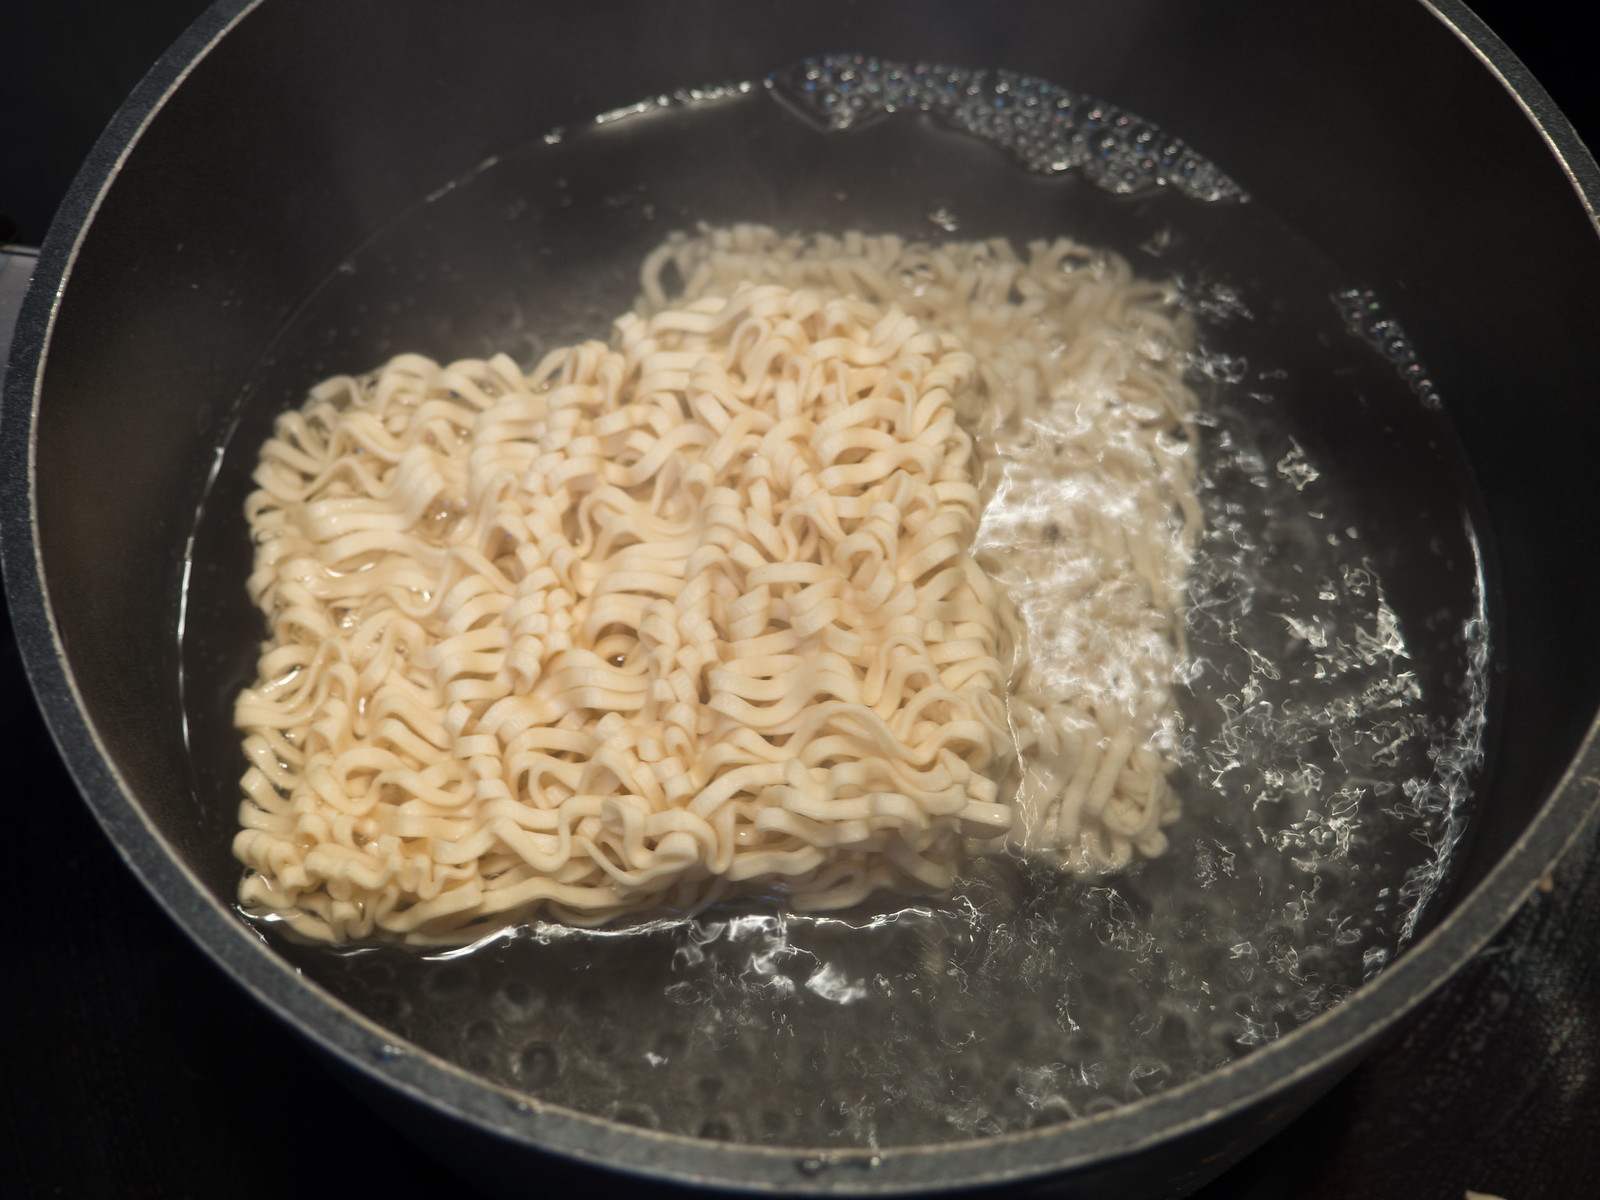
5. Prepare the noodles according to the instructions on the box it came in.
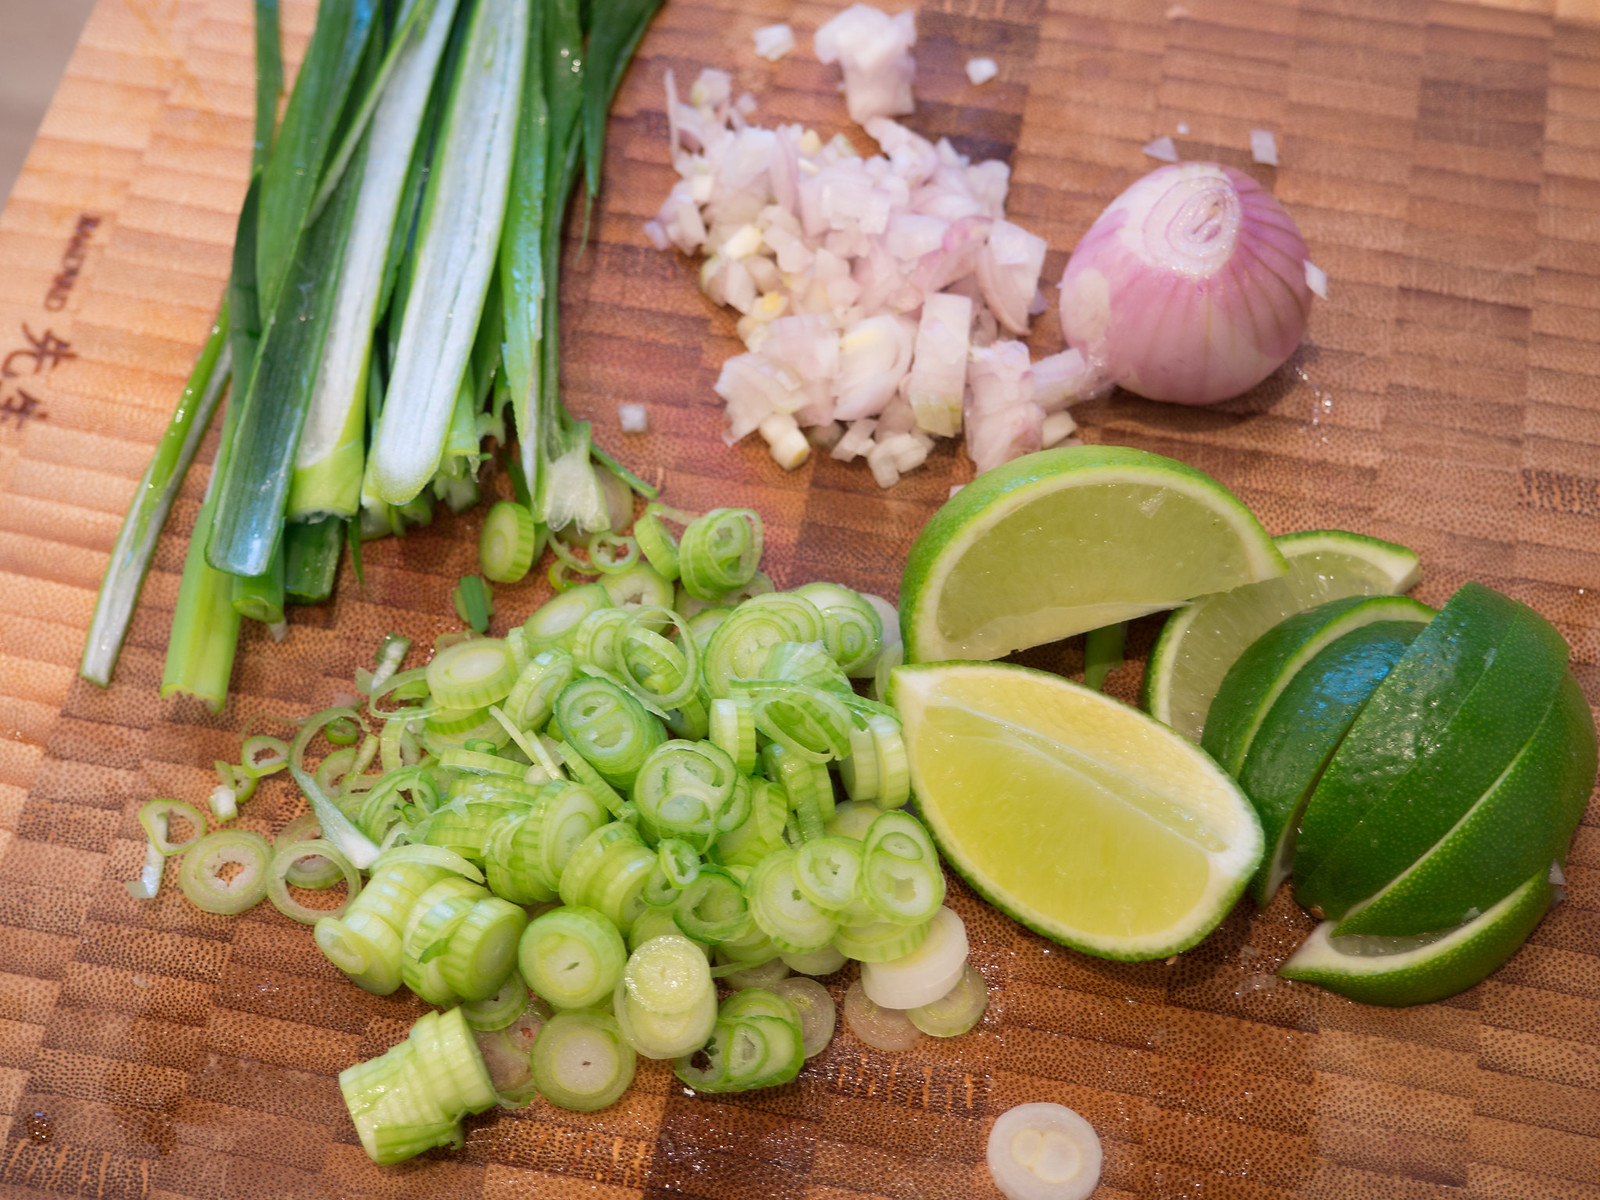
6. Prepare the topping; finely chop the shallots, the green onions and the cilantro.
Tip: Serve this dish in a deep dinner bowl; first, some freshly prepared noodles, then some hot curry with chicken and finely sprinkle the top of this dish with some shallots, green onions and cilantro.

The post Chiang Mai Curry Noodles (Kao Soi) appeared first on Nordic Food & Living.
]]>The post Parsley Ham Chicken Pie appeared first on Nordic Food & Living.
]]>
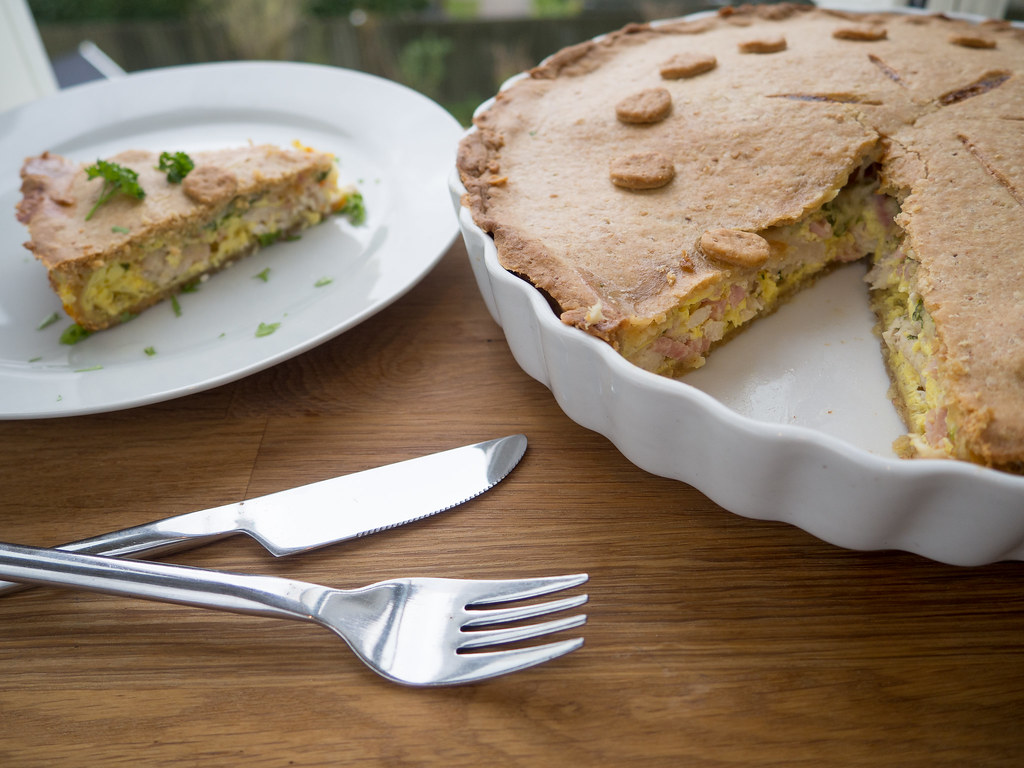
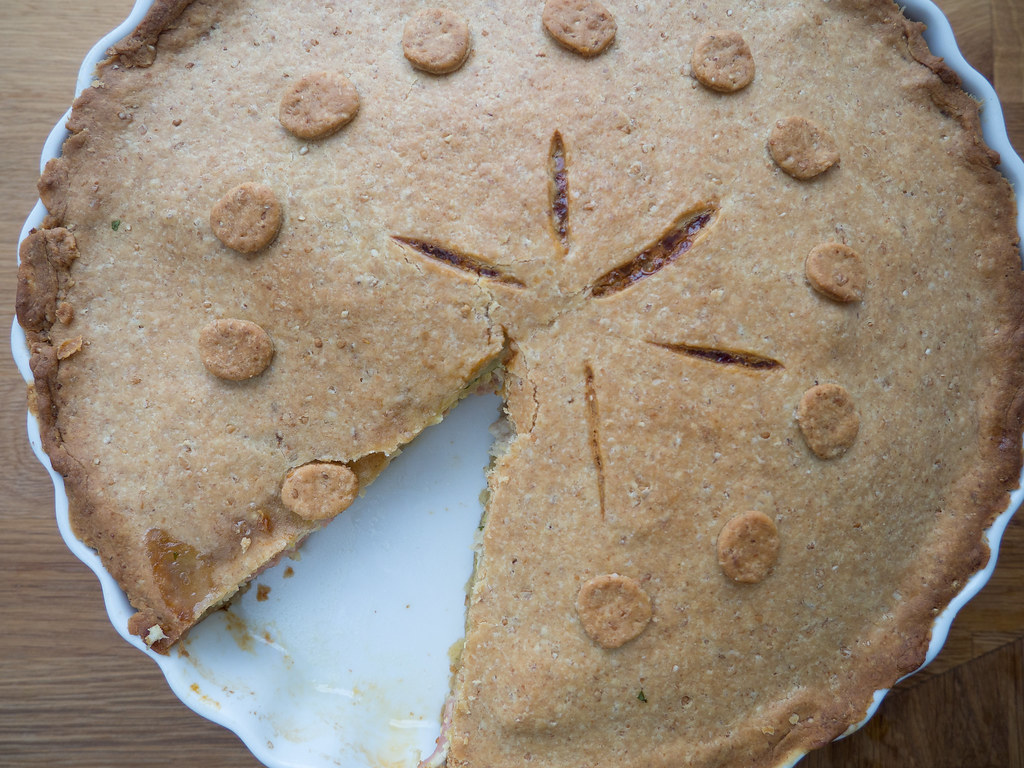
I love making pie and especially this pie I have listed in the recipe further down on this page. This cheese, ham and chicken pie is made from scratch and from a few and simple ingredients. Making the homemade pie is simple to make and it actually does not take that long.
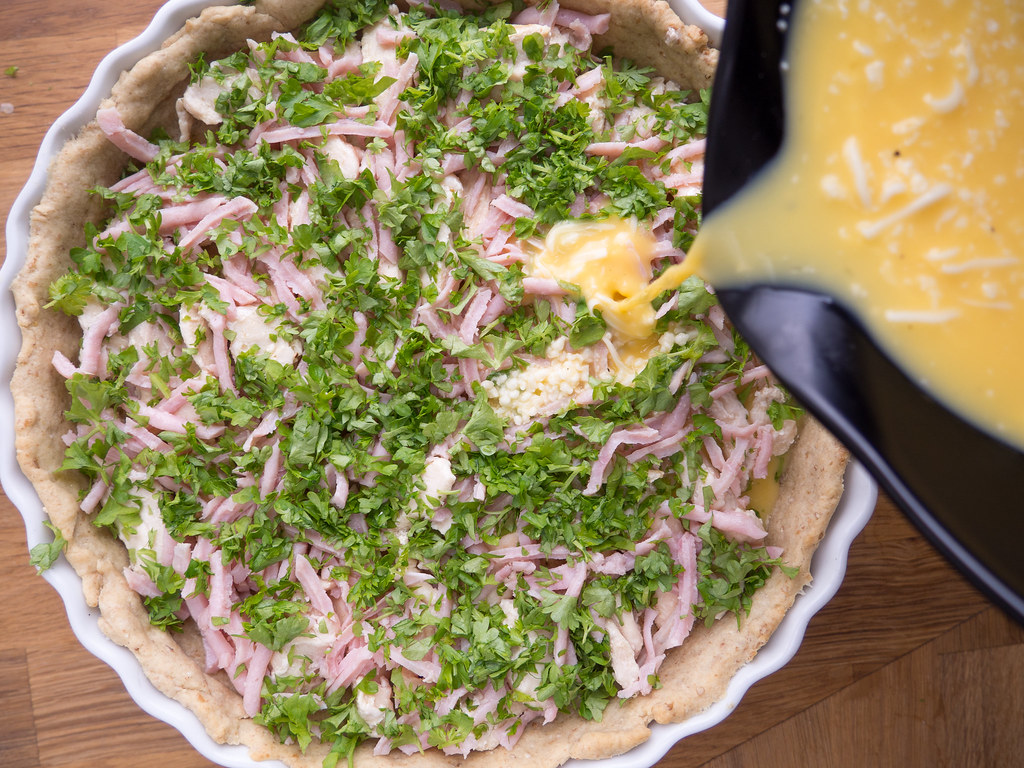
In this recipe, I have made the crust of the pie myself and then filled it with fried chicken, ham, grated cheese and assembled with some beaten eggs. I personally think that this combination of filling is super delicious and I can highly recommend it. However, the great thing about this recipe is that you can use the basic recipe for the piecrust and then add filling according to your own taste and preferences. As I have said in several other posts here on my blog; I love to experimenting in my kitchen and this experimenting is actually how I came up with this combination - you can use it or maybe try to come up with your own favorite pie.
I hope that you will enjoy this pie as much as I do. If you have any great recommendations for filling please let me know in the comment section below on this page.
Parsley Chicken Ham Pie
3-4 people
Preparation time: 25 minutes
Total Time: 1 hour and 15 minutes
Danish title: Kylling og skinketærte
Category: dinner
Ingredients:
Pie Crust
150 g (5 oz) butter, cold
300 g (10 oz) all-purpose flour
1 beaten egg (half in the dough)
2-3 tbsp water
1 tsp salt
Filling
300 g (10 oz) chicken filet
100 g (3.5 oz) ham, strips or diced
1 bunch of parsley, finely chopped
4 eggs
2 dl (1 cup) milk
100 g (3.5 oz) grated mozzarella cheese
salt and pepper
Instructions:
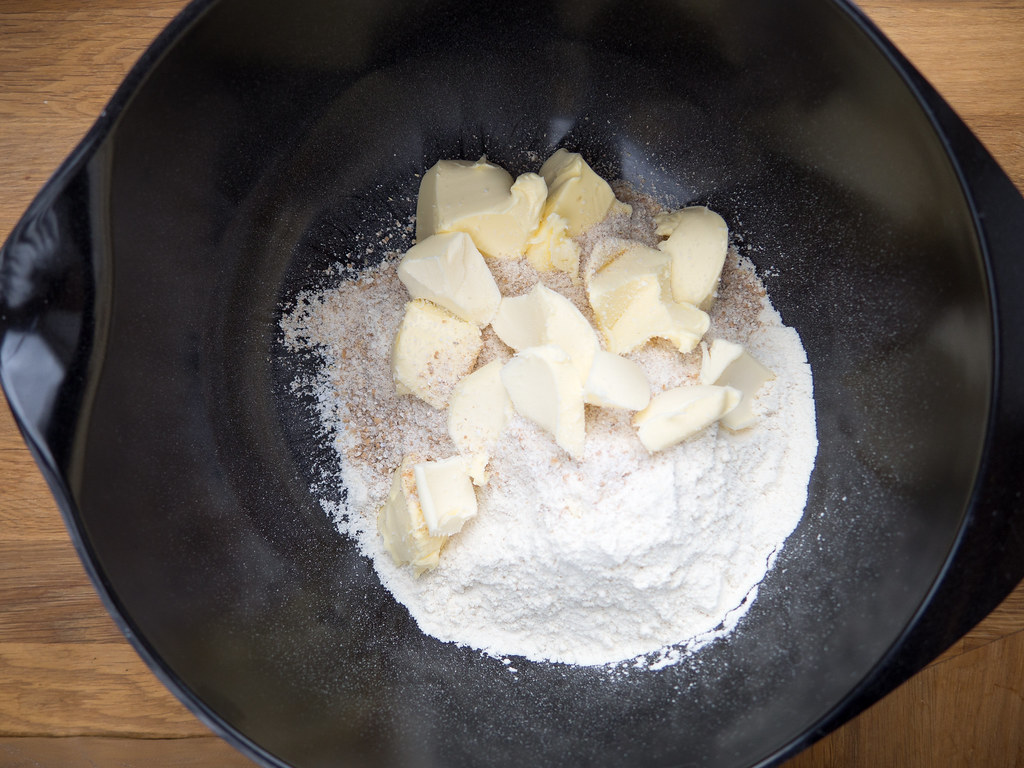
1. Dice the cold butter.
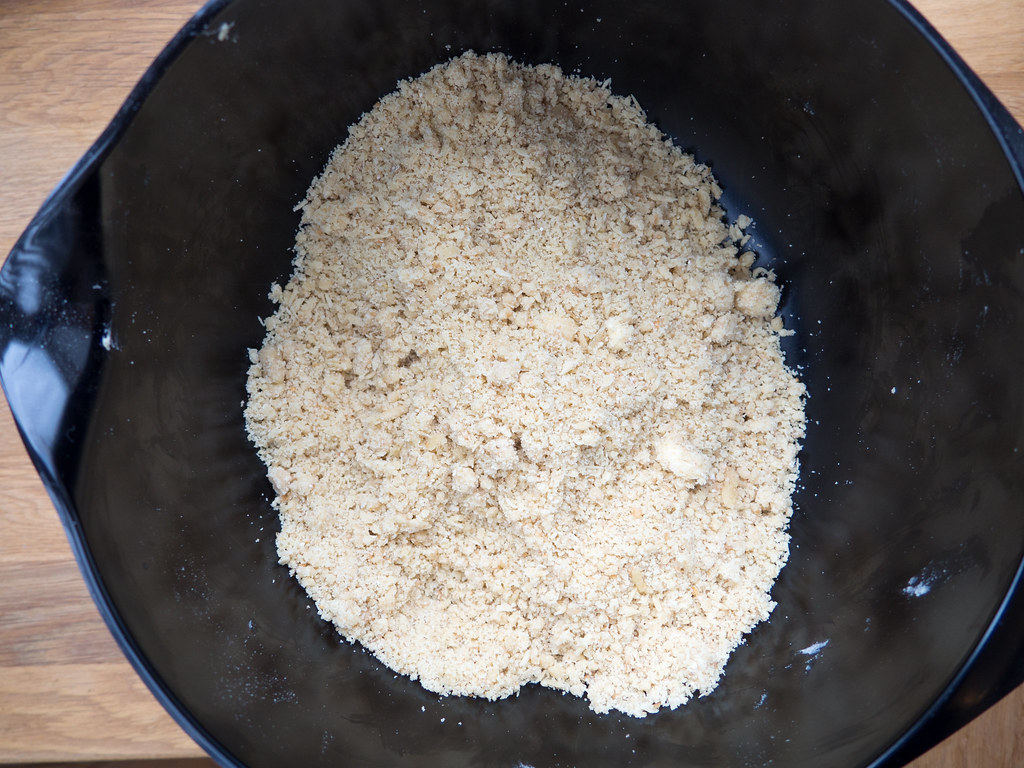
2. In a large bowl; add the all-purpose flour, salt and the cold butter. Assemble the flour and butter using your fingers. You can with advantage substitute 1/5 of the flour with whole-wheat flour.
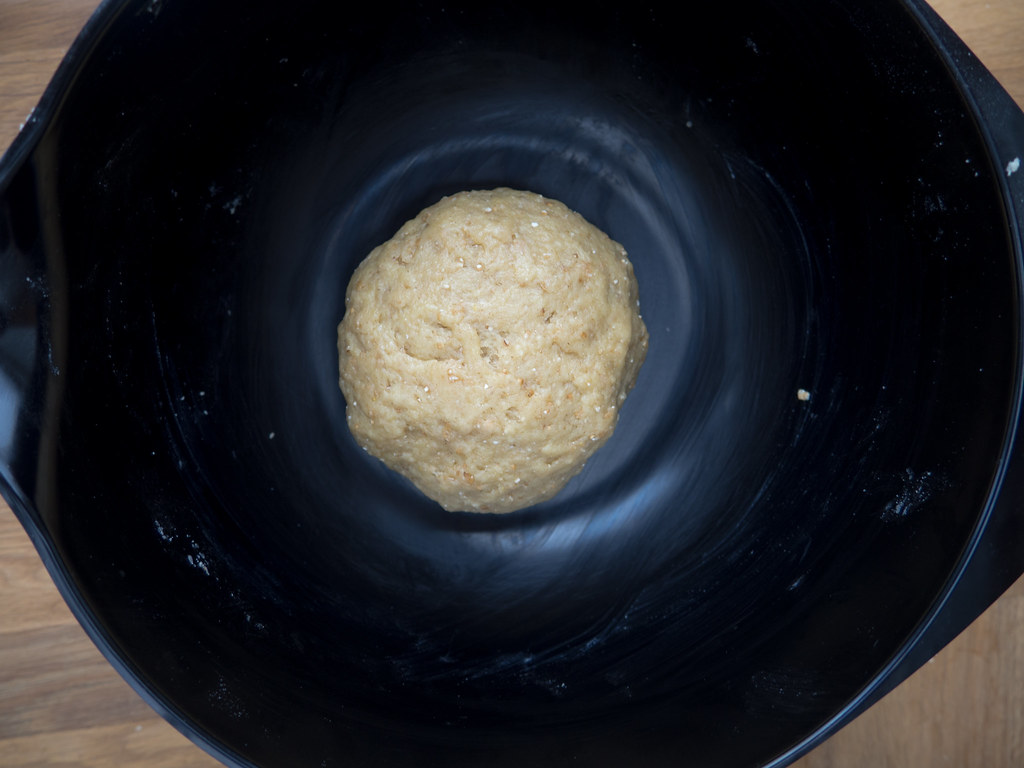
3. Beat an egg; save about half of the egg for brushing of the pie and then add the last to the crumbled dough. Add the water and assemble the ingredients into a pie dough.
4. Let the pie dough rest in the fridge for about 30 minutes while preparing the ingredients for the filling.
5. Slice up the chicken filet and frying it a little on a frying pan.
6. Clean the parsley thoroughly and finely chop it.
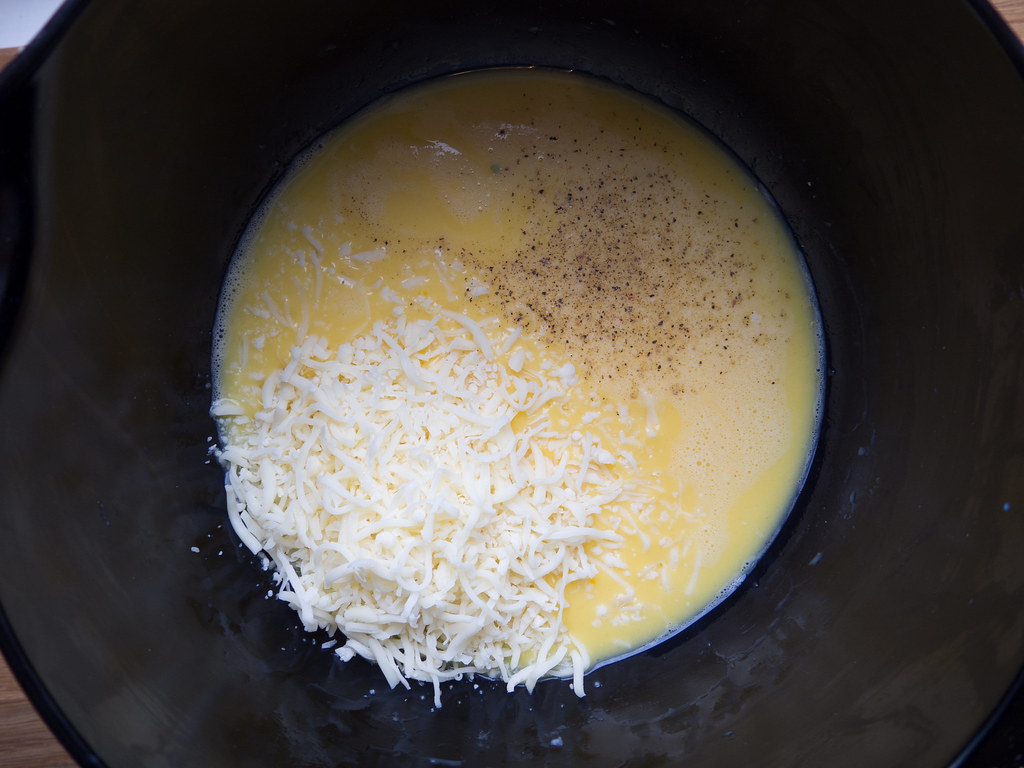
7. For the filling; beat the four eggs and add salt, pepper, milk, grated cheese. Mix it together.
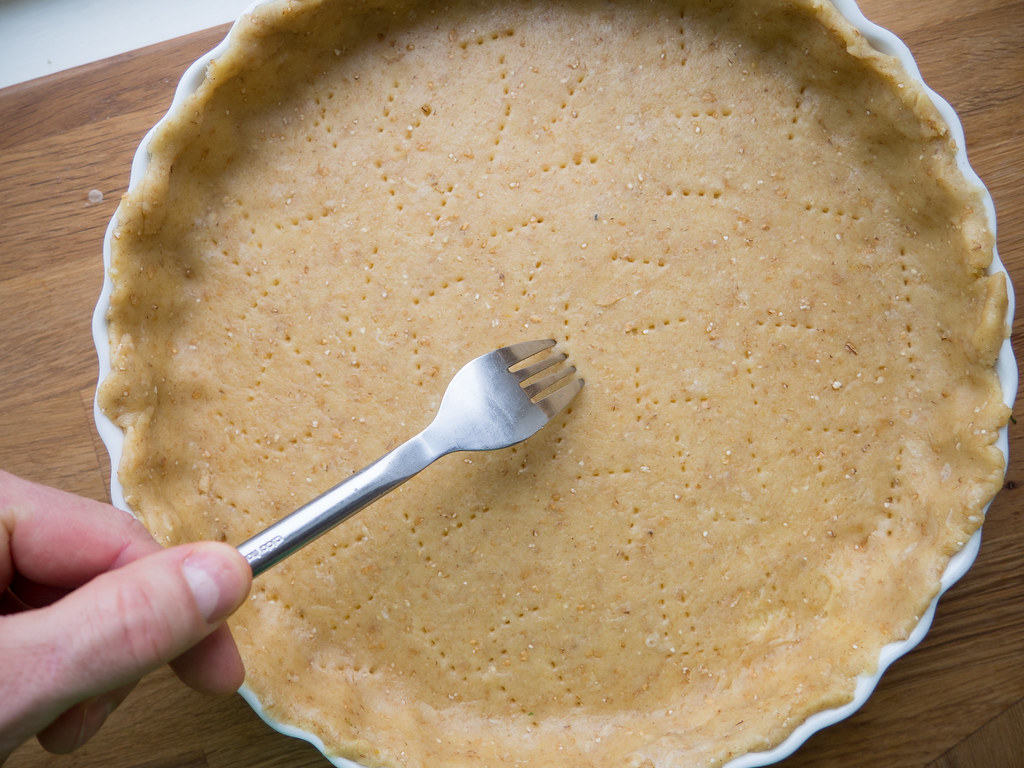
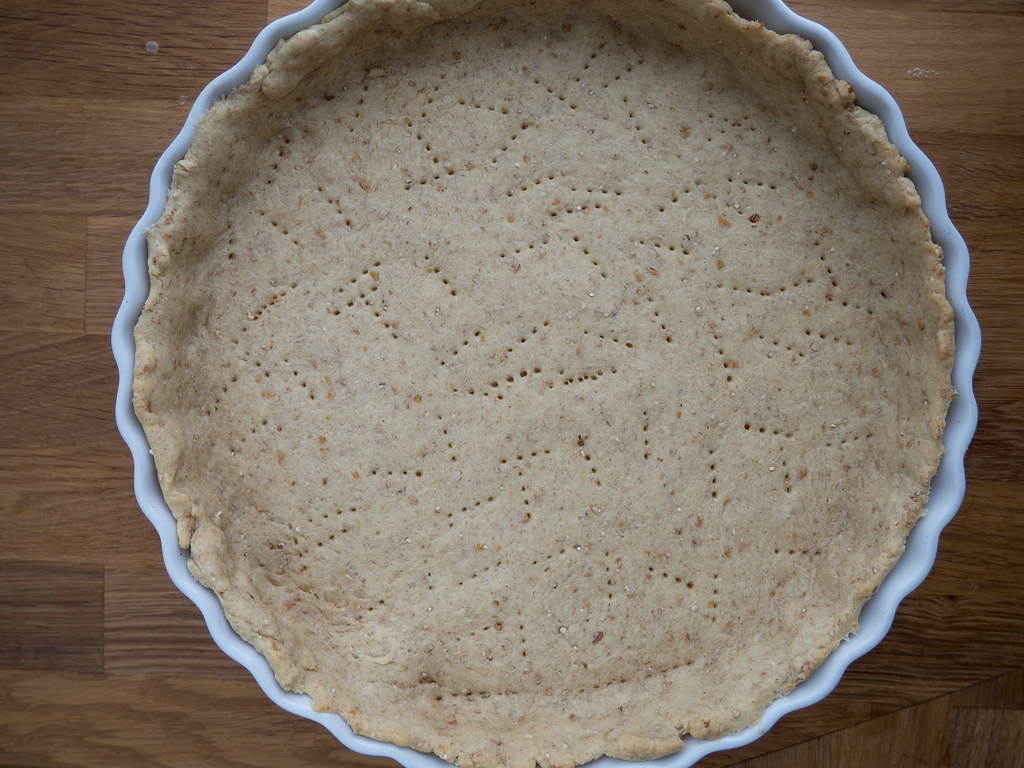
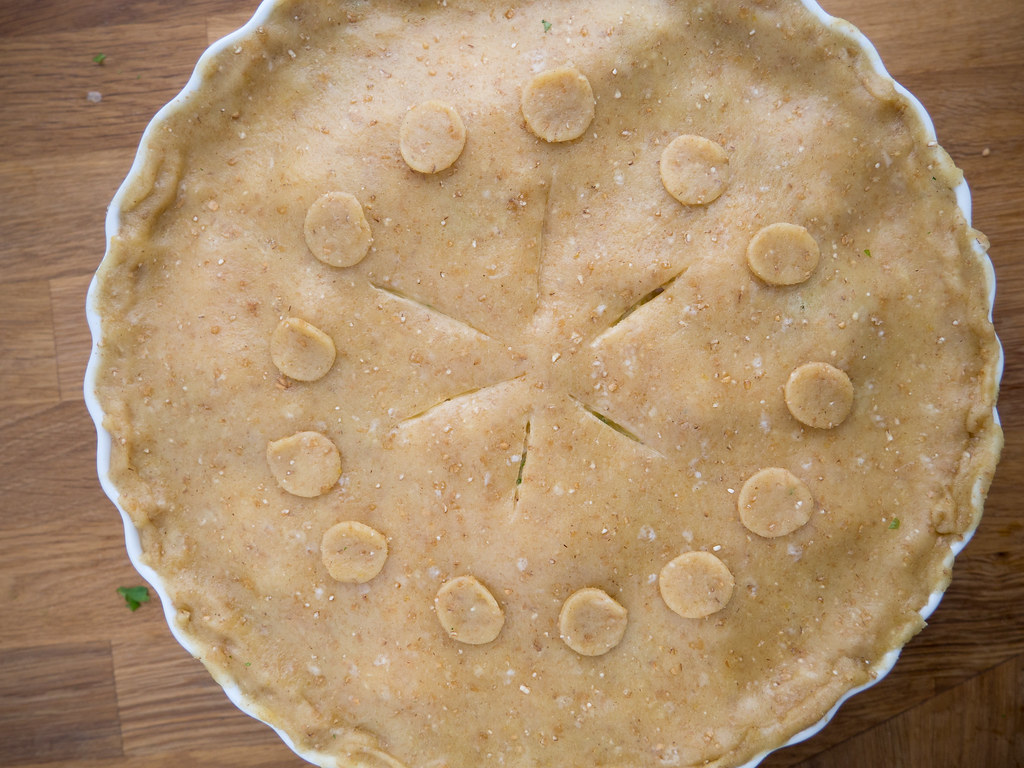
8. Now divide the pie dough into two pieces; using a rolling pin to fatten one piece. Transfer the dough to a pie pan (diameter about 23 cm/9 inch). Use a fork to prick small holes in the dough.
9. Prebake the piecrust for about 10 minutes in a 200 C (400 F) preheated oven.
10. While the pie is prebaking; use the rolling pie to fatten out the other piece of dough. This is going to be used as a lid for the pie.
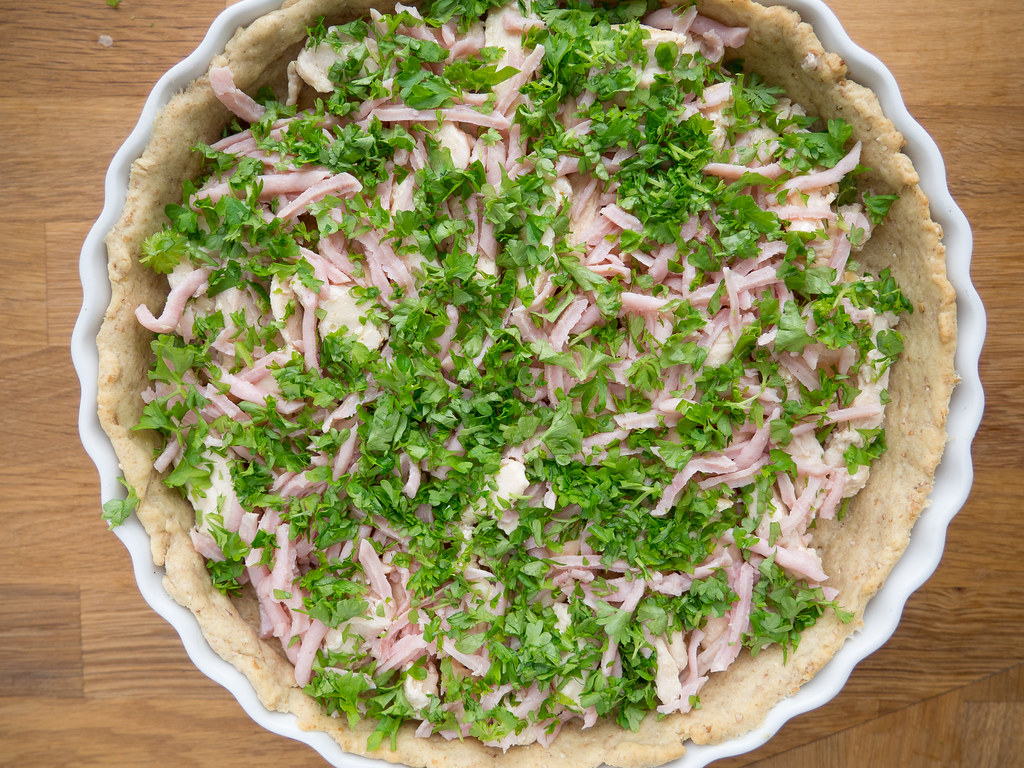
10. Transfer the fried chicken, chopped parsley and egg/cheese mixture into the pie.
11. Cover the pie with the last dough. Cut small holes in the lid and decorate the top of the pie.
12. Brush the pie with the last beaten egg.
12. Finally, bake the pie for about 45 minutes at 200 C (400 F).


The post Parsley Ham Chicken Pie appeared first on Nordic Food & Living.
]]>The post Cream Cheese, Mushroom and Bacon Chicken appeared first on Nordic Food & Living.
]]>
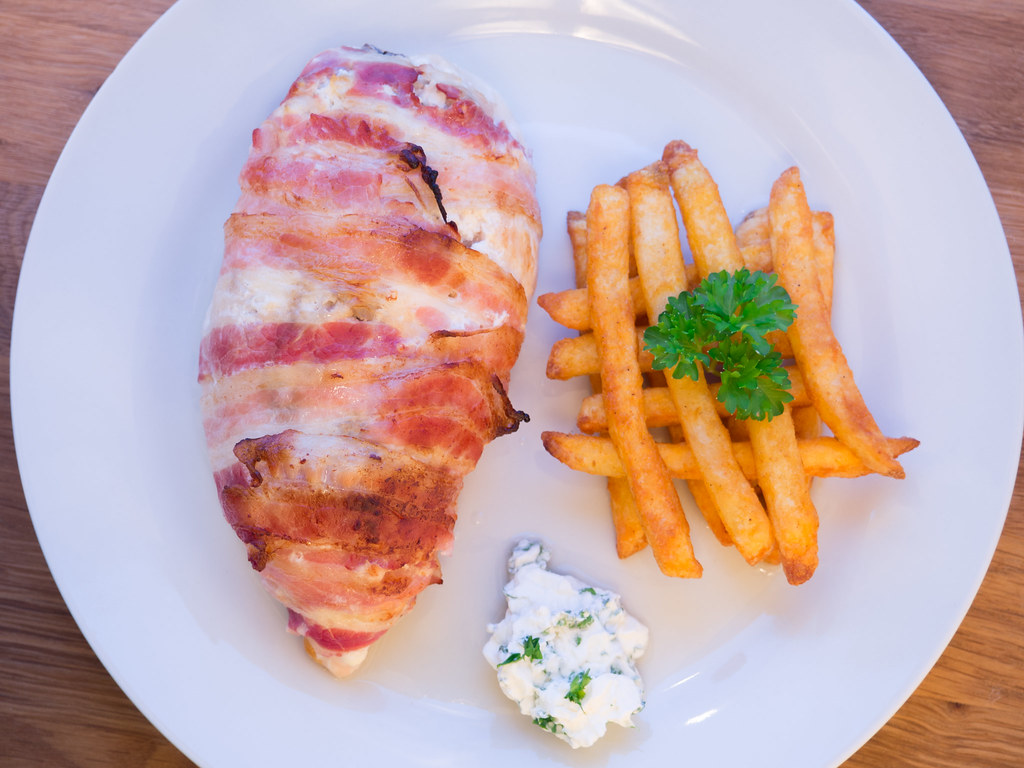
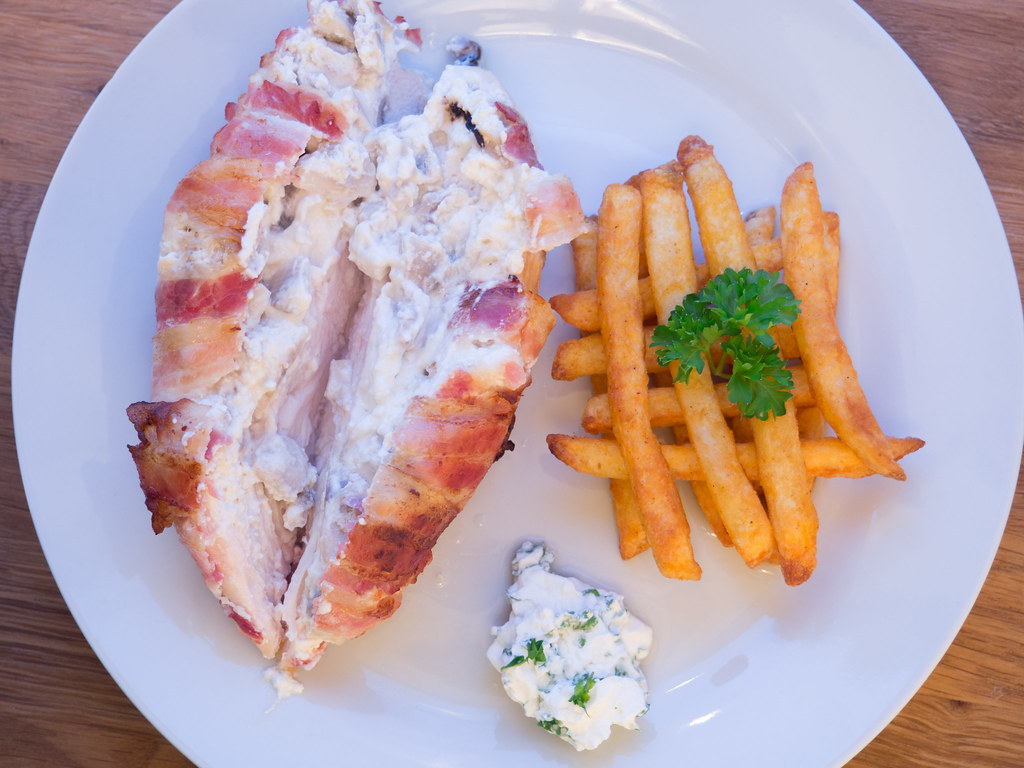
This recipe for cream cheese, mushroom and bacon chicken filet is one of my favorite everyday dishes. The fact that these stuffed chicken filets are super easy to make and that they have a great taste makes them very popular in my home. I have now made these chicken filets so many times that it is one of the fastest dinners I can make - from start to serving it takes about 25 minutes to prepare this dish. Of course, the first it might take you some extra time.
Because this bacon chicken is so easy to prepare I also typically just end up serving them together with some homemade oven potatoes or, when I am very lazy, just some pre-made oven fries. However, this stuffed chicken also goes perfectly together with a homemade and fresh green salad. I can recommend to take a look in my section with salads if you are looking for some inspiration.
Instructions:
As I have mentioned above, this cream cheese and mushroom stuffed chicken is very easy to prepare.
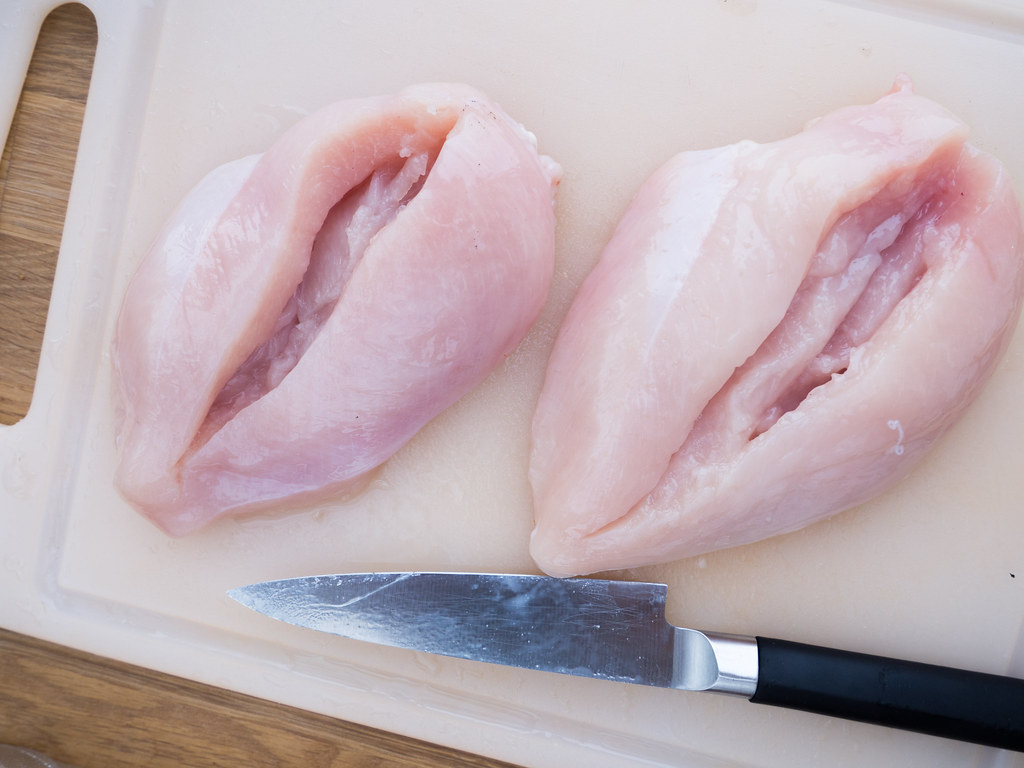
You start by cutting a lengthwise, long and deep groove in the chicken filet. Put the chicken aside while preparing the stuffing.
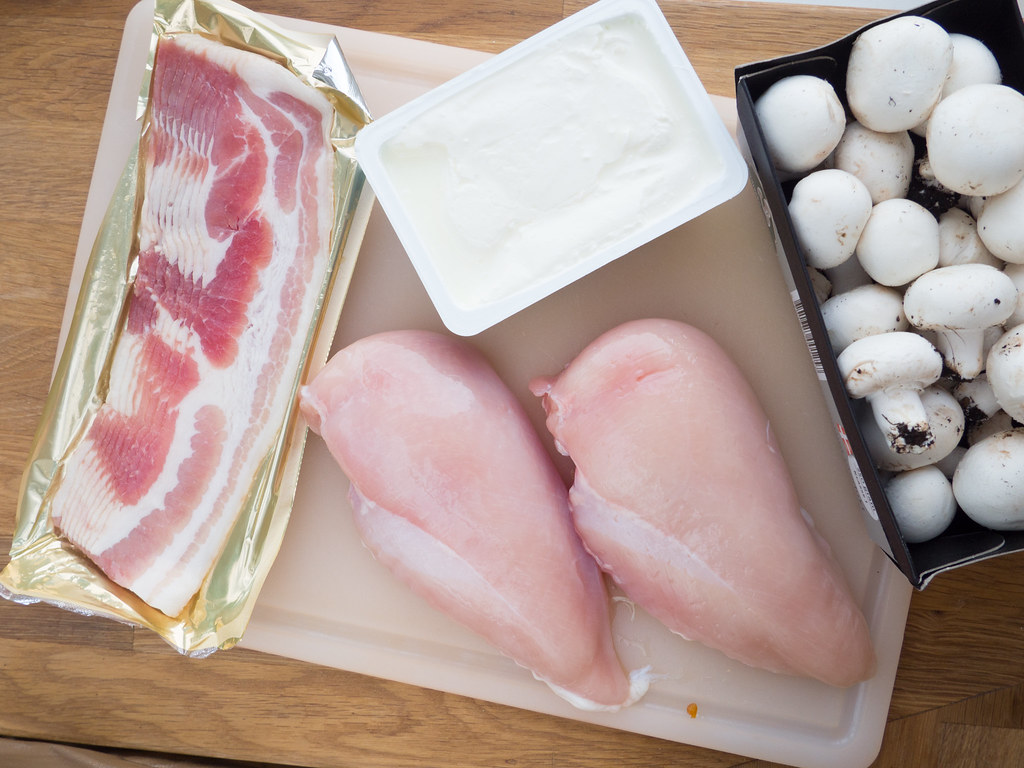
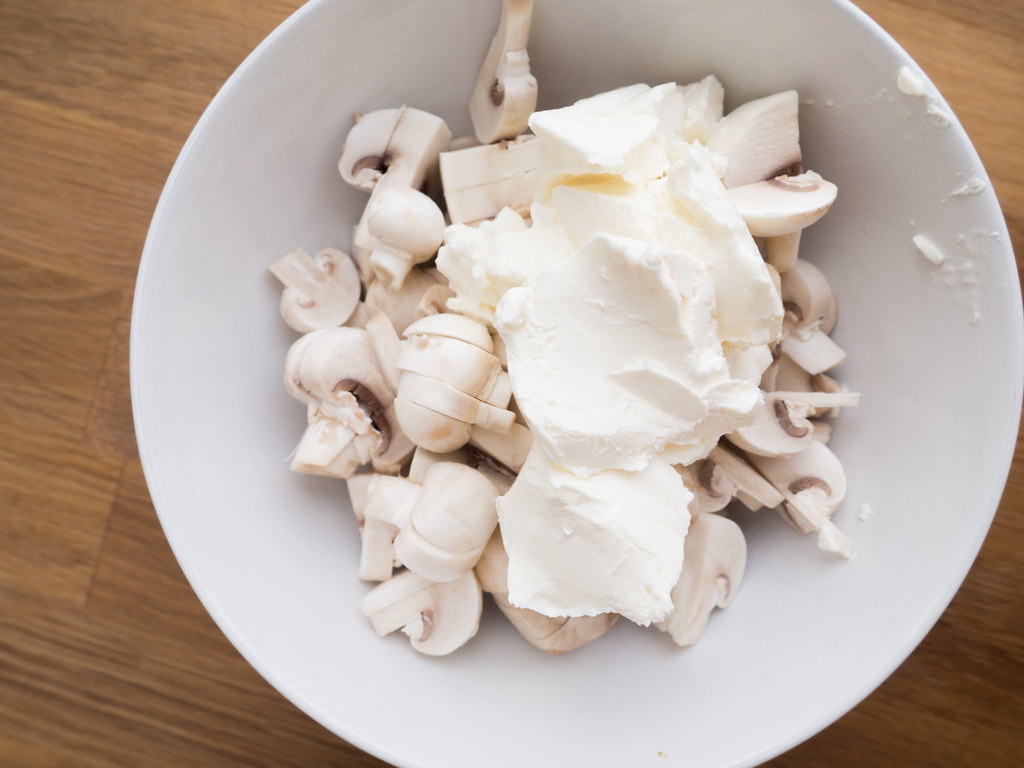
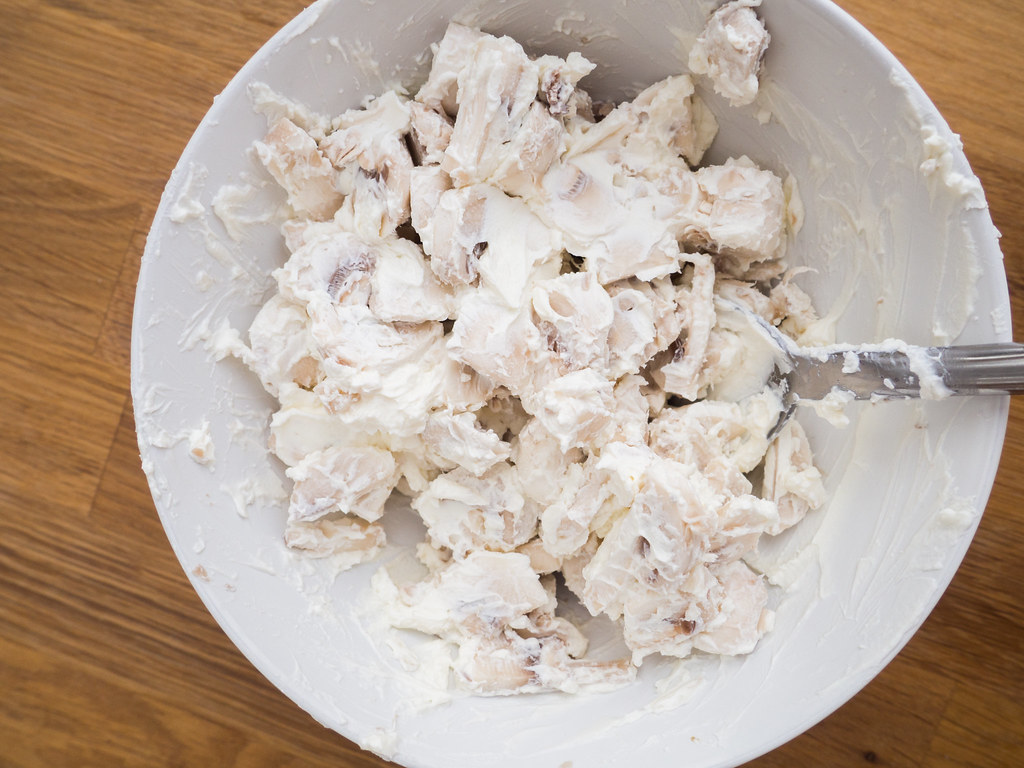
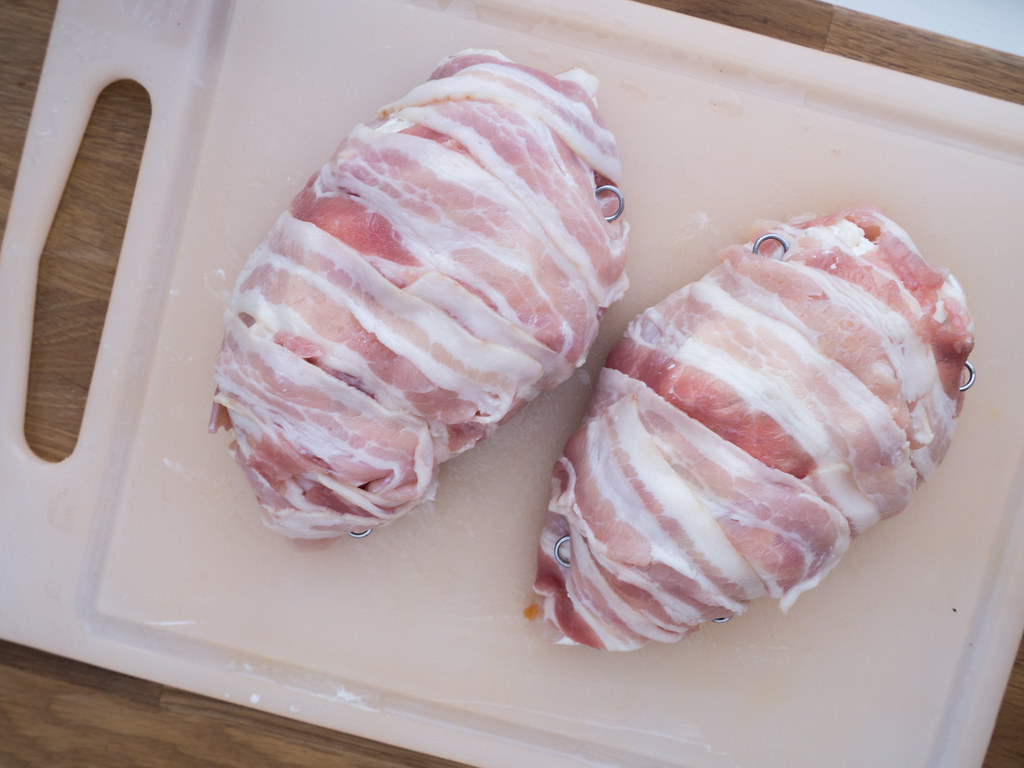
Clean the mushrooms and slice them up nicely. In a bowl, mix the mushrooms with the cream cheese. Now use a spoon to fill the chicken filet with the mushroom and cream cheese mixture. When done, wrap each chicken filet with some bacon stripes. I normally uses about 2-3 stripes for each chicken filet. If you have some meat needles, you can with advantage use them to secure the bacon to the chicken a little better. However, this step can be omitted.
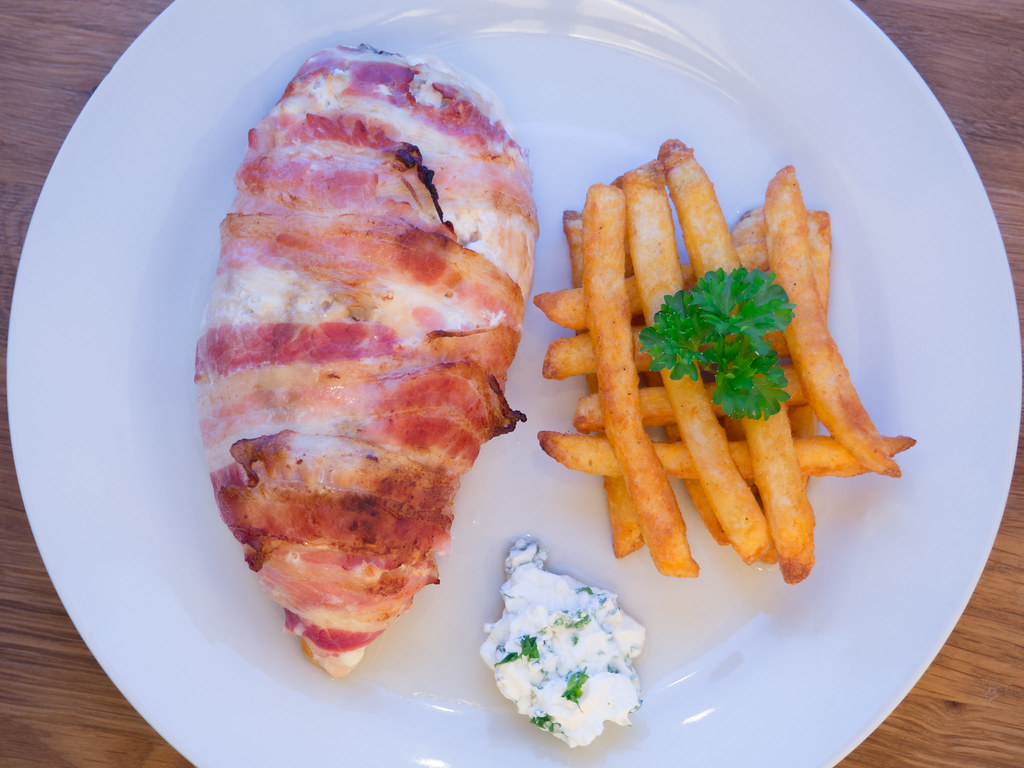
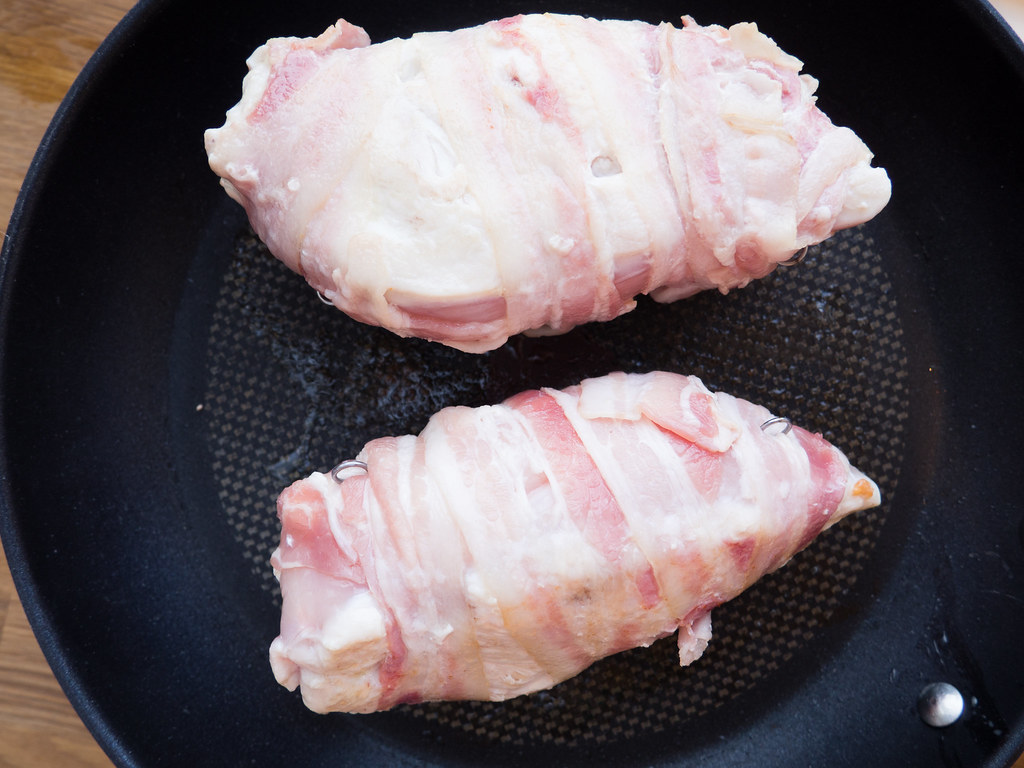
Now fry the bacon chicken for about one minute on each side on a frying pan. Transfer the chicken to an ovenproof dish. Finally, cook the chicken in the oven for about 15-20 minutes depending on the size of the filets.
Cheese, Mushroom and Bacon Chicken
3-4 people
Preparation time: 15 minutes
Total Time: 40 minutes
Danish title: Cream cheese, champignon og bacon fyldt kyllingfilet
Category: dinner
Ingredients:
450 g (16 oz) chicken filet
125 g (5 oz) mushroom
100 g (3.5 oz) cream cheese, natural
125 g (5 oz) bacon strips
Instructions:
1. Start by cleaning the chicken filet by cutting away any unwanted fat or smaller bones if necessary. Then cut deep and long lengthwise grooves in the filets. Put the chicken aside and continue with the next step.
2. Clean the mushrooms using cold water and slice them up.
3. In a bowl; mix the sliced mushrooms and the cream cheese.
4. Now spoon the mushrooms and cheese mixture into the sliced chicken filet.
5. Wrap 2-4 bacon stripes around the filets. Secure the bacon with meat needles if you have some. This last step can be skipped if you tightly wrap the bacon.
6. On frying pan; fry the chicken for about one minute on each side. This will make the bacon a little crisper.
7. Transfer the chicken to an ovenproof dish and cook them in the oven at 200 C (400 F) for about 15-20 minutes. The cooking time depends on the sizes of the filets. Use a fork to gently test if the chicken is cooked all way through.
Serve the chicken with some homemade oven potatoes and a simple green salad.

The post Cream Cheese, Mushroom and Bacon Chicken appeared first on Nordic Food & Living.
]]>The post Parmesan Crusted Chicken appeared first on Nordic Food & Living.
]]>
Today I sharing this delicious recipe for Parmesan crusted chicken. There are several things I like about this breaded chicken; the best is that the inside is nice and moist while the outside is golden and crisp. The time it takes to make them is really not that long, I normally estimate about 45 minutes from start until you have a batch of these homemade chicken strips.
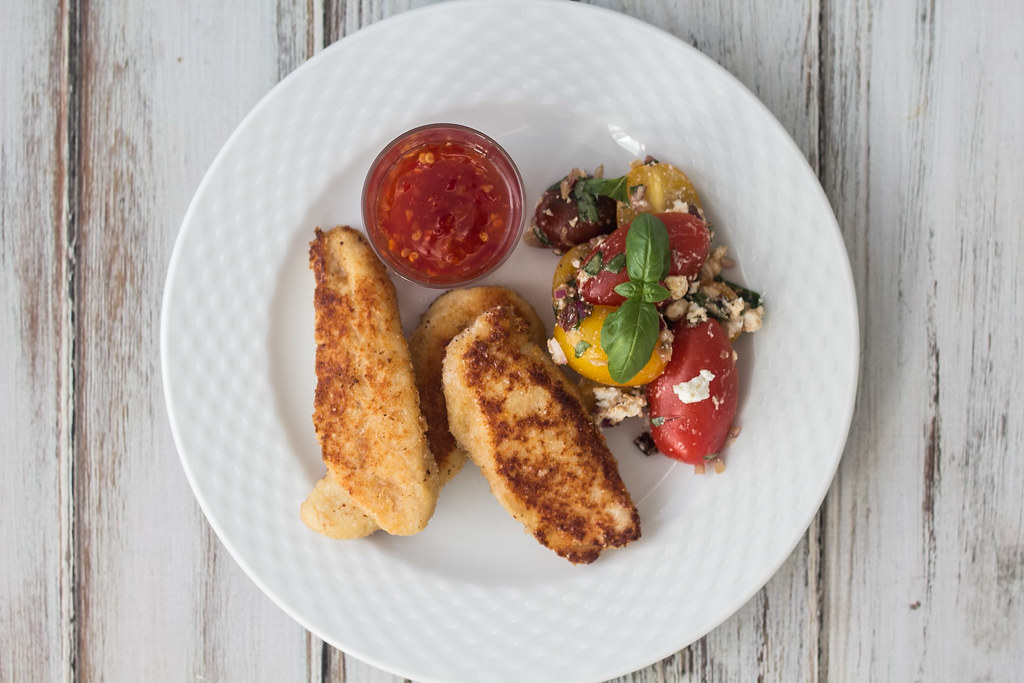
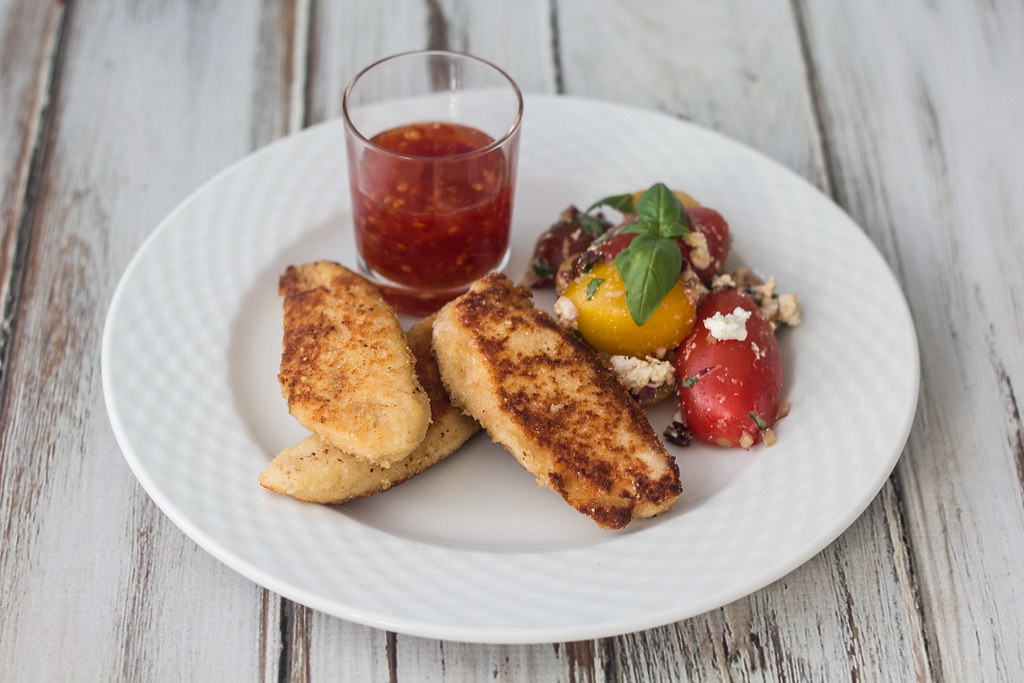
I typically serve these chicken strips together with some sweet-sour sauce for dipping and then a nice salad on the side - a simple but very delicious dish if you ask me. It is also my experience that most people really like these parmesan crusted chicken strips when I have served them for guests and family. Especially, the kids love them. I believe that it is the crisp crust and the delicious taste from the parmesan that I really like about these chicken strips.
If you are looking for a nice salad to be served together with these chicken pieces I can recommend to take a look in my section with different salads. You can find the categories on top of this page.
Instructions
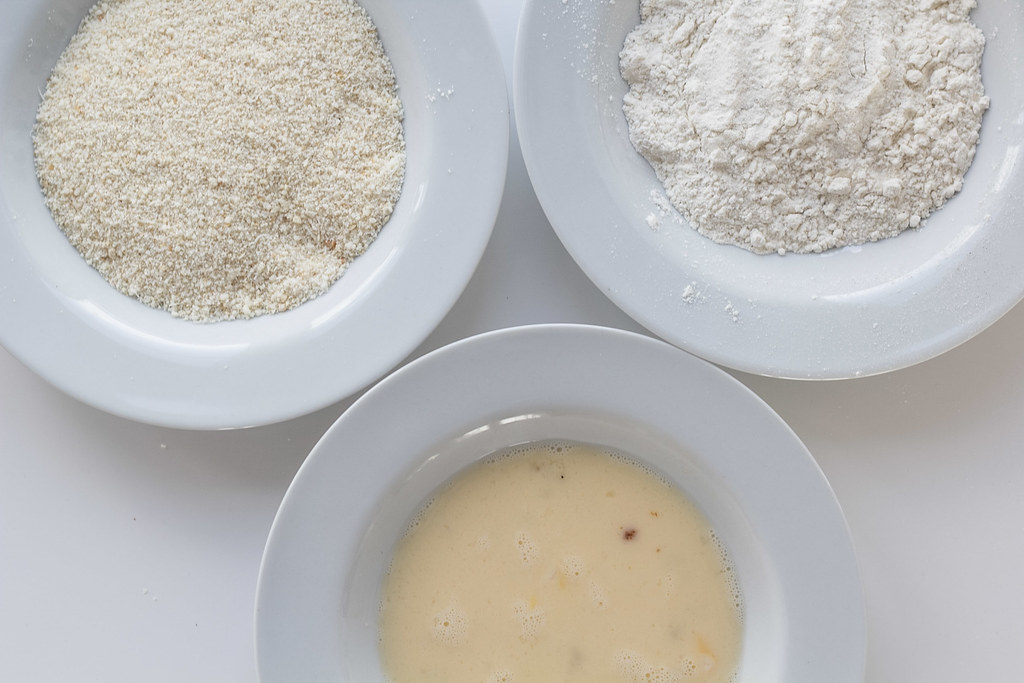
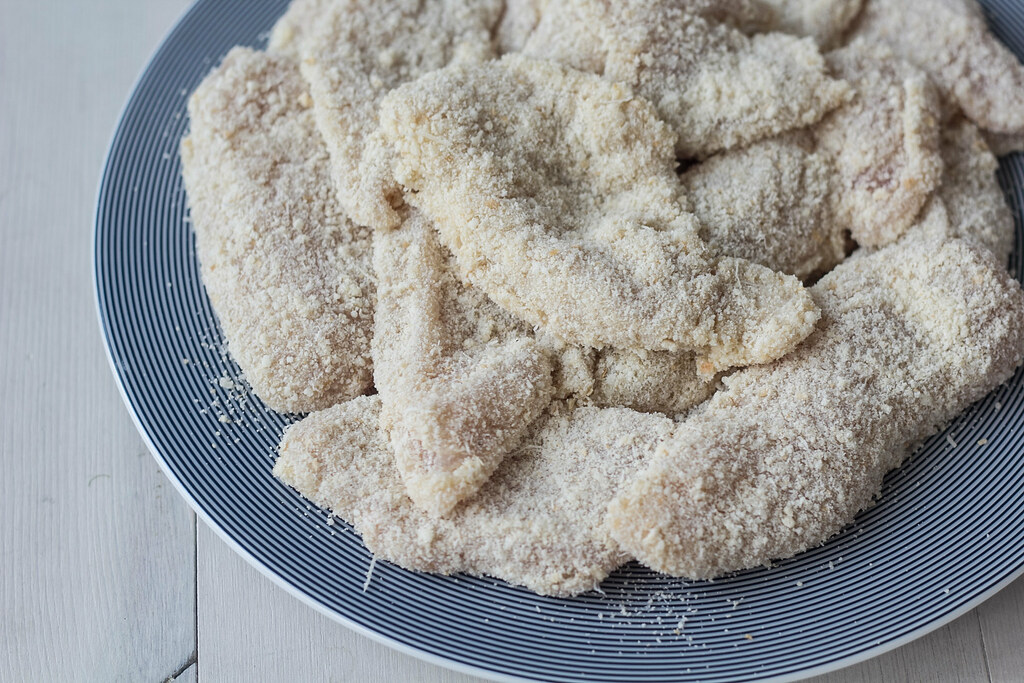
As mentioned above, this Parmesan crusted chicken is actually really simple to make. You start by cutting some nice stripes from chicken breasts. Then you prepare the double breading; you should arrange three deep plates. In the first plate you have all-purpose flour, the second you have a beaten egg and in the last deep plate you mix regular breadcrumbs, grated Parmesan, salt and pepper.
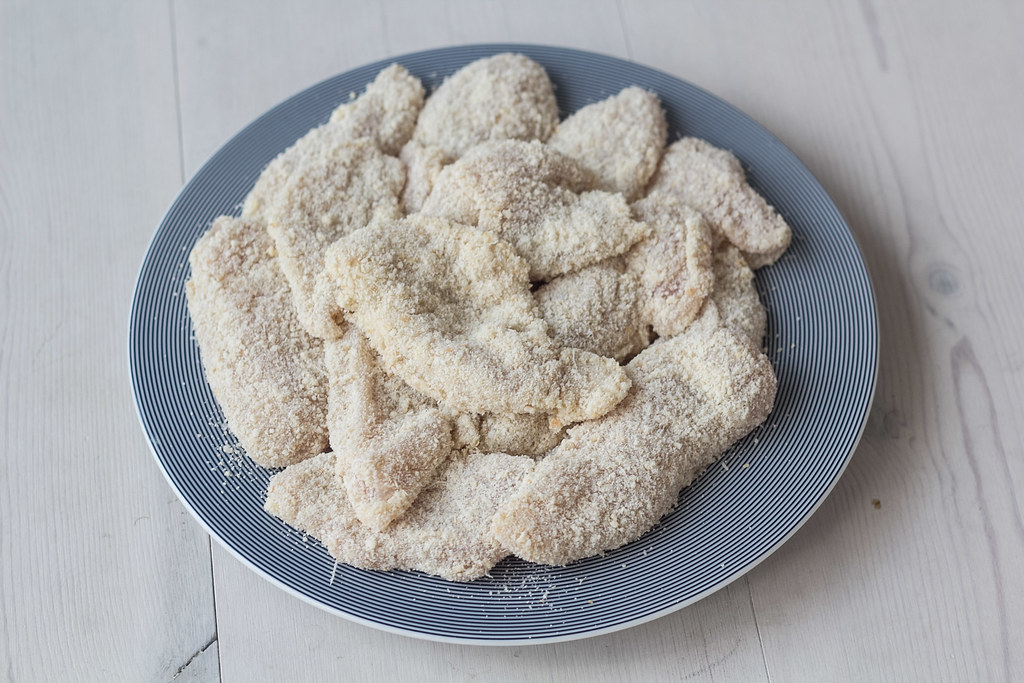
Then you are going to cover the chicken in the all-purpose flour, then in the beaten egg and finally a nice layer of Parmesan-breading. Place the breaded chicken on a plate and let them rest in the fridge for about 30 minutes. You can jump this step if you are in a hurry.
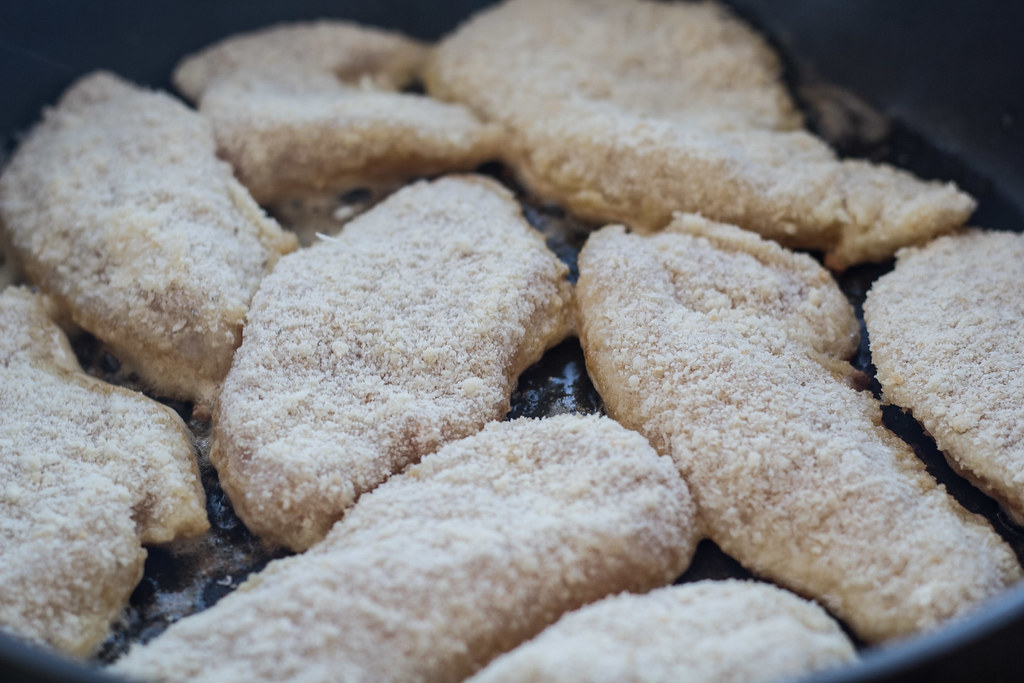
After the resting time, on a frying pan you heat up some oil or butter. Then gently fry the breaded chicken. This step is only to make the chicken and breading crisp on the outside. In the final step, you bake the chicken in the oven at 180 C (360 F) for about 10 minutes; this is to cook the inside of the chicken. If you have made thin chicken strips then you can skip the oven-part and just fry fry the chicken on the frying pan.
Serve the crisp chicken hot directly from the oven and together with a green salad and some sour-sweet sauce as dipping. Enjoy!
Parmesan Crusted Chicken
3-4 people
Preparation time: 30 minutes
Total Time: 45 minutes
Danish title: Parmesan Parneret Kylling
Category: dinner
Ingredients:
300-400 g (40 oz) chicken filet
75 g (2.5 oz) grated parmesan
75 g (2.5 oz) all-purpose flour
salt and pepper
Instructions:
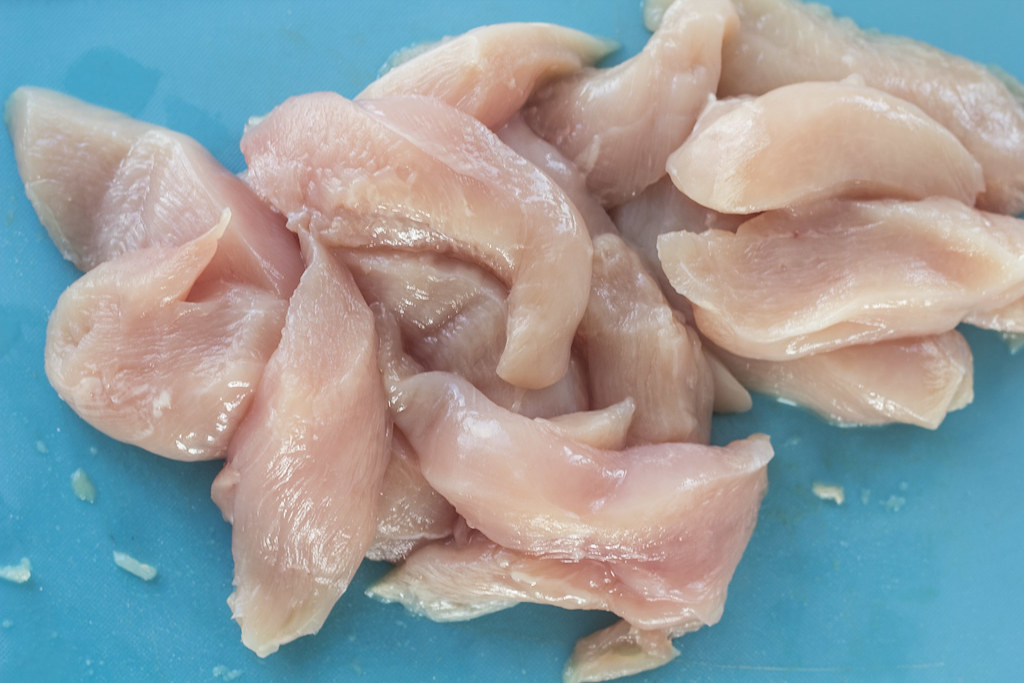
1. Start by cutting the chicken filet into smaller pieces or strips.
2. Arrange three different deep plates; plate 1: The all-purpose flour. Plate 2: a beaten egg. Plate 3: mix the breadcrumbs with grated parmesan, salt and pepper.
3. Dip and cover the chicken strips in the all-purpose flour from plate 1.
4. Then dip and cover the chicken strips in the beaten egg.
5. Finally, dip and cover the chicken strips in the parmesan-bread crumbs mixture. It is a good idea to use one hand for step 4 and the other hand for step 5.
6. Place all the parmesan breaded chicken strips on a plate and set it aside in the fridge for about 20-30 minutes. This step can be skipped.
7. On a hot frying pan; fry the parmesan breaded chicken strips in some oil or butter. If you have made some thick chicken strips it is a good idea only to fry the chicken for a short time and then bake them in a 180 C (360 F) hot oven for about 10 minutes.
Tip: Serve these parmesan crusted chicken strips with a nice tomato salad and some sweet-sour sauce as dipping.

The post Parmesan Crusted Chicken appeared first on Nordic Food & Living.
]]>The post Butter Chicken appeared first on Nordic Food & Living.
]]>
Butter Chicken or Murgh Makhani, as it is called some places, is an Indian dish which was invented at a restaurant in Daryaganj Delhi in India. Even though this dish has its roots on the other side of the planet, far away from the traditional Nordic kitchen, I am still sharing it here on my blog.
When I was younger, I was not that happy with foreign and spicy food but after I started to explore the different food the world has to offer, especially the Indian and Asian cuisine, I have learned how to make so many fantastic dishes. From time to time I stumble upon a new kind of food or dish, which I have never had or heard about before but now find very delicious. This Butter Chicken, which I am share the recipe for here in this blog post, is one of these wonderful dishes which I have discovered too late in my life. I know that this dish, for some people, is just a 'normal' and everyday dish but for me it is a great and new experience in the world of food.
I have to admit, the first time I heard about this dish, I thought it was one of these dishes that just taste so good but is too unhealthy to eat on an everyday basis. However, this is not the truth - in this case the name of this dish initially tricked me to think, that is was based on a lot of butter. When I started researching for this dish, I quickly realized that butter is absolutely not the major ingredient as I thought. Actually, this dish is not that unhealthy and it contains protein rich chicken, tomato and of course many delicious and tasteful spices.
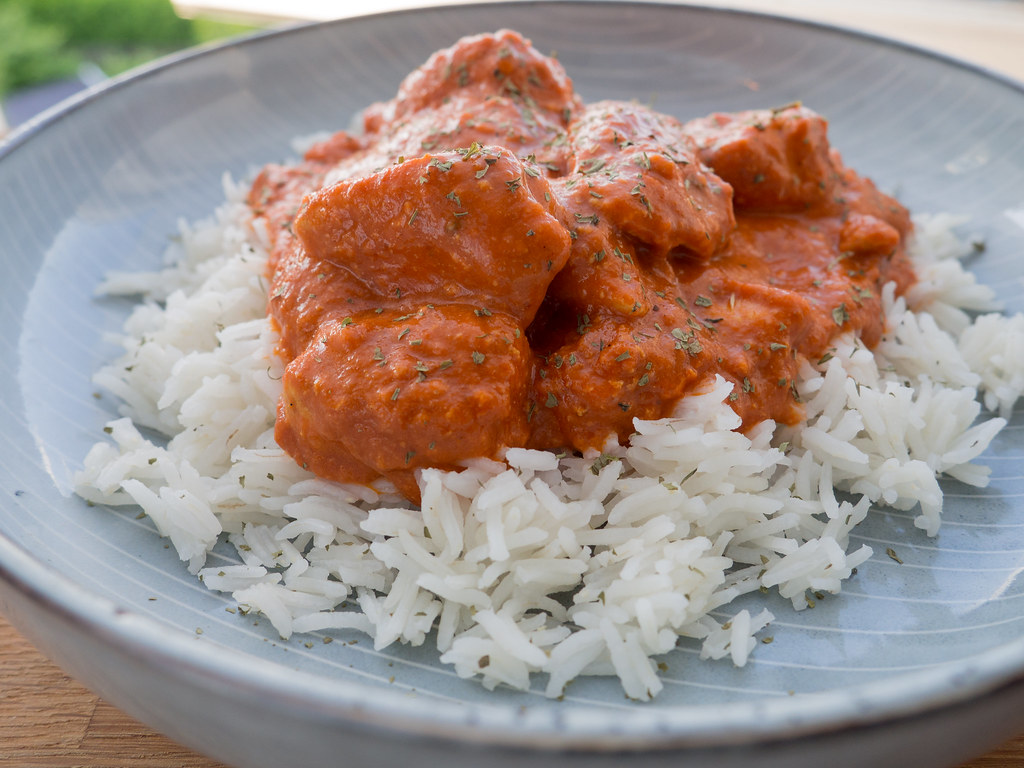
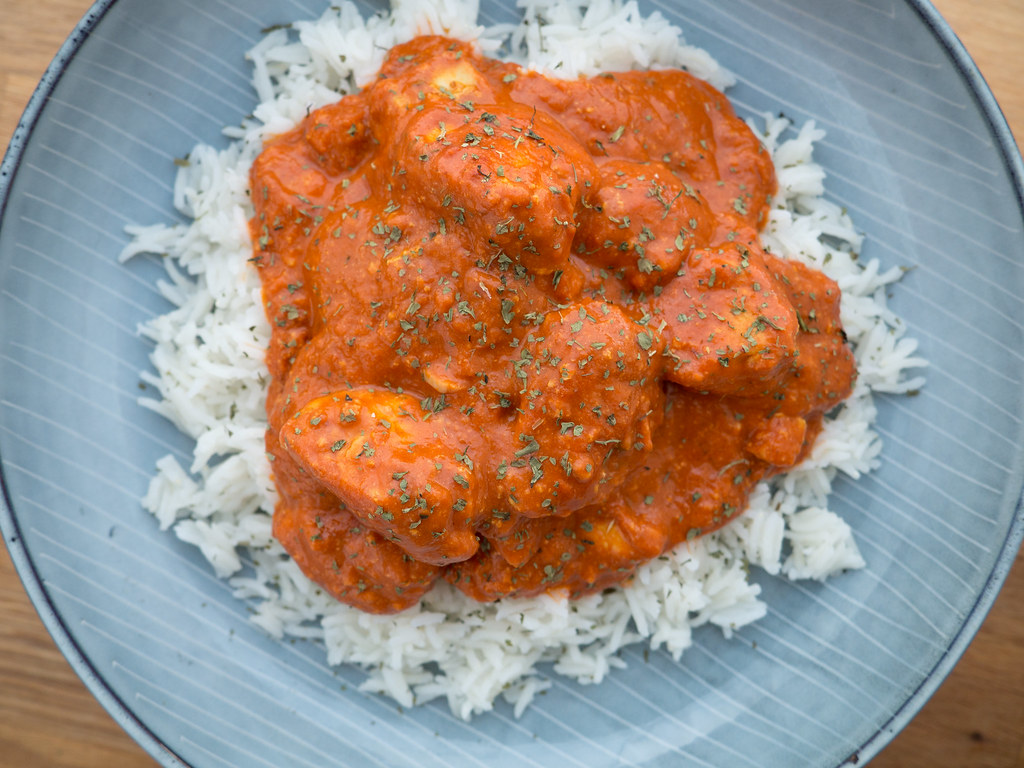
This dish is typically served with white rice or freshly baked Naan bread. I sometimes substitute the white rice with the more healthy brown rice. Brown rice has a greater content of dietary fiber, which is good for your stomach and makes you feel full for a longer time - I personally think the taste is almost the same.
Instructions
This dish is actually quite easy to prepare and does not require you to have any particular skills in the kitchen.
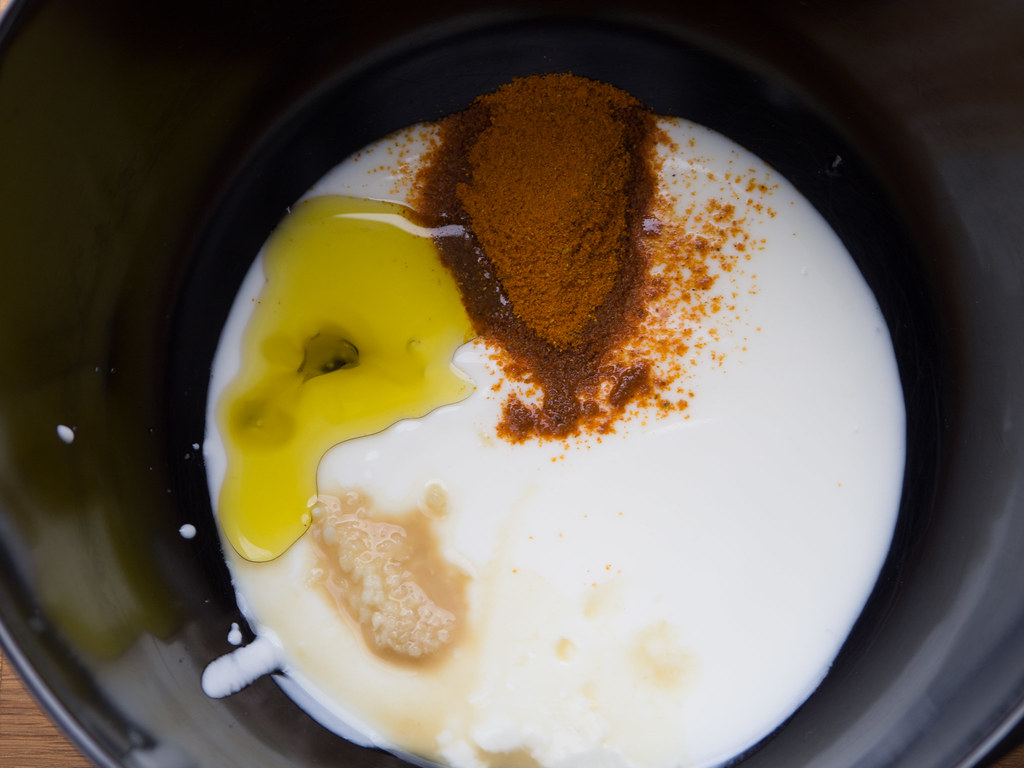
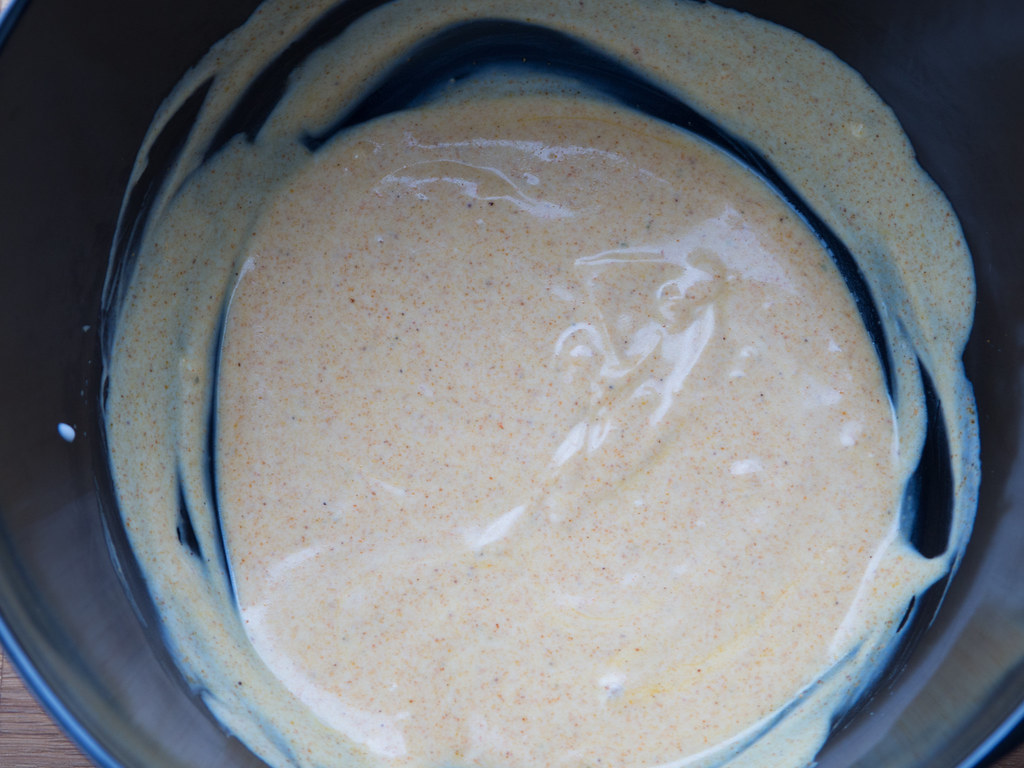
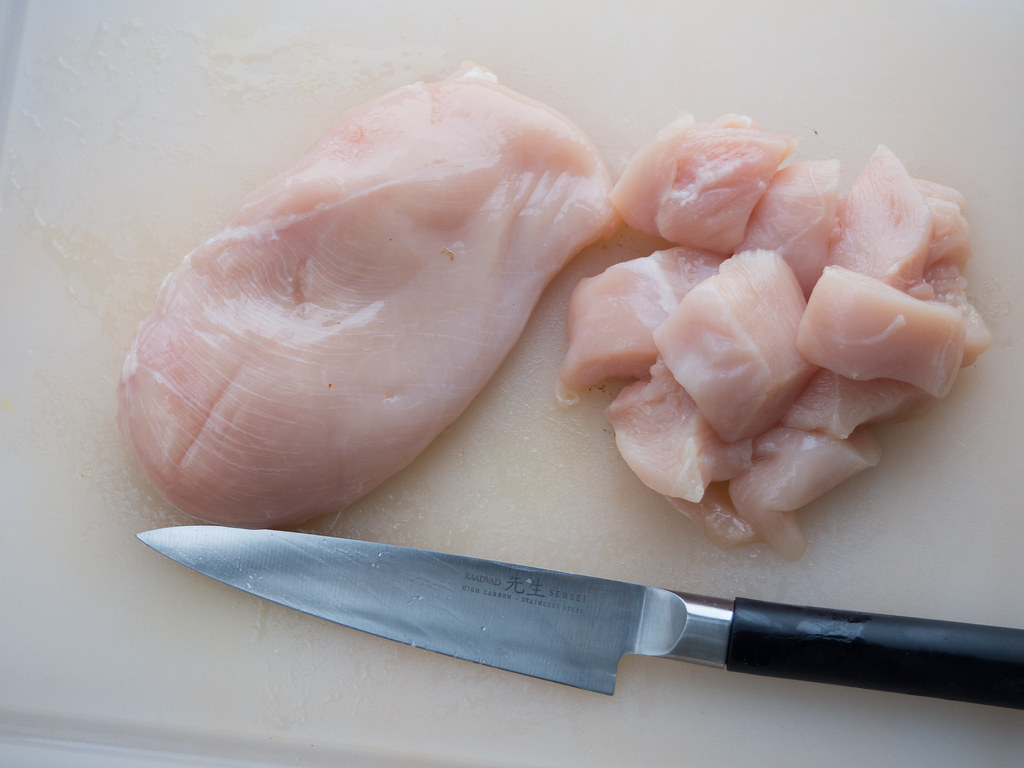
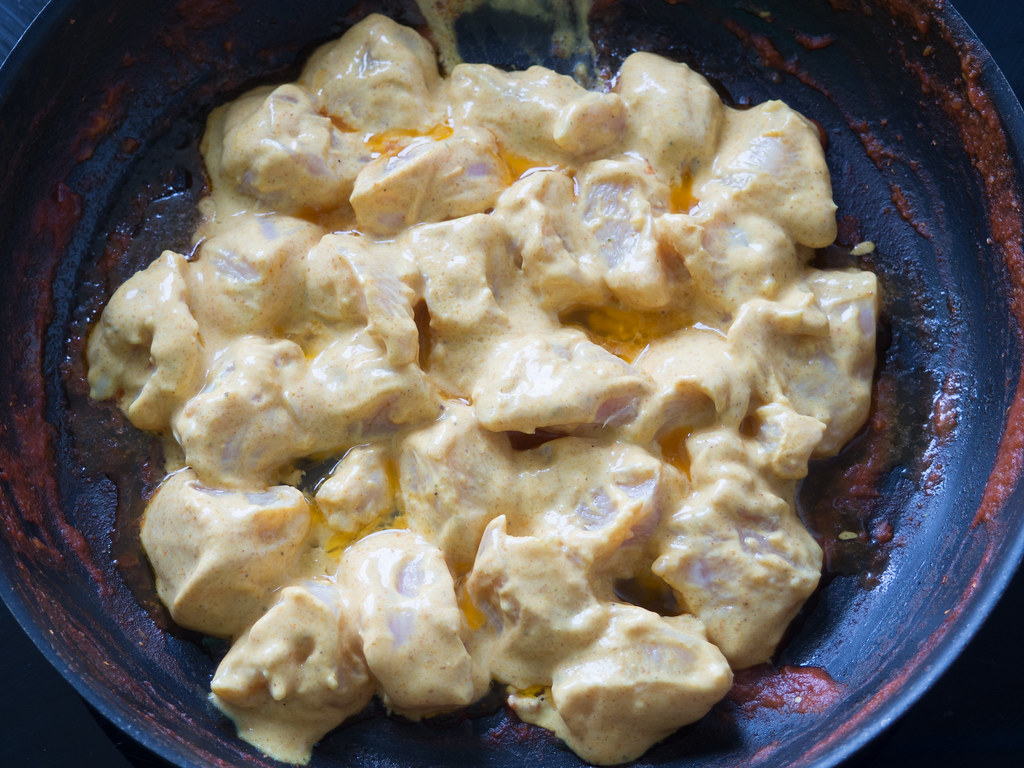
You start by mixing the spices and yogurt for the marinate. Cut the chicken filet into nice pieces with a size of about 2-3 cm (1 inch). Mix the chicken with marinate and set it aside in the fridge for minimum 20-30 minutes but preferably for 12-24 hours.
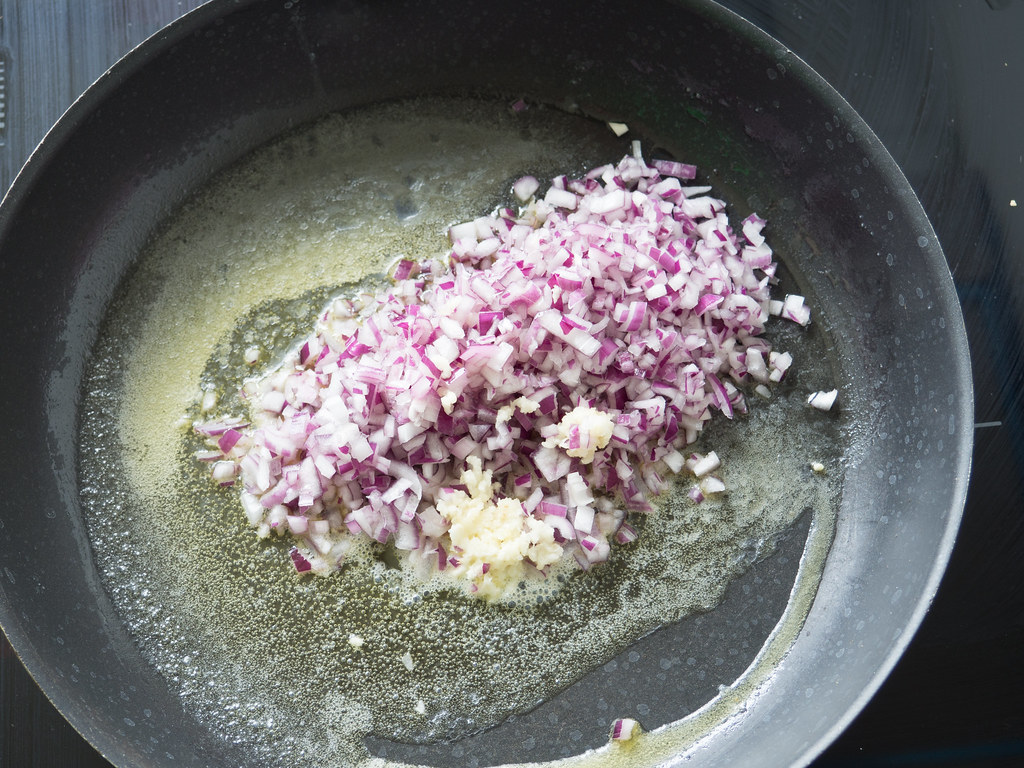
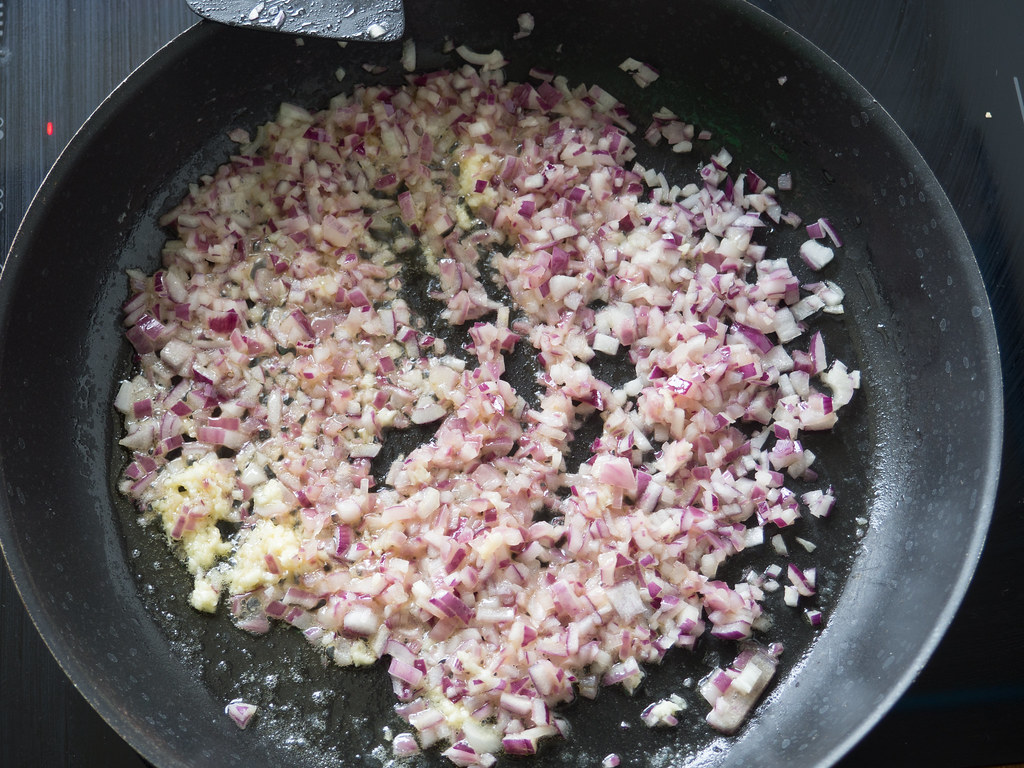
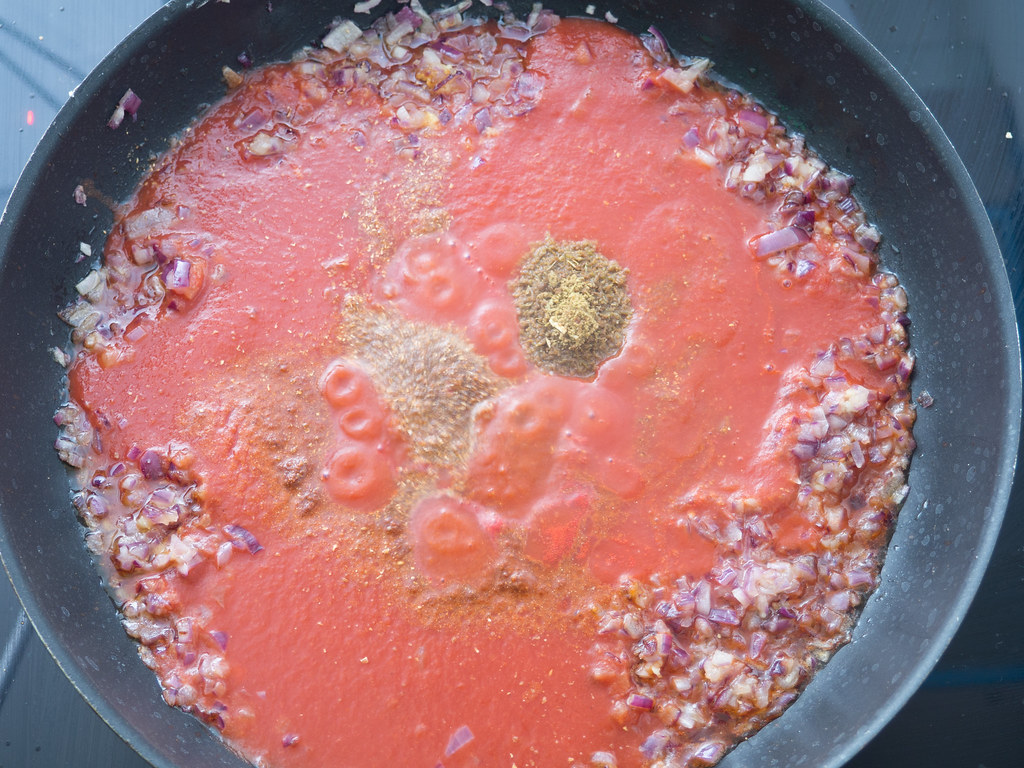
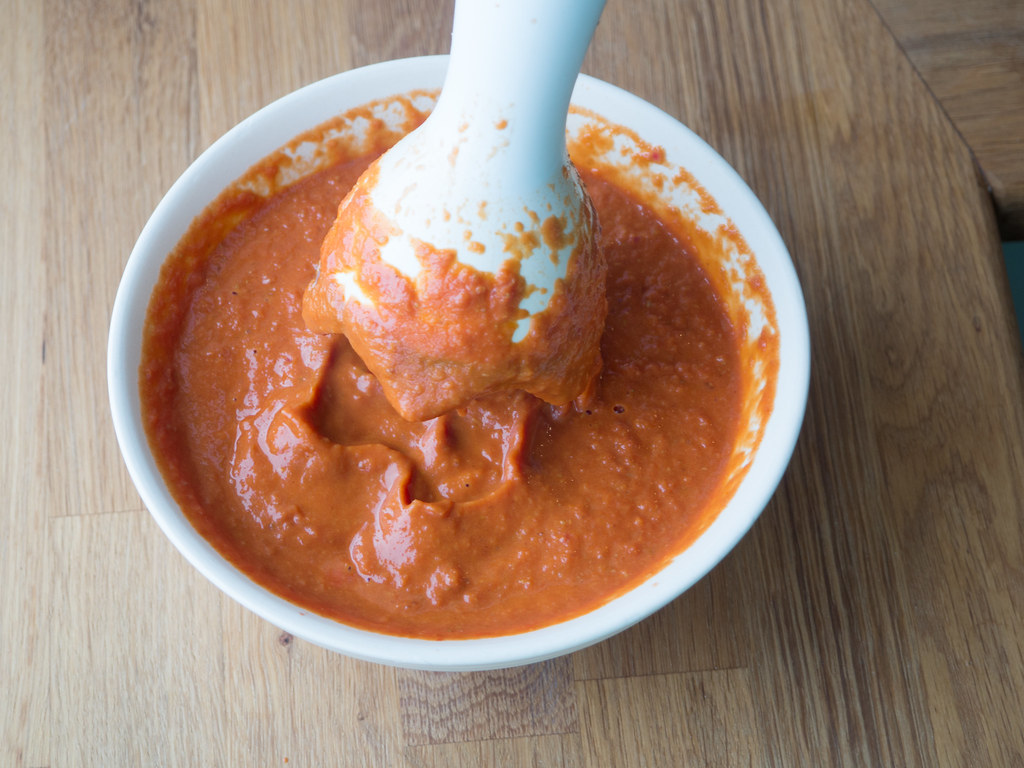
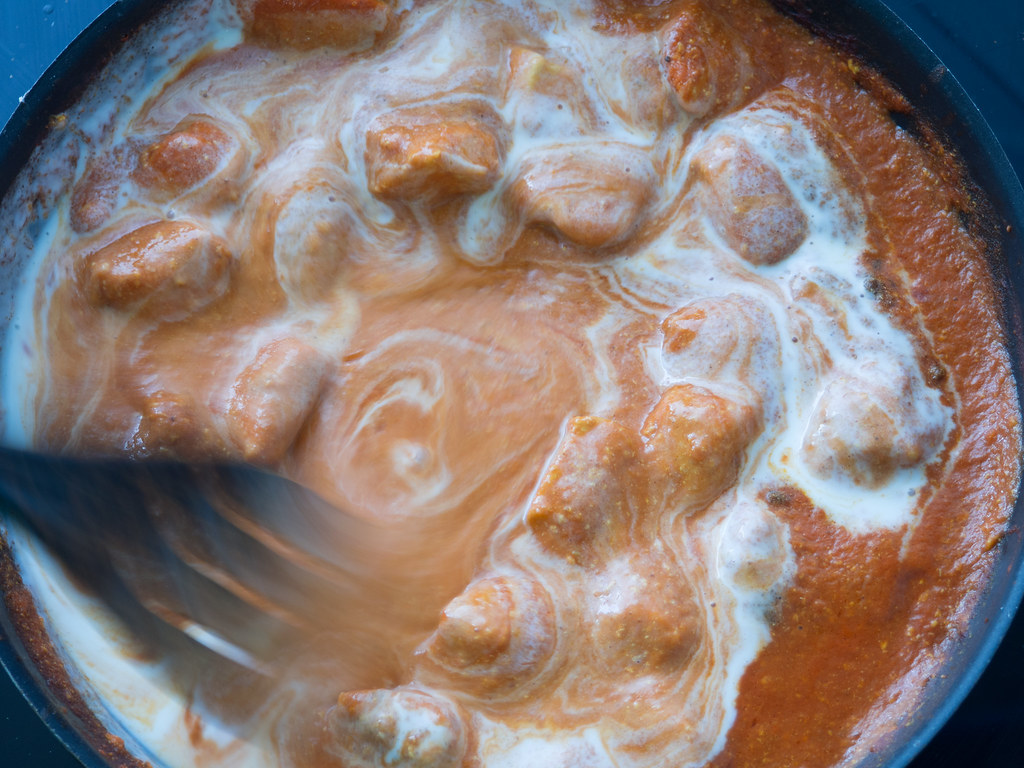
Continue with the curry butter sauce; in a large frying pan add the butter and oil and let it melt. Add the diced onion and sauté for about 5 minutes or until they are translucent. Add the minced garlic and ginger paste (or similar ginger juice), fry for an extra minute. Then add the crushed tomatoes, chili powder, cumin powder and coriander/cilantro powder - continue cooking the tomato sauce for another 5-10 minutes. Remove the pan from the heat and then you can either pour the sauce in a blender or use a hand blender directly to blend the sauce into a smooth and uniform tomato sauce. Now, at this point you can decide if you want to refrigerate the sauce up to 48 hour or freeze it for up to 3-4 months. This makes it super easy to make this Butter Chicken easily when you are just looking for some delicious food.
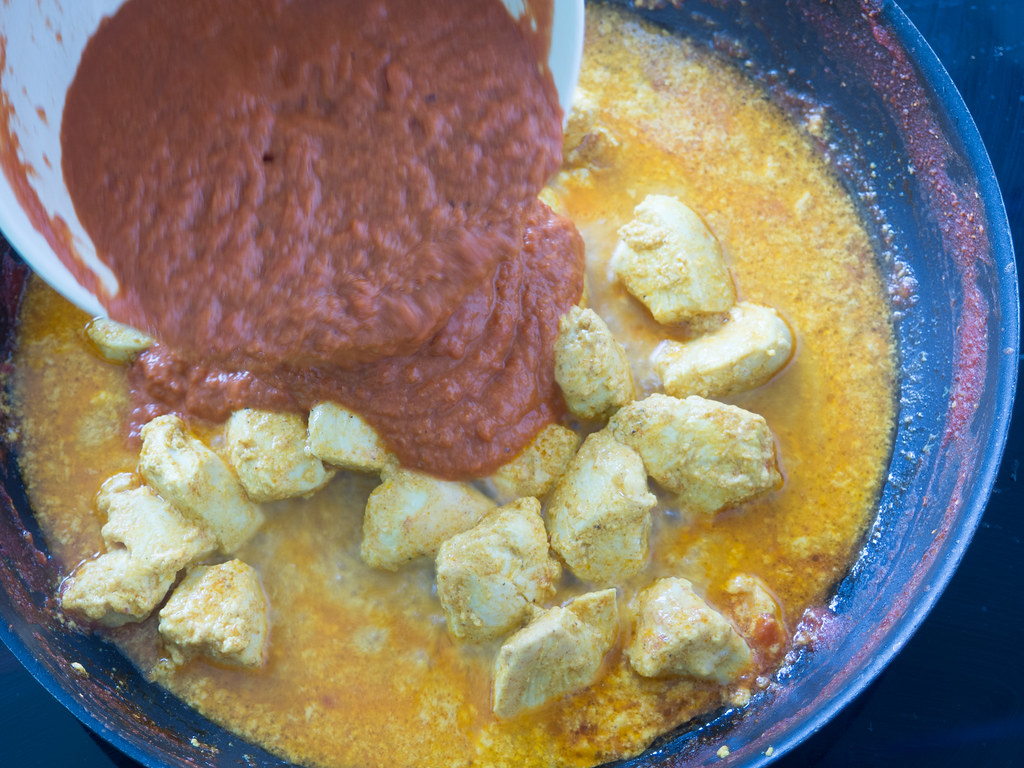
In order to continue, add some butter on a frying pan and gently fry the marinated chicken. Discard the extra and superfluous marinate. When the chicken is done, add the blended tomato sauce to the frying pan and then heat it up together with the chicken. When then sauce, with the chicken, starts to bubble add the heavy cream and Garam Masala and let it all simmer for a couple of minutes. Just before serving the butter chicken add some crushed dried Fenugreek leaves or some fresh and chopped coriander/cilantro leaves.
Butter Chicken
2-3 people
Preparation time: 20 minutes
Total Time: 60 minutes
Cuisine: Indian
Category: dinner
Ingredients:
Chicken Marinade
350 g (4/5 lb) chicken fillet
2 tbsp Tandoori Masala
1 tsp ginger paste (or ginger juice)
1 clove of garlic, minced
1 dl (1/2 cup) yogurt natural
1 tbsp vegetable oil
Butter Chicken Sauce
1 tbsp butter
1 tbsp oil
1 onion, finely chopped
1 1/2 tsp ginger paste (or ginger juice)
1 clove of garlic, minced
1 can (400 ml/14.5 oz) of crushed tomatoes
1/2 tsp chili powder
1 1/2 tsp cumin powder
1 1/2 tbsp cilantro/coriander powder
1 dl (1/2 cup) heavy cream
1/2 tsp Garam Masala
A little dried fenugreek leaves (or fresh coriander leaves)
Instructions:
Chicken Marinade
1. In a bowl; add all the ingredients for the marinade and stir to mix.
2. Cut the chicken breast into bit-sized pieces 2-3 cm (1 inch).
3. Pour the chicken pieces into the marinade and mix everything together. Let the chicken marinade for minimum 20-30 minutes but preferably 12-24 hours in the fridge. The longer you wait; you get a better taste and a more juicy chicken.
Butter Chicken Sauce
4. In a large sauce- or wok pan; add the butter and oil and let it melt at medium heat.
5. Finely dice the onion and mince the garlic. Add both ingredients to the hot pan and fry for a couple of minutes or until the onions are nice and translucent.
6. Add the ginger paste/juice, crushed tomatoes, chili powder, cumin powder and cilantro/coriander powder. Stir and cook for another 5-8 minutes. Try not making the sauce boil but only simmer.
7. Pour the sauce from the pan into a blender and blend everything into a nice and smooth butter chicken sauce. You can also pour it into a bowl and use a hand blender.
8. On the same and now empty frying pan; add a little butter and gently fry the chicken. The chicken should only be 98 % done. The last cooking of the chicken will be done in the next step.
9. Pour the butter sauce back to the frying pan with the chicken. Let the sauce and chicken heat up under low heat. When the sauce starts to boil, add the heavy cream and the Garam Masala spices.
10. Finally, finely chop some fresh coriander or crush some Fernugreek leaves over the sauce in the pan. Serve together with rice or Naan bread.


The post Butter Chicken appeared first on Nordic Food & Living.
]]>The post Peanut Butter Chicken with Apples and Spring Onions appeared first on Nordic Food & Living.
]]>
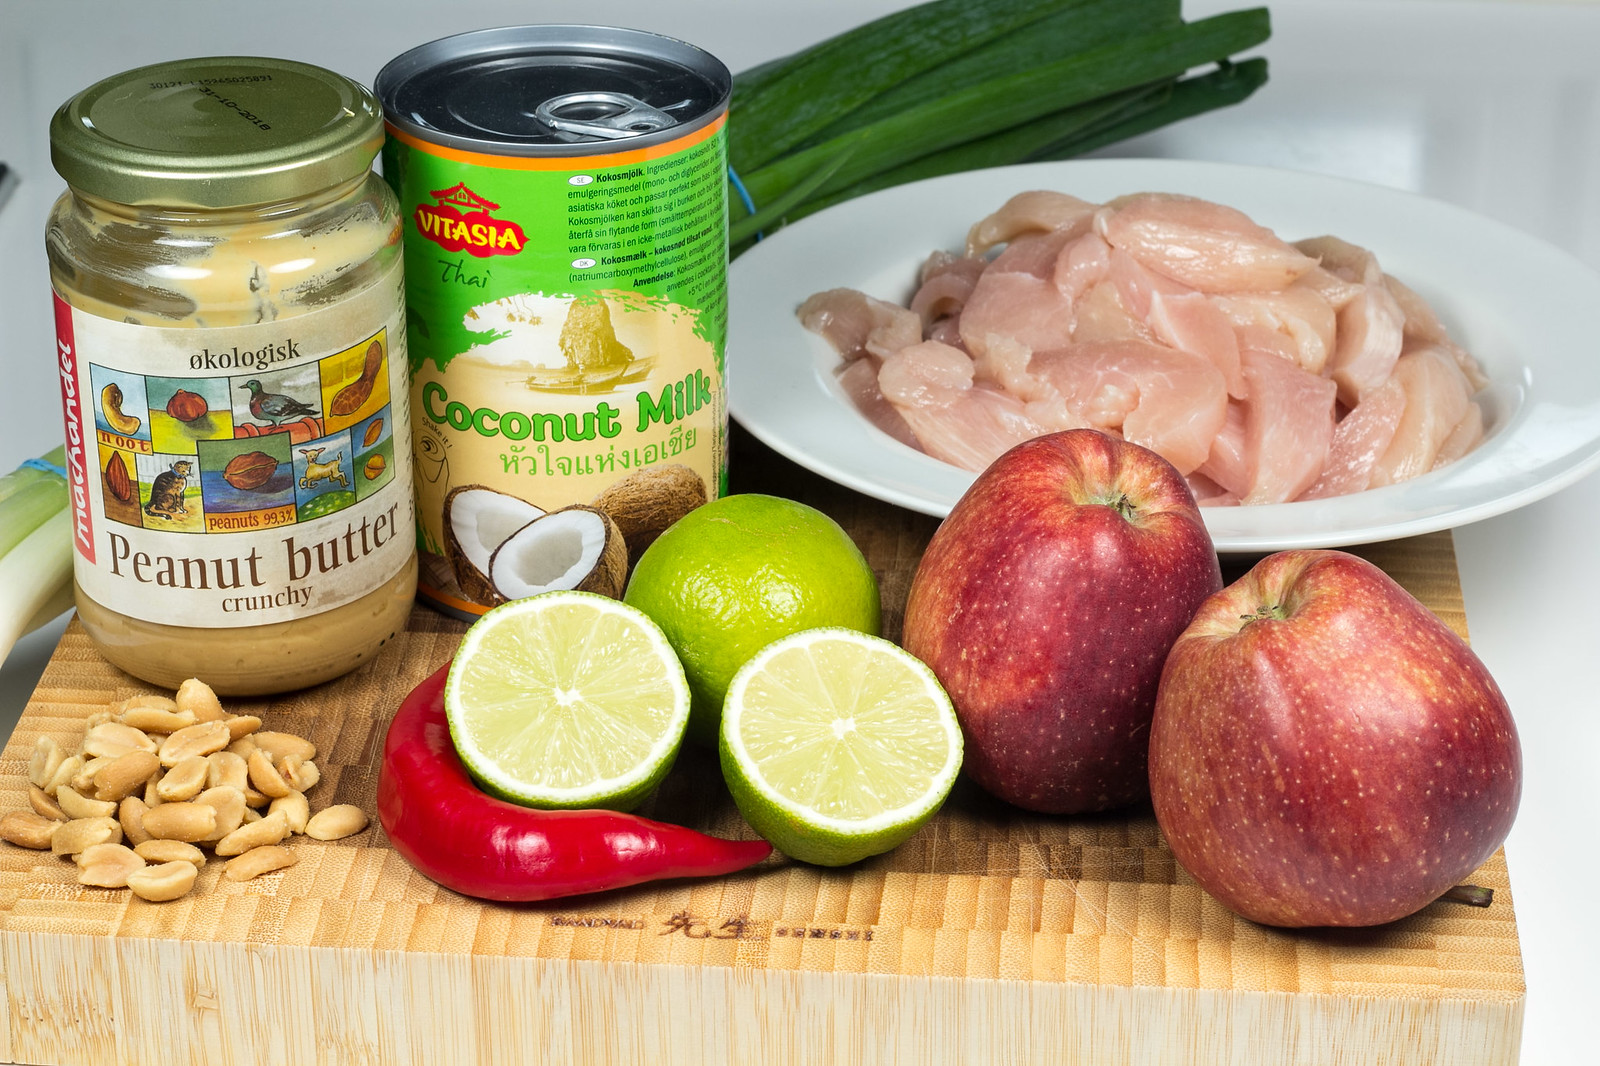
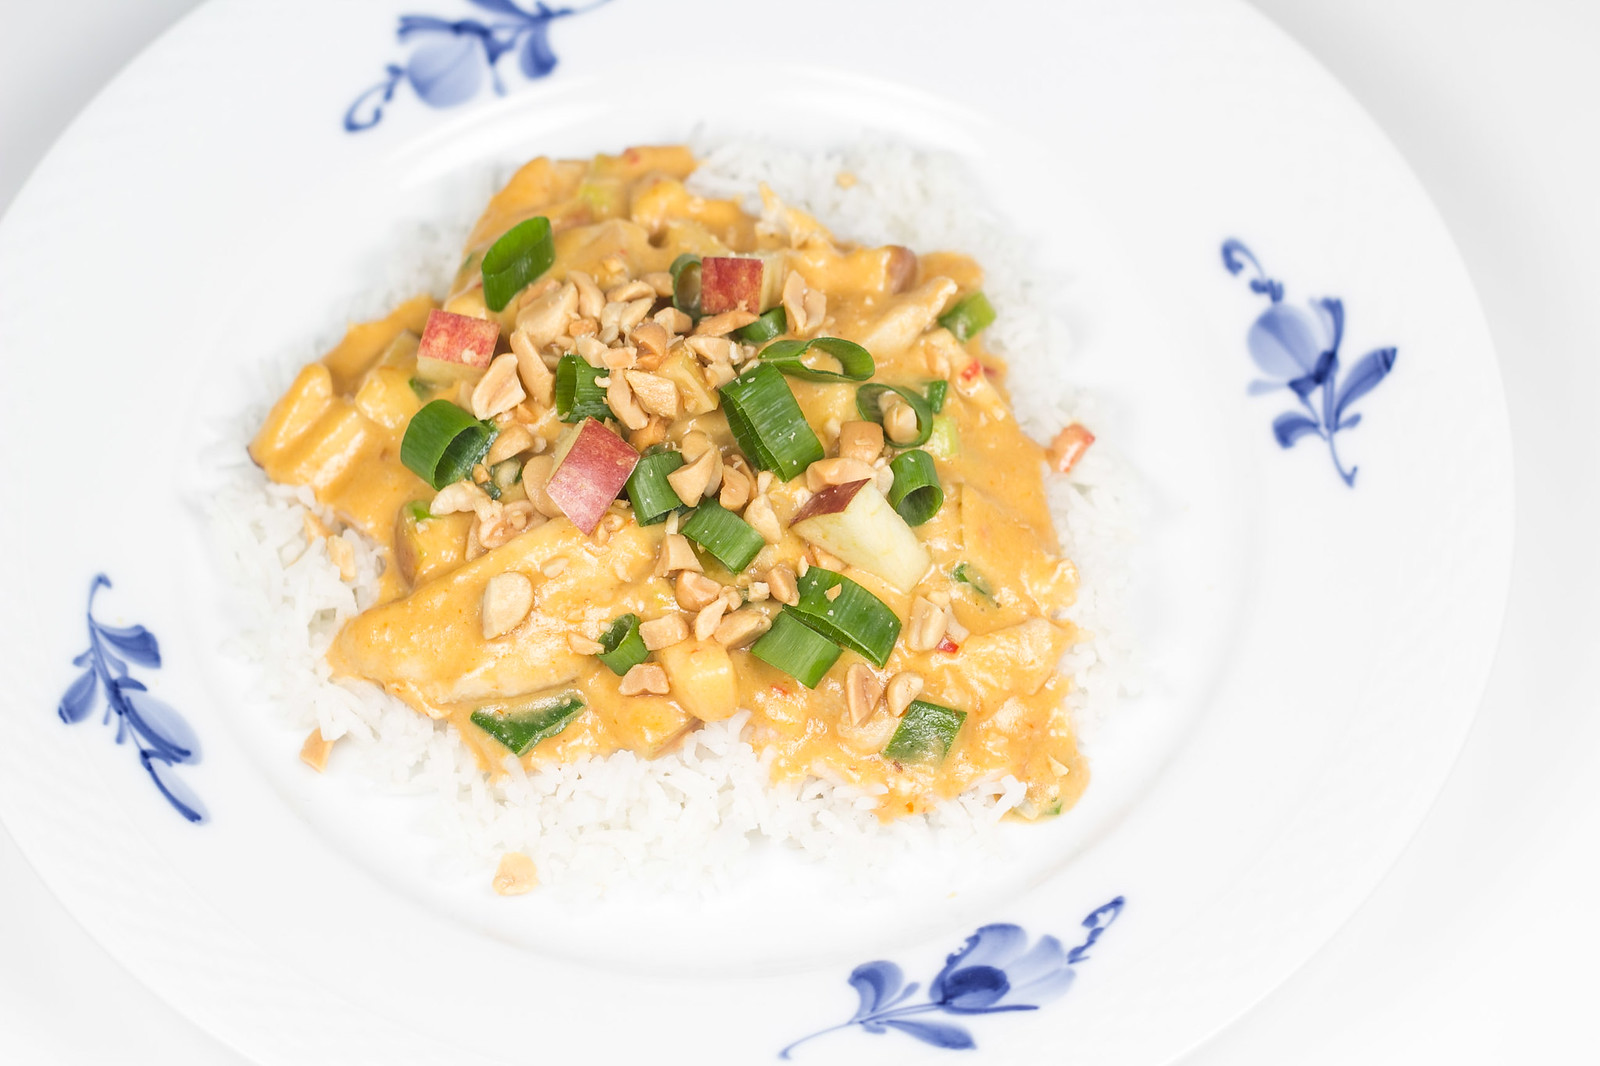
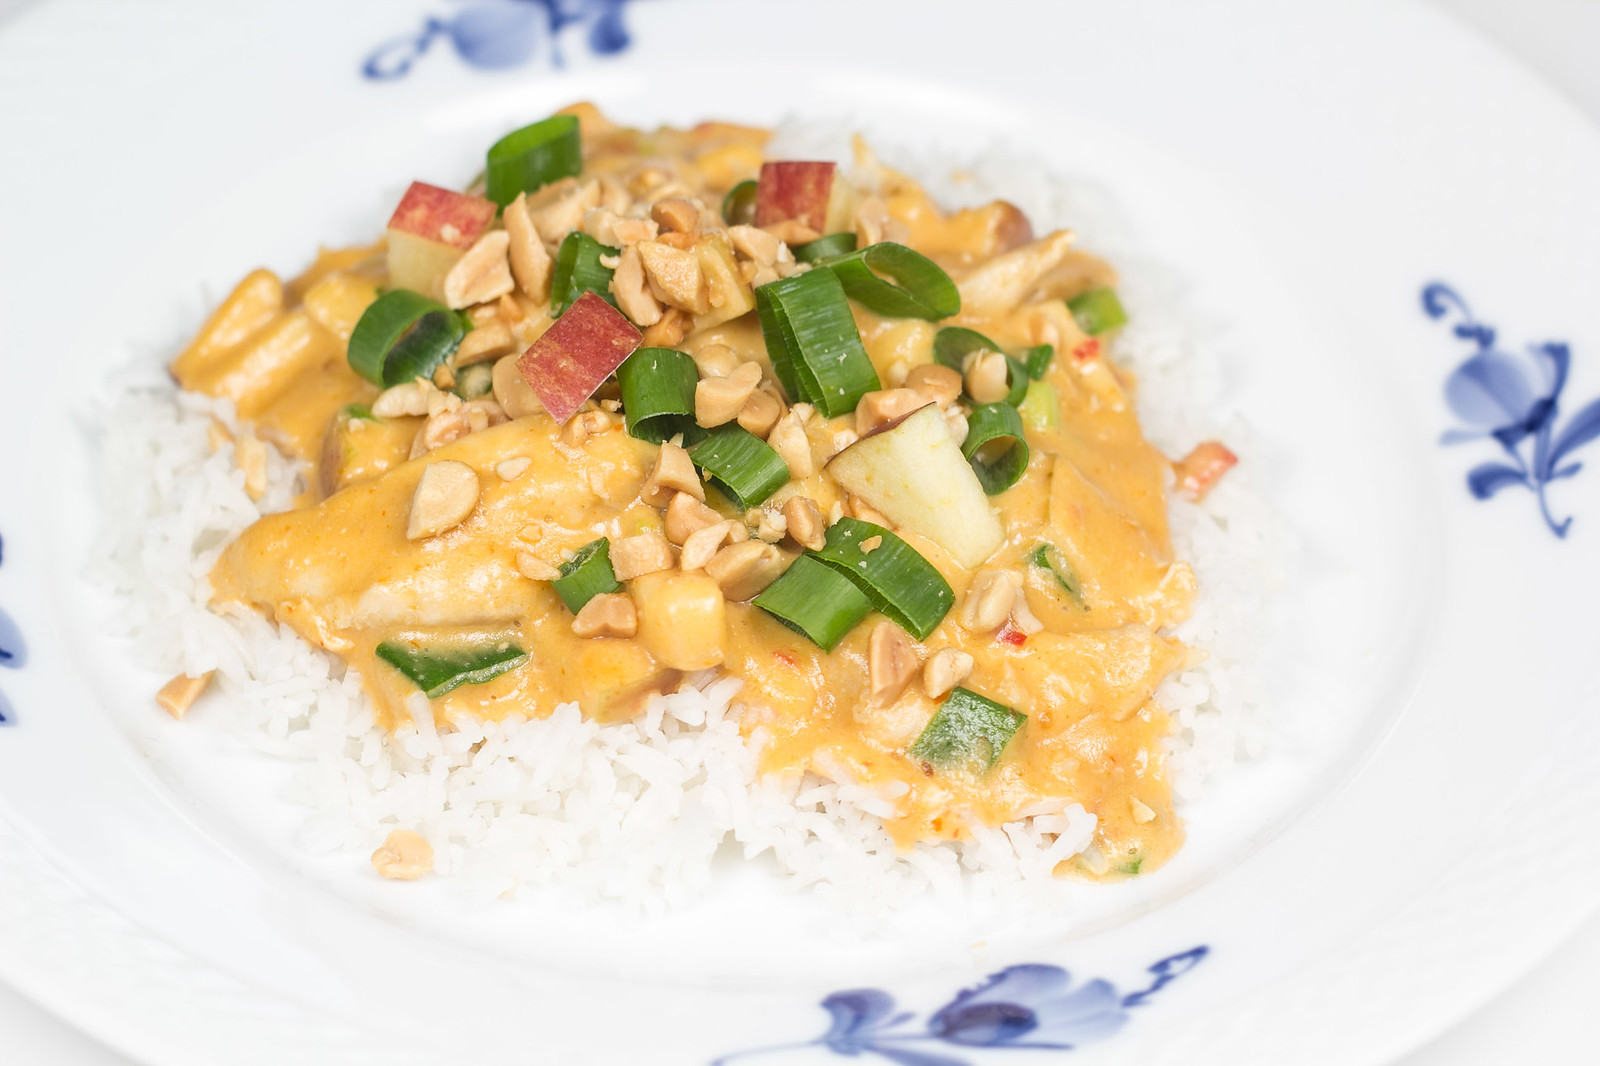
The recipe I have shared on this page is very delicious and quite easy to make. This is a recipe for fried chicken in a super delicious peanut butter sauce top with fresh slices of apples and chopped spring onions - allover a great dish, which according to my experience, is loved by most people and especially the younger crowd.
Peanut Butter?
I have to confess something that most people probably think is totally crazy - for many years I could not eat peanut butter because I thought that the smell and taste was awful. Then I moved state side for a period of my life and now I love it. Today, this recipe is one of my favorite dinner recipes where peanut butter is used.
The consistency of the peanut butter sauce is just fantastic and it goes great together with the fried and sliced chicken breast. I always serve this peanut butter chicken with some white rice. However, recently I have been moving more and more away from the traditional white rice and changed to the more healthy alternative brown rice. Brown rice contains more dietary fiber and protein and therefore gives you a more filling feeling and you will let you feel full for longer. I can highly recommend using brown rice together with this peanut butter chicken.
The Instructions
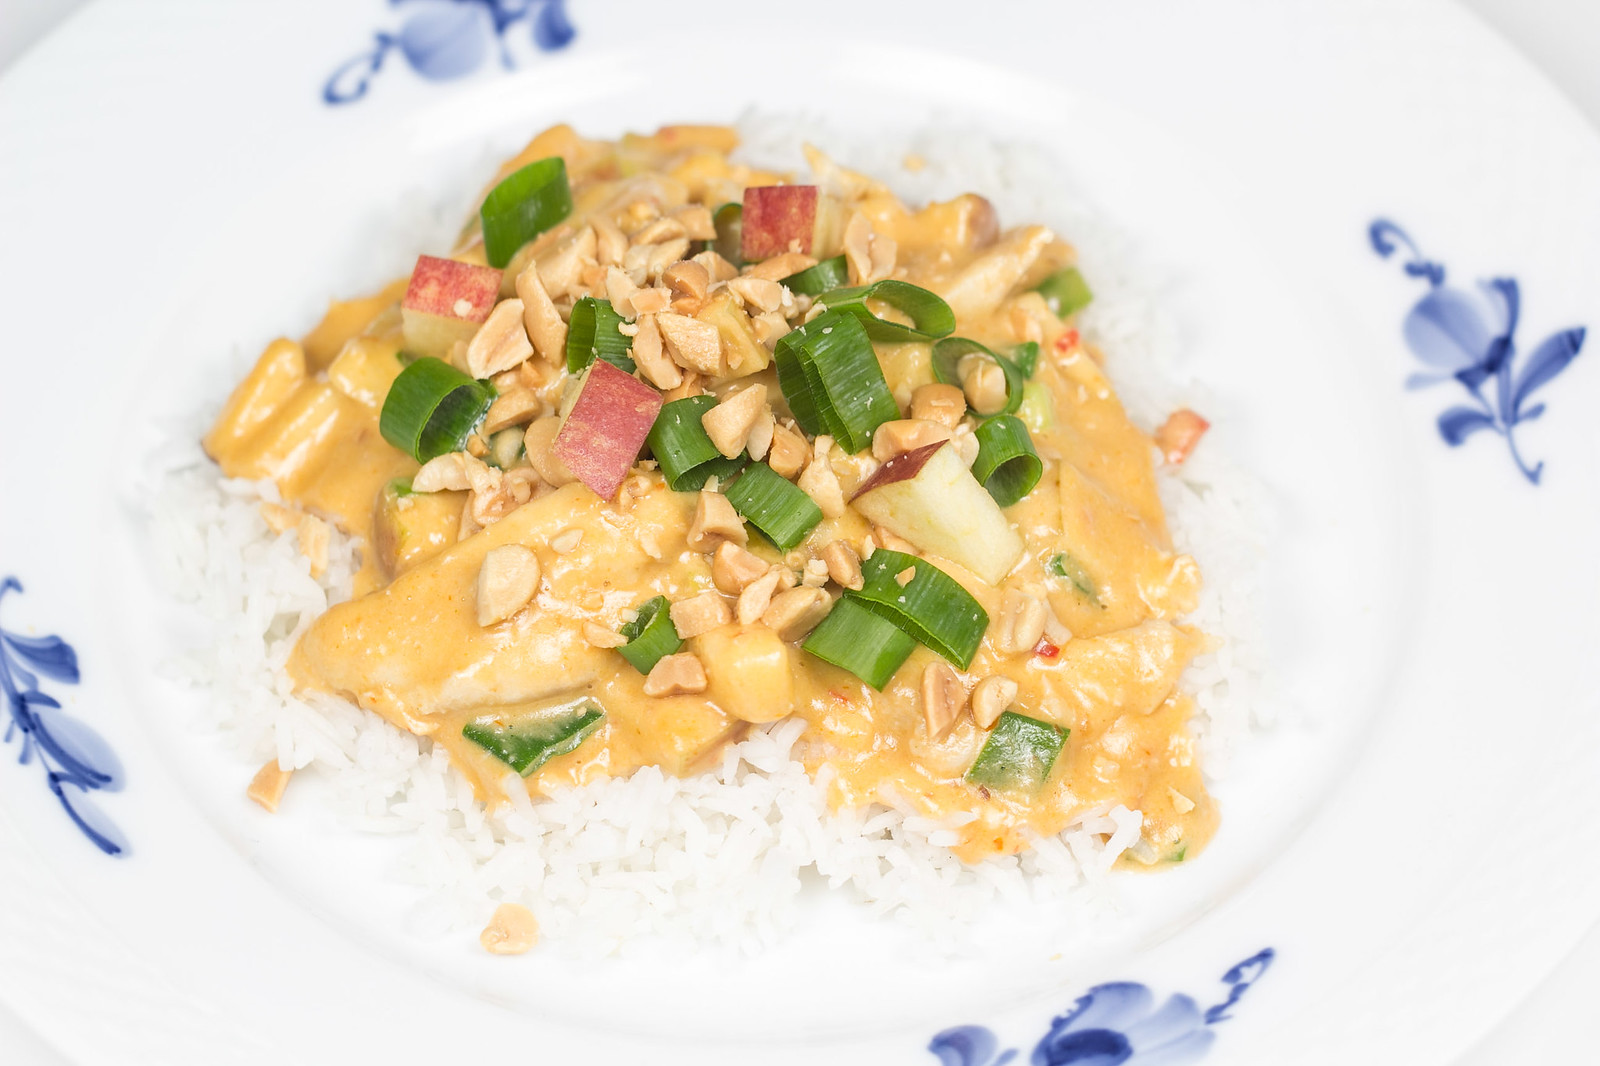
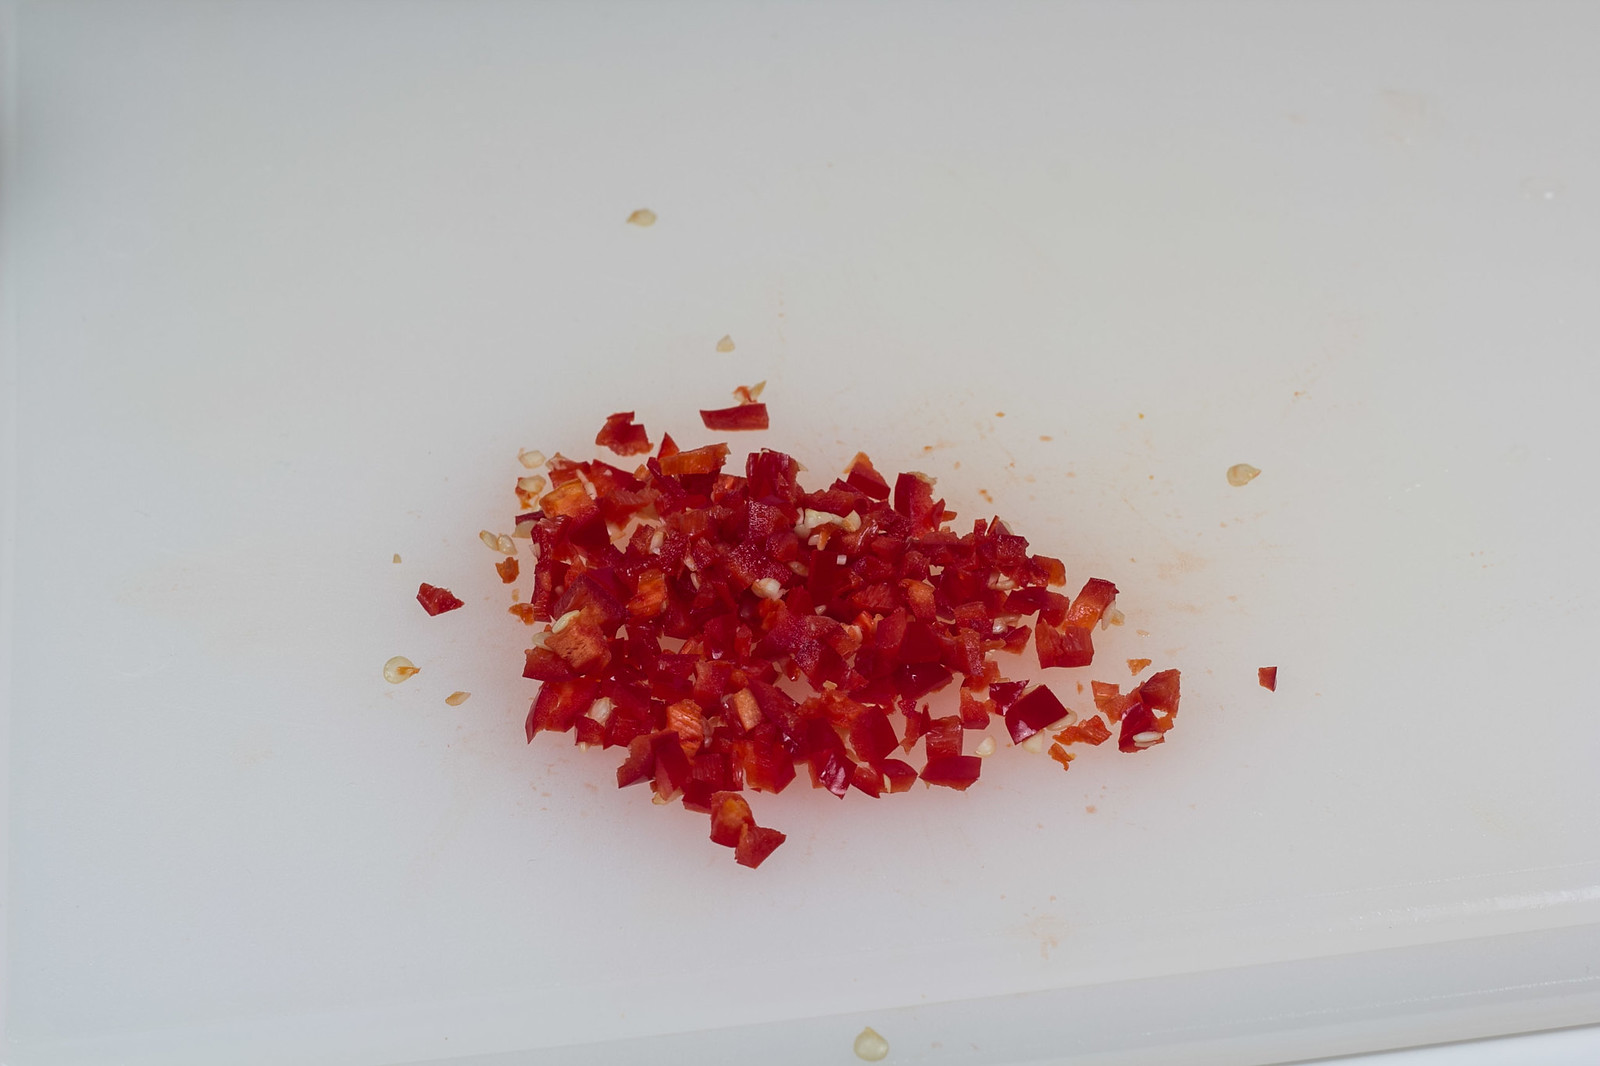
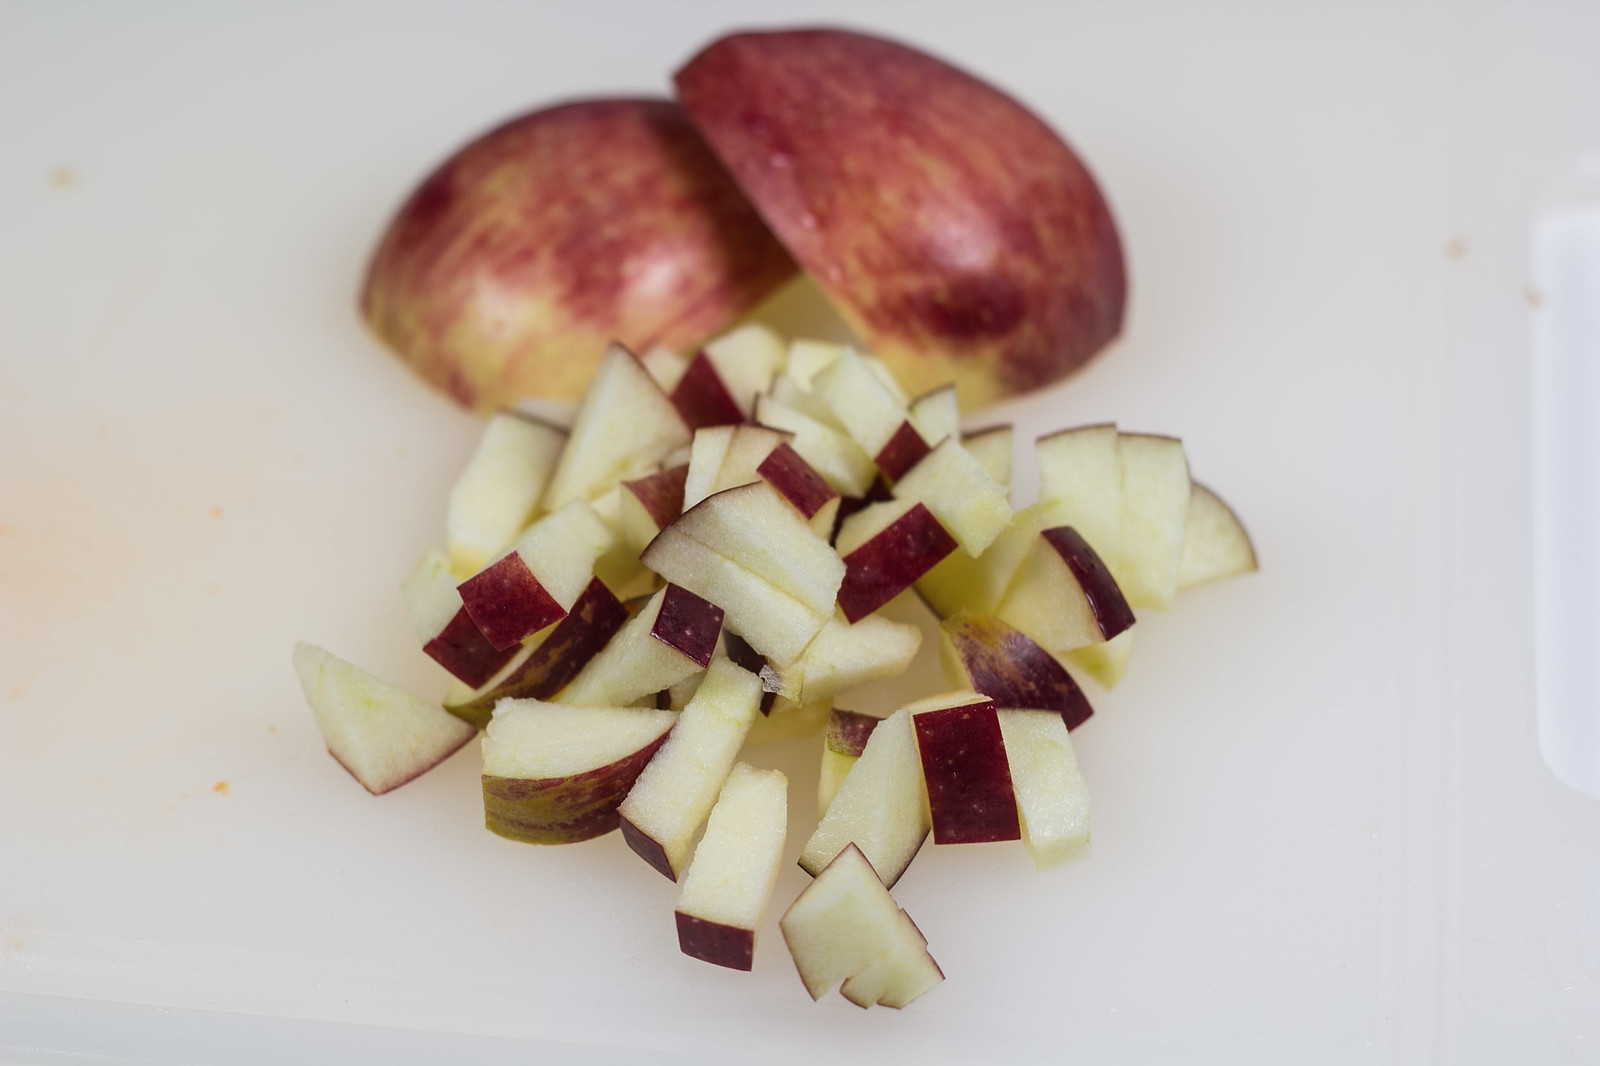
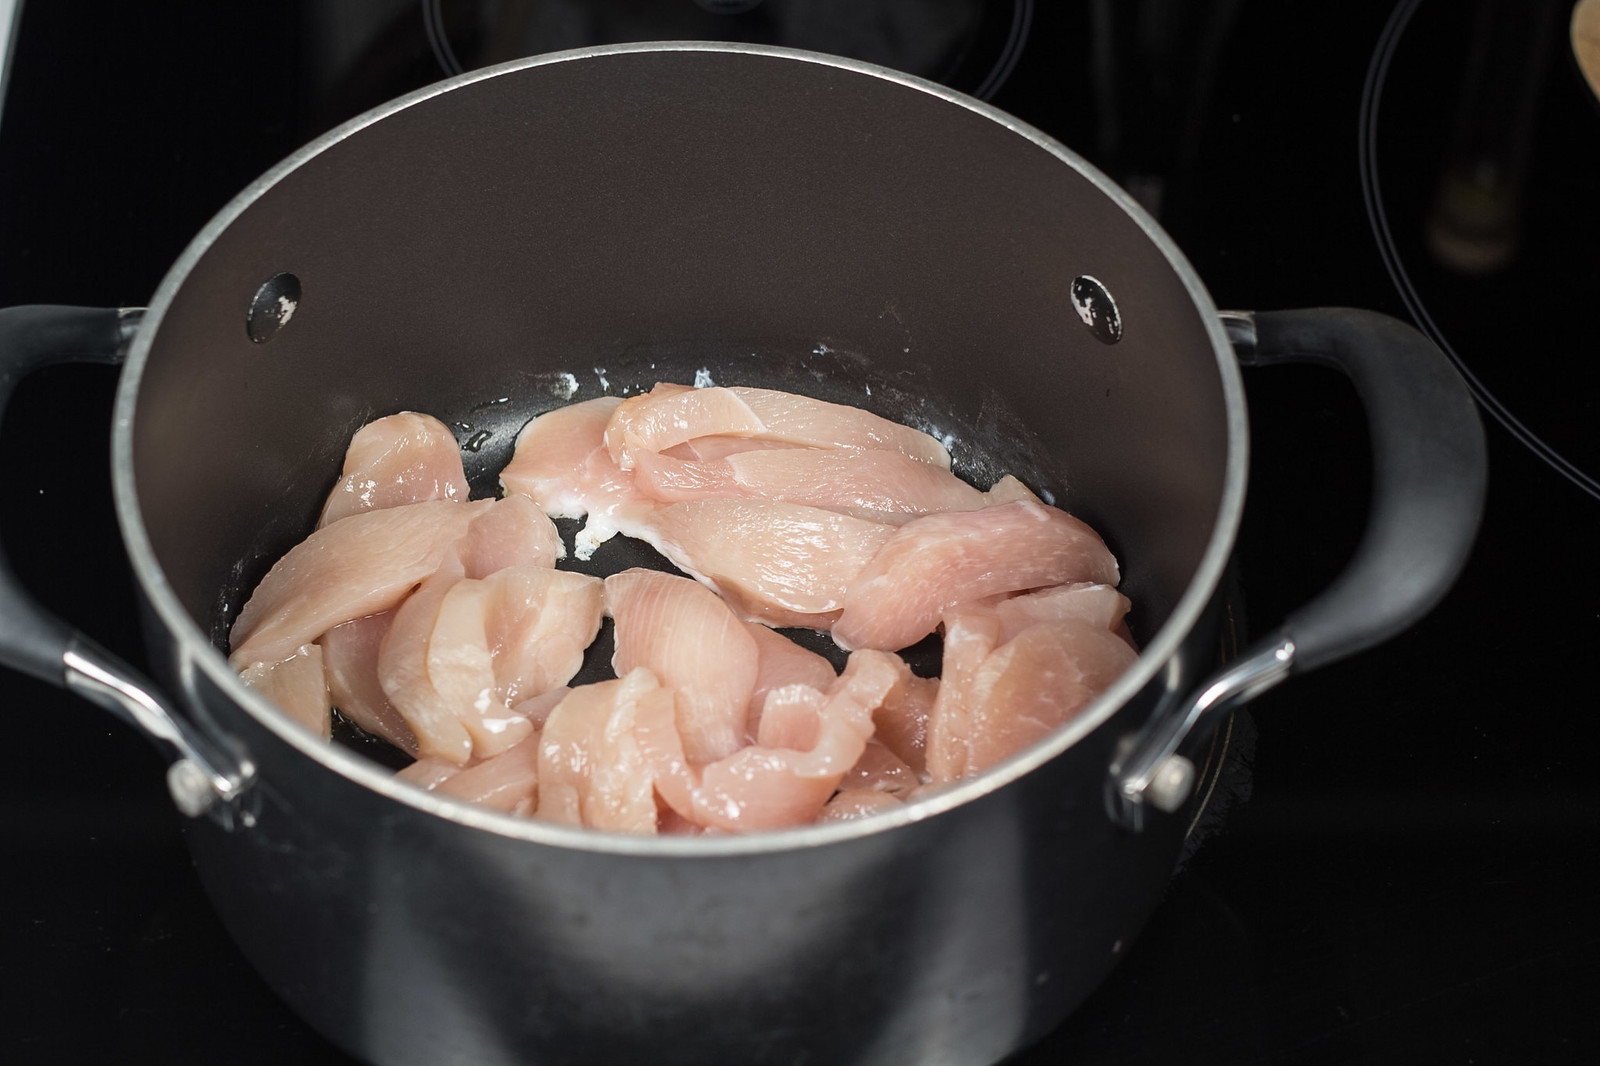
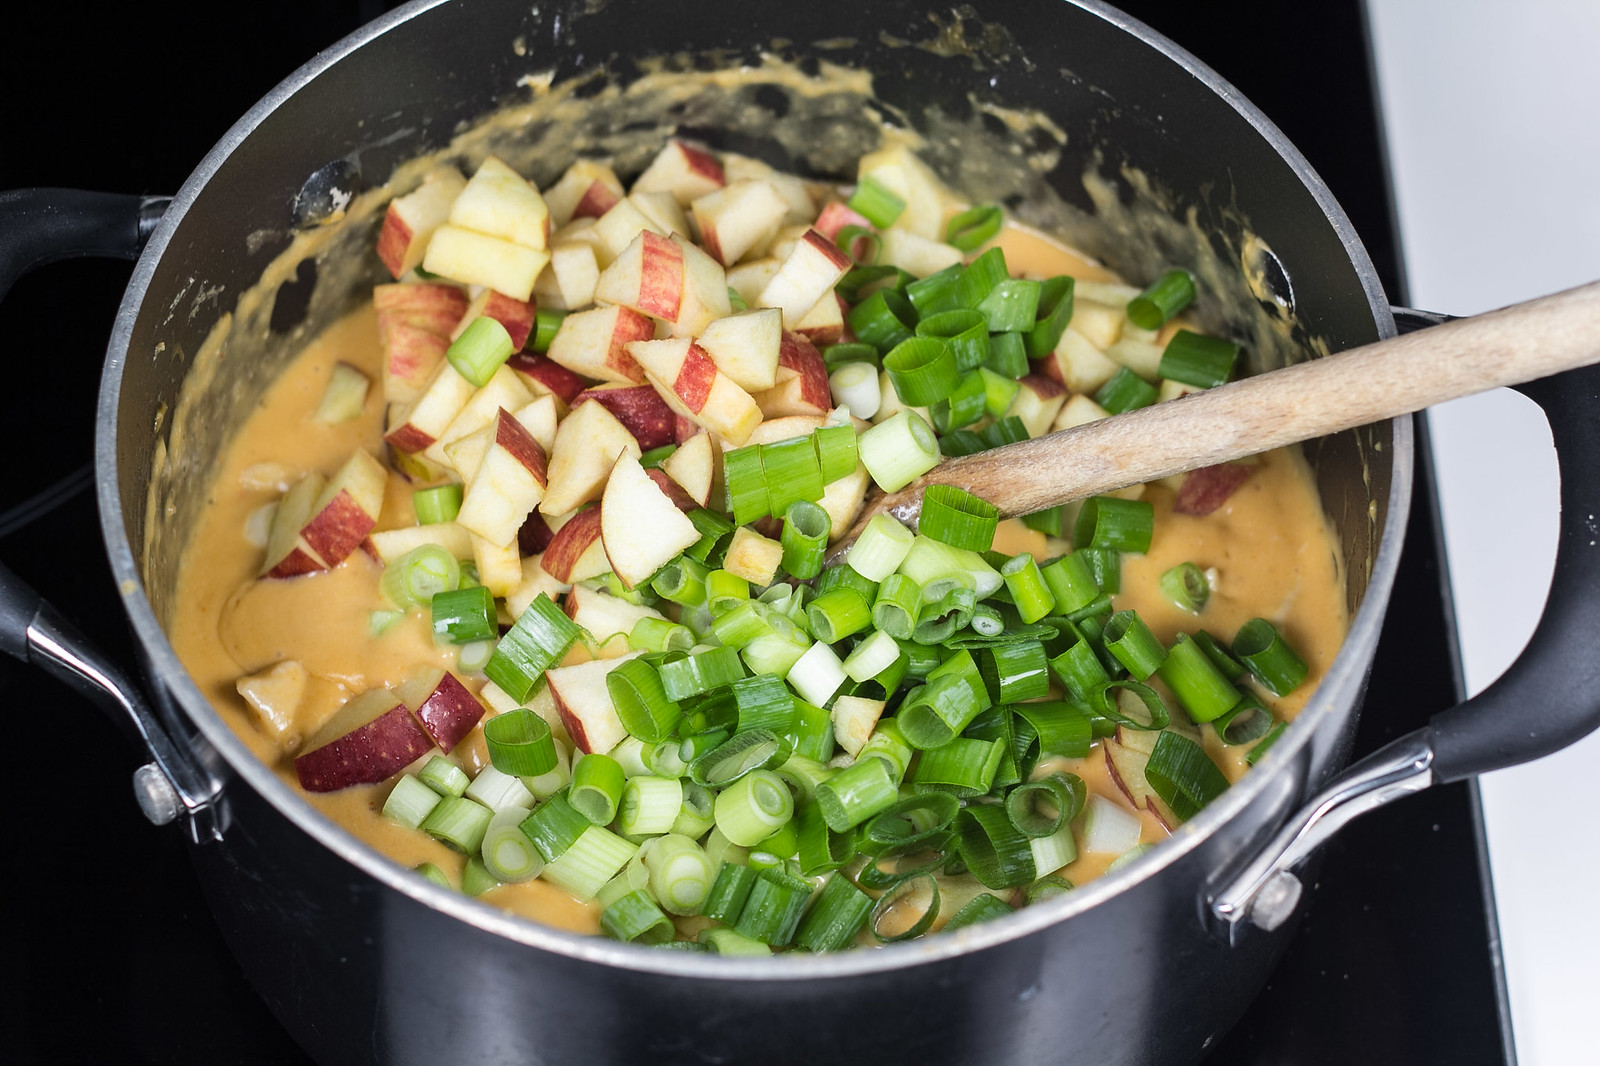
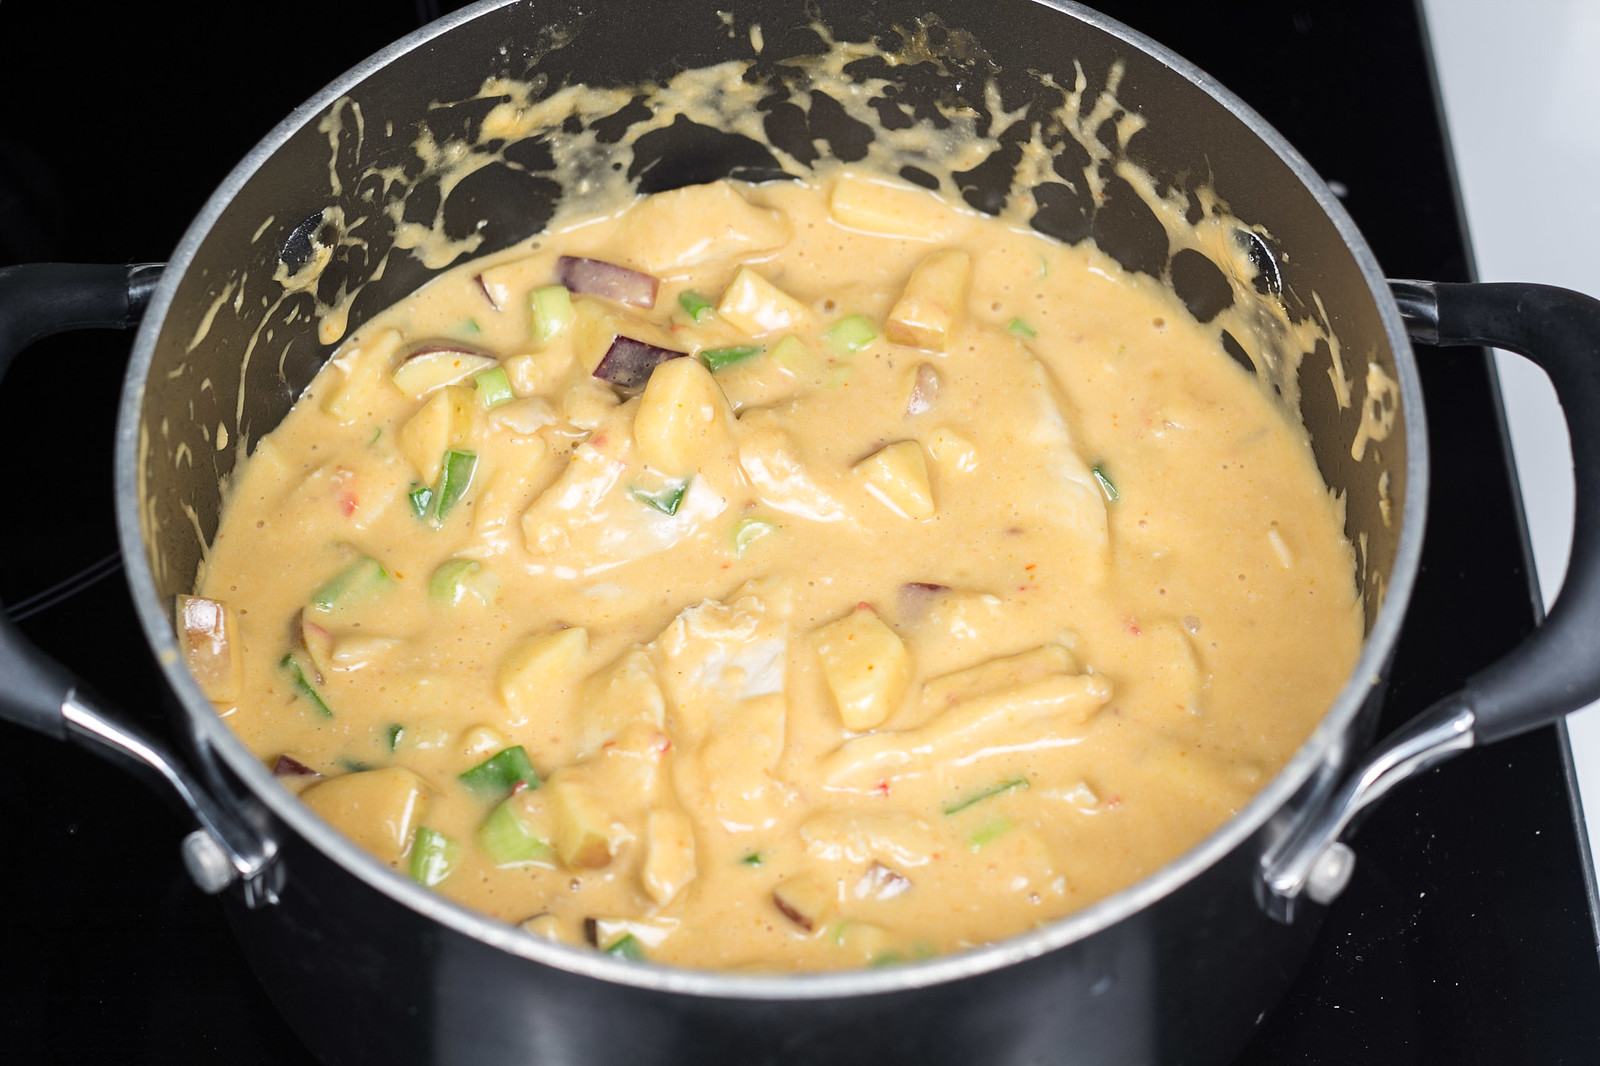
As said above, this peanut butter and chicken dish is actually not that difficult to prepare. You start by cutting the chicken breast into strips and fry them in a saucepan in a little oil. Then add the peanut butter, some chopped chili, the red curry pasta, coconut milk, milk, chicken stock and the juice from half a lime fruit. Let it all simmer for about 5-10 minutes. I normally prefer the sauce as it is after this time. However, if you prefer a thicker sauce add some thickener to make it thicker. Finally, add some diced apples and chopped spring onions - let it all heat up for a bit and then serve this delicious dish together with some freshly cooked rice and some salted peanuts as the final topping.
Peanut Butter Chicken with Apples and Spring Onions
Amount: 2-3 people
Preparation time: 30 minutes
Total Time: 40 minutes
Danish title: Peanut butter kylling med æbler
Cuisine: Danish
Category: dinner
Ingredients:
350 g (12 oz) chicken filet (boneless)
1/2 red chili
2 apples
3 spring onion (green onions)
3 tbsp peanut butter
1 can coconut milk (400 ml - 13.5 fl oz)
1 dl (1/2 cup) milk
2 tsp red curry pasta
1 cube chicken stock (about 10 g or 1/3 oz)
1/2 lime, the juice
some thickener
salt
On the Side:
Rice
Salted peanuts
Instructions:
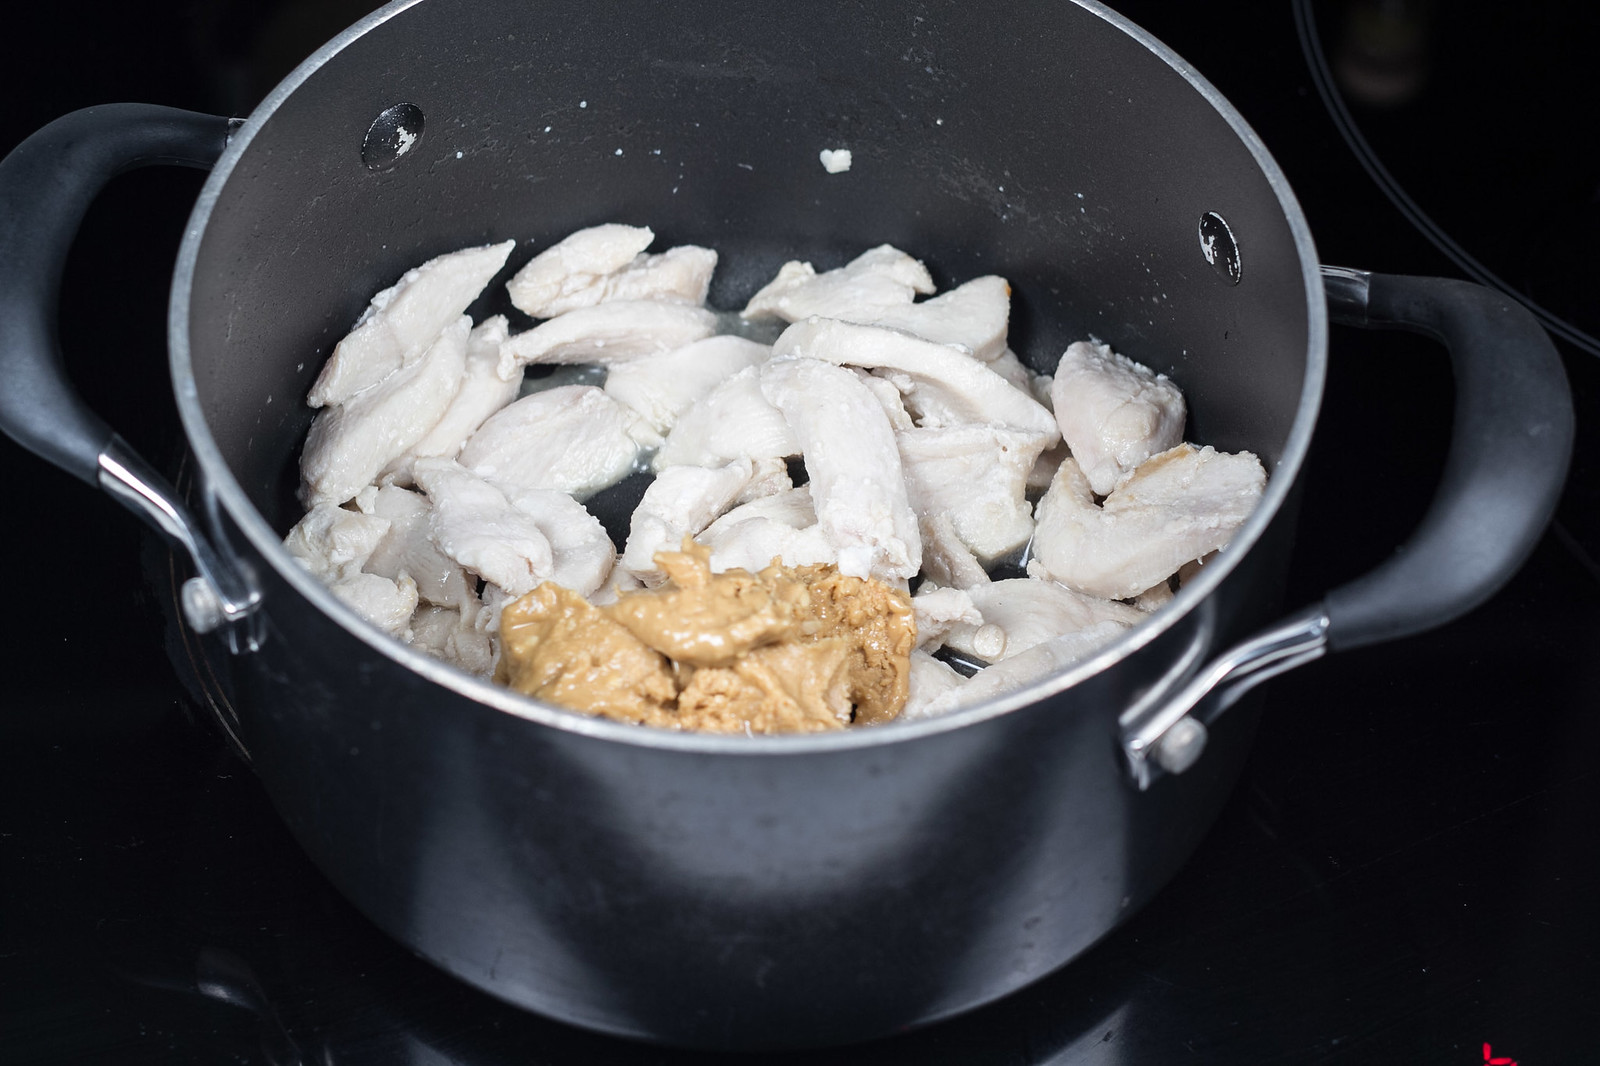
1. Cut the chicken filet into smaller pieces, finely chop the chili, peel and dice the apples and chop the green onions.
2. In a saucepan; fry the chicken gently in a little oil.
3. Add the peanut butter and let it melt a little for about 1-2 minutes. Stir in it frequently.
4. Add the chopped chili and red curry pasta. Stir and mash it together with the peanut butter.
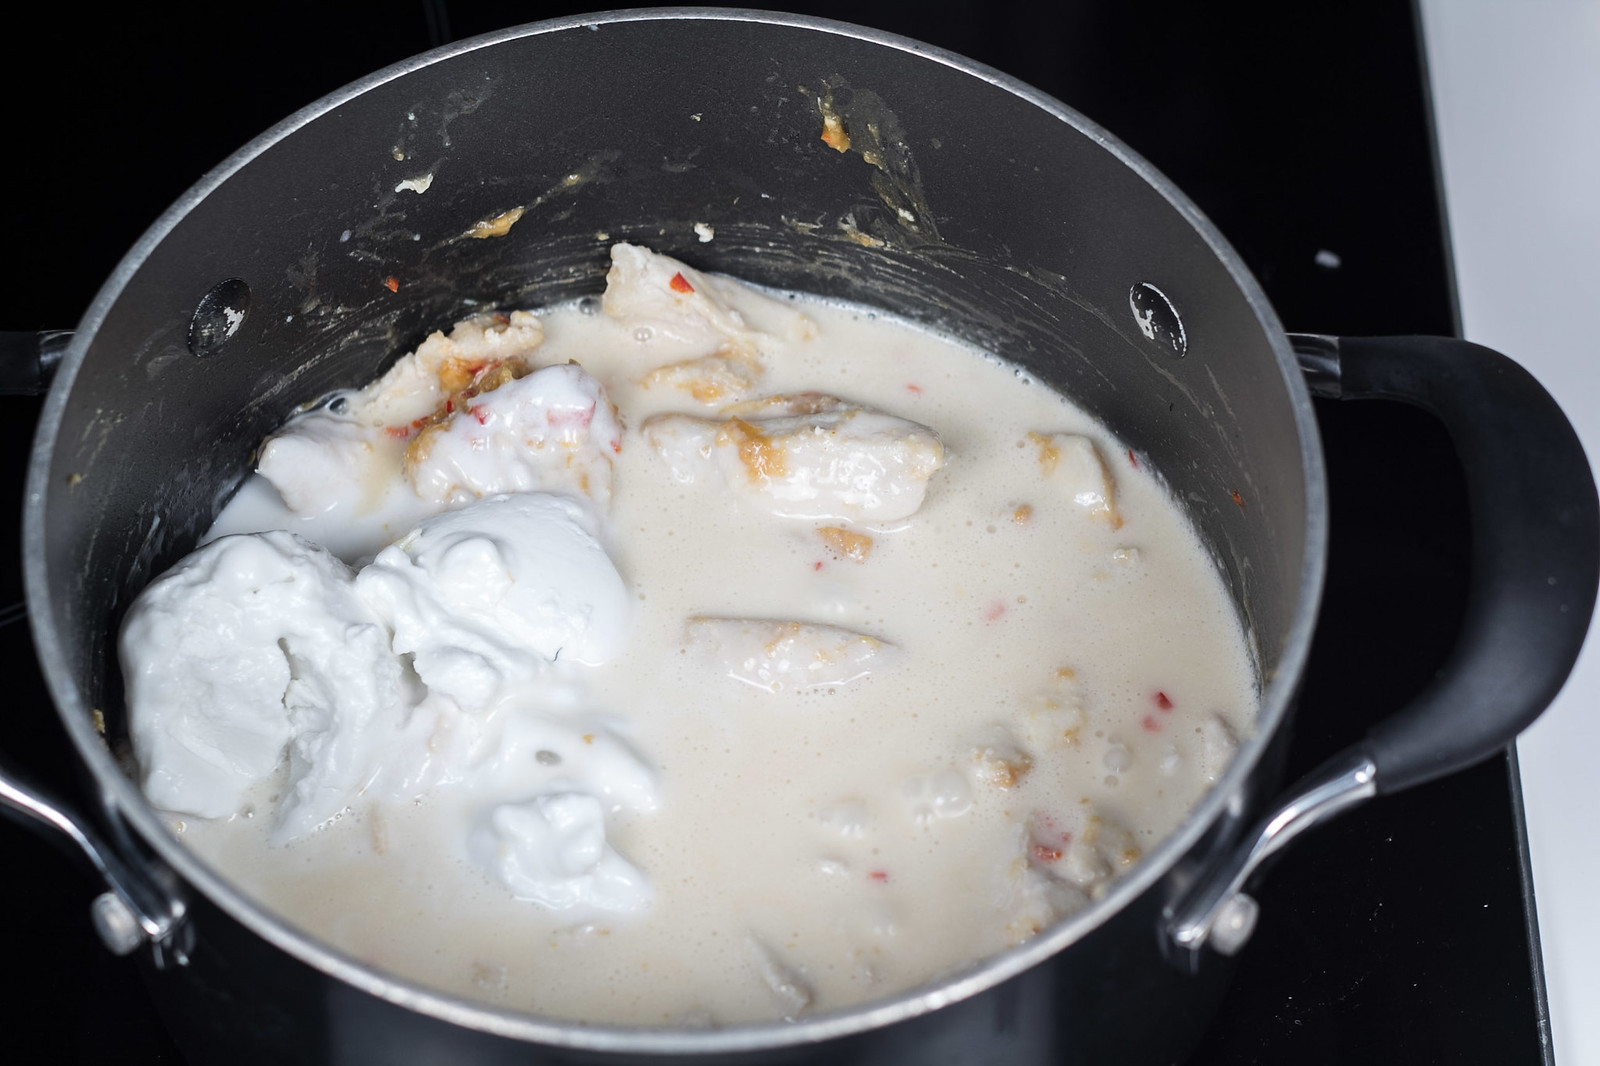
5. Add the coconut milk, the concentrated chicken stock, milk, and the juice from half a lime. Let it all simmer for about 5-10 minutes.
6. Make the sauce a little thicker using some thickener. Make the sauce as thick as you like - this it up to you own preferences.
7. Add the diced apples and the green onions. Simmer everything for another 5 minutes on low heat.
8. Finally, add the salt to taste and maybe a little more lime juice if you like.
Tip: Serve this peanut butter sauce together with some freshly prepared rice. Top the dish with some coarsely chopped salted peanuts.
The post Peanut Butter Chicken with Apples and Spring Onions appeared first on Nordic Food & Living.
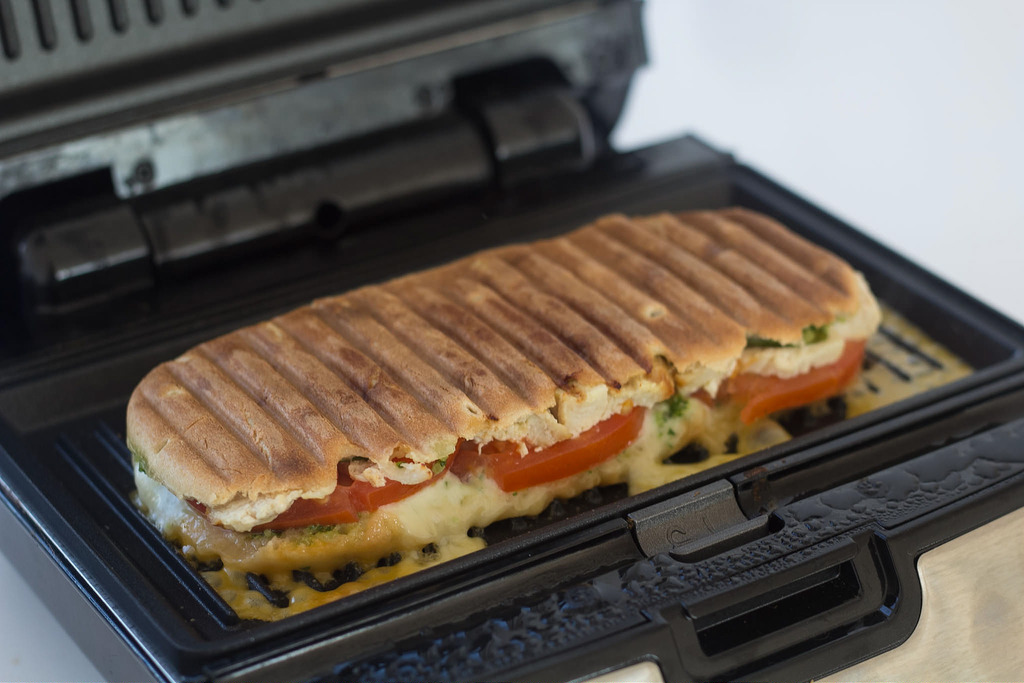
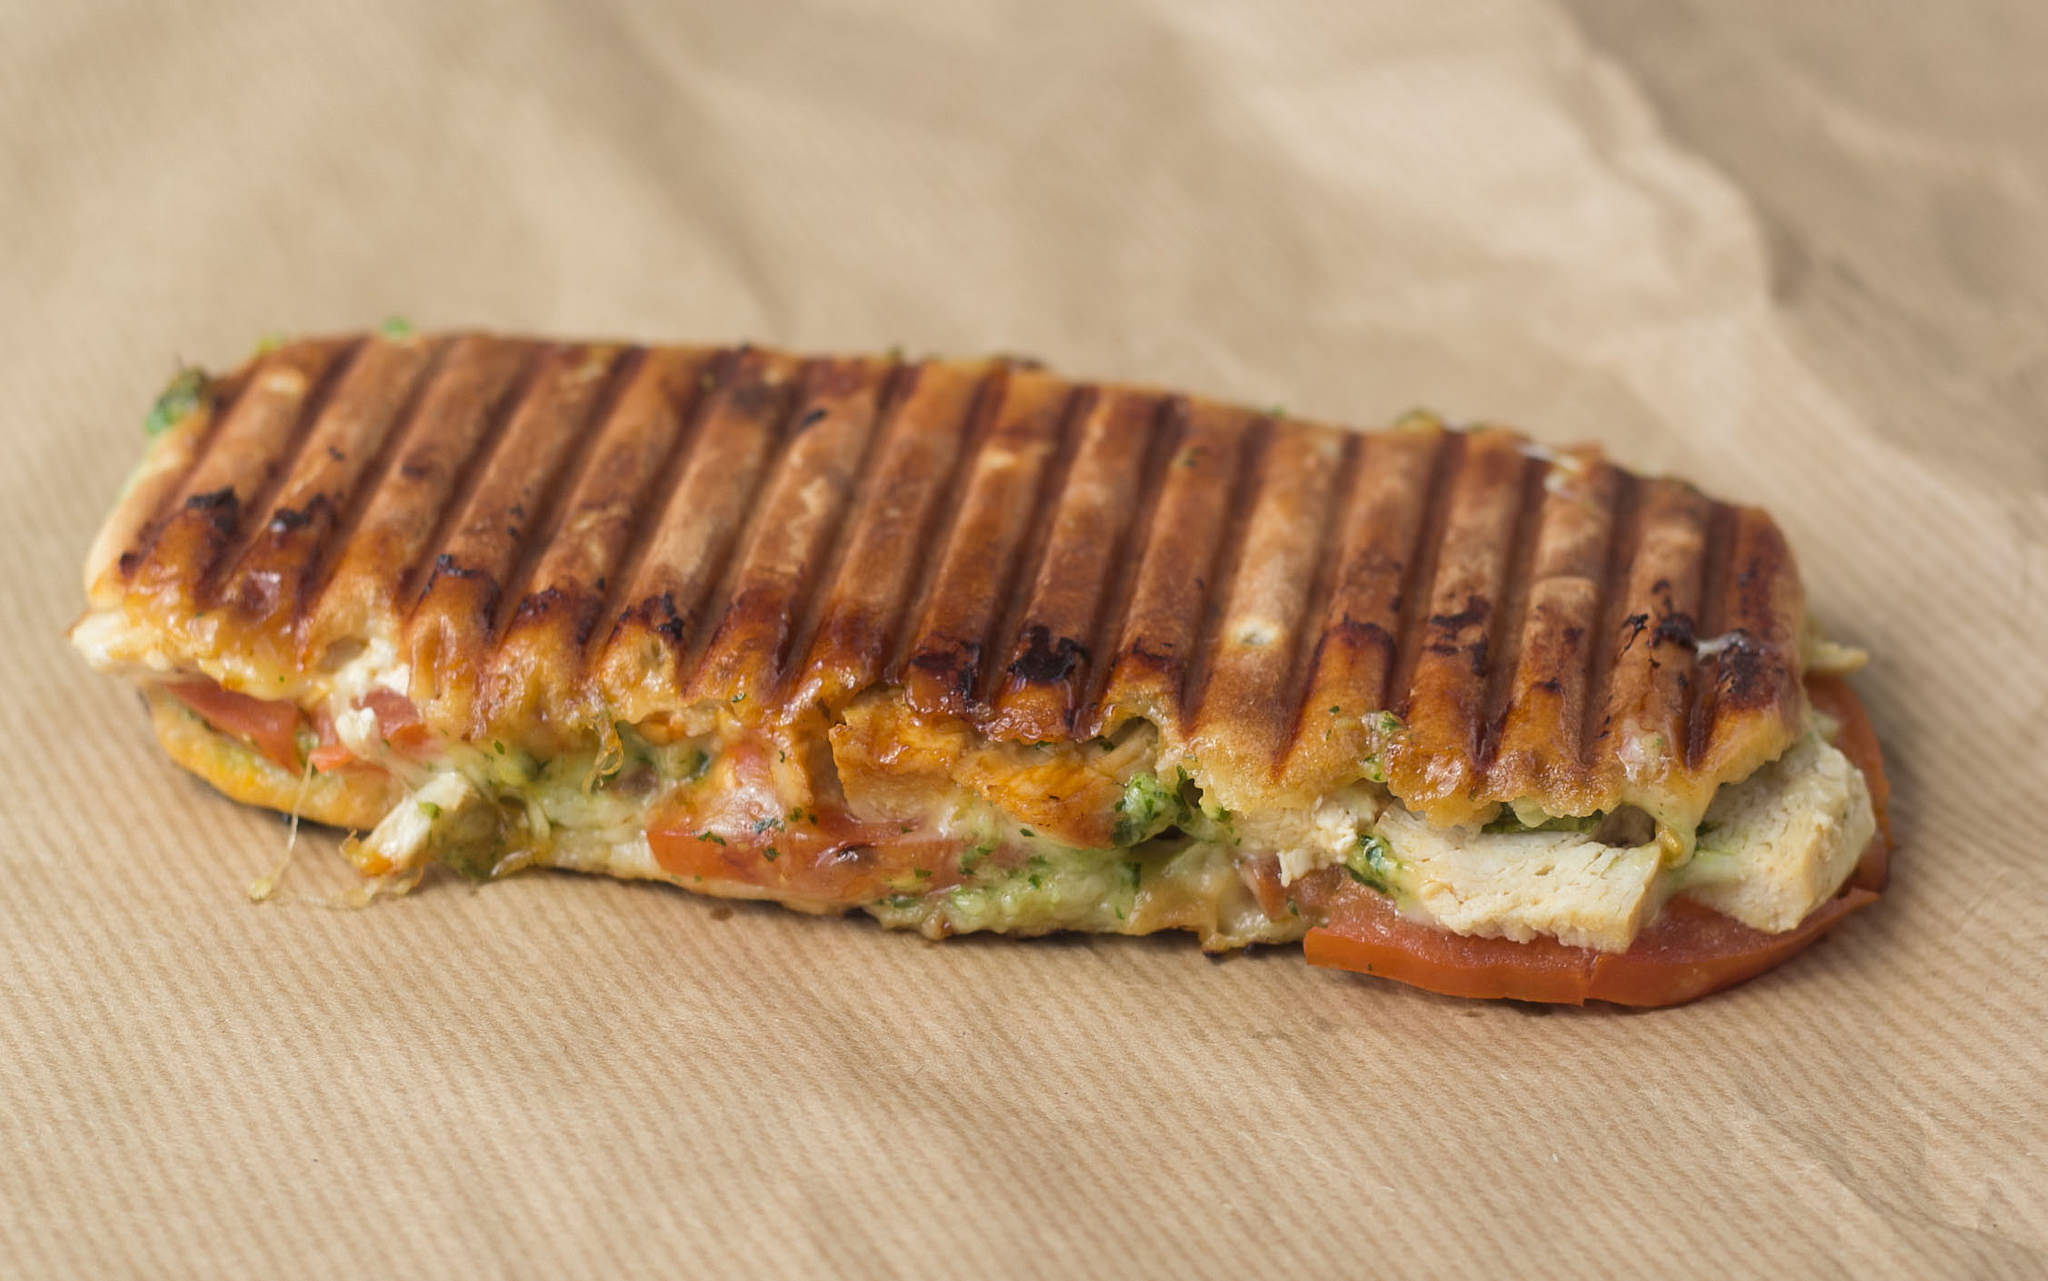
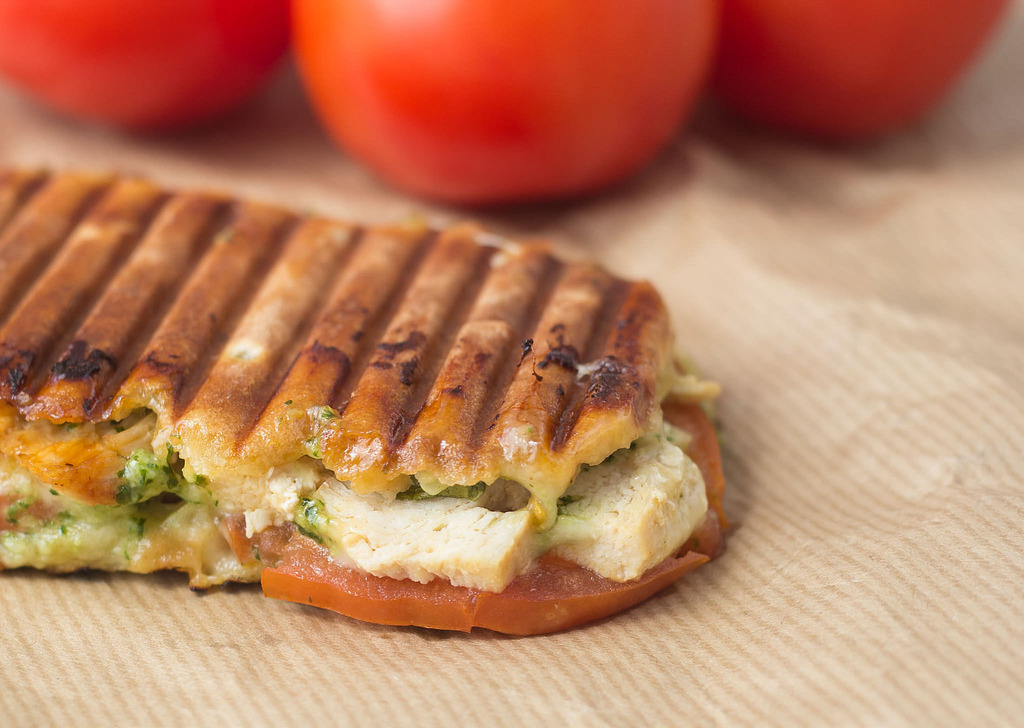
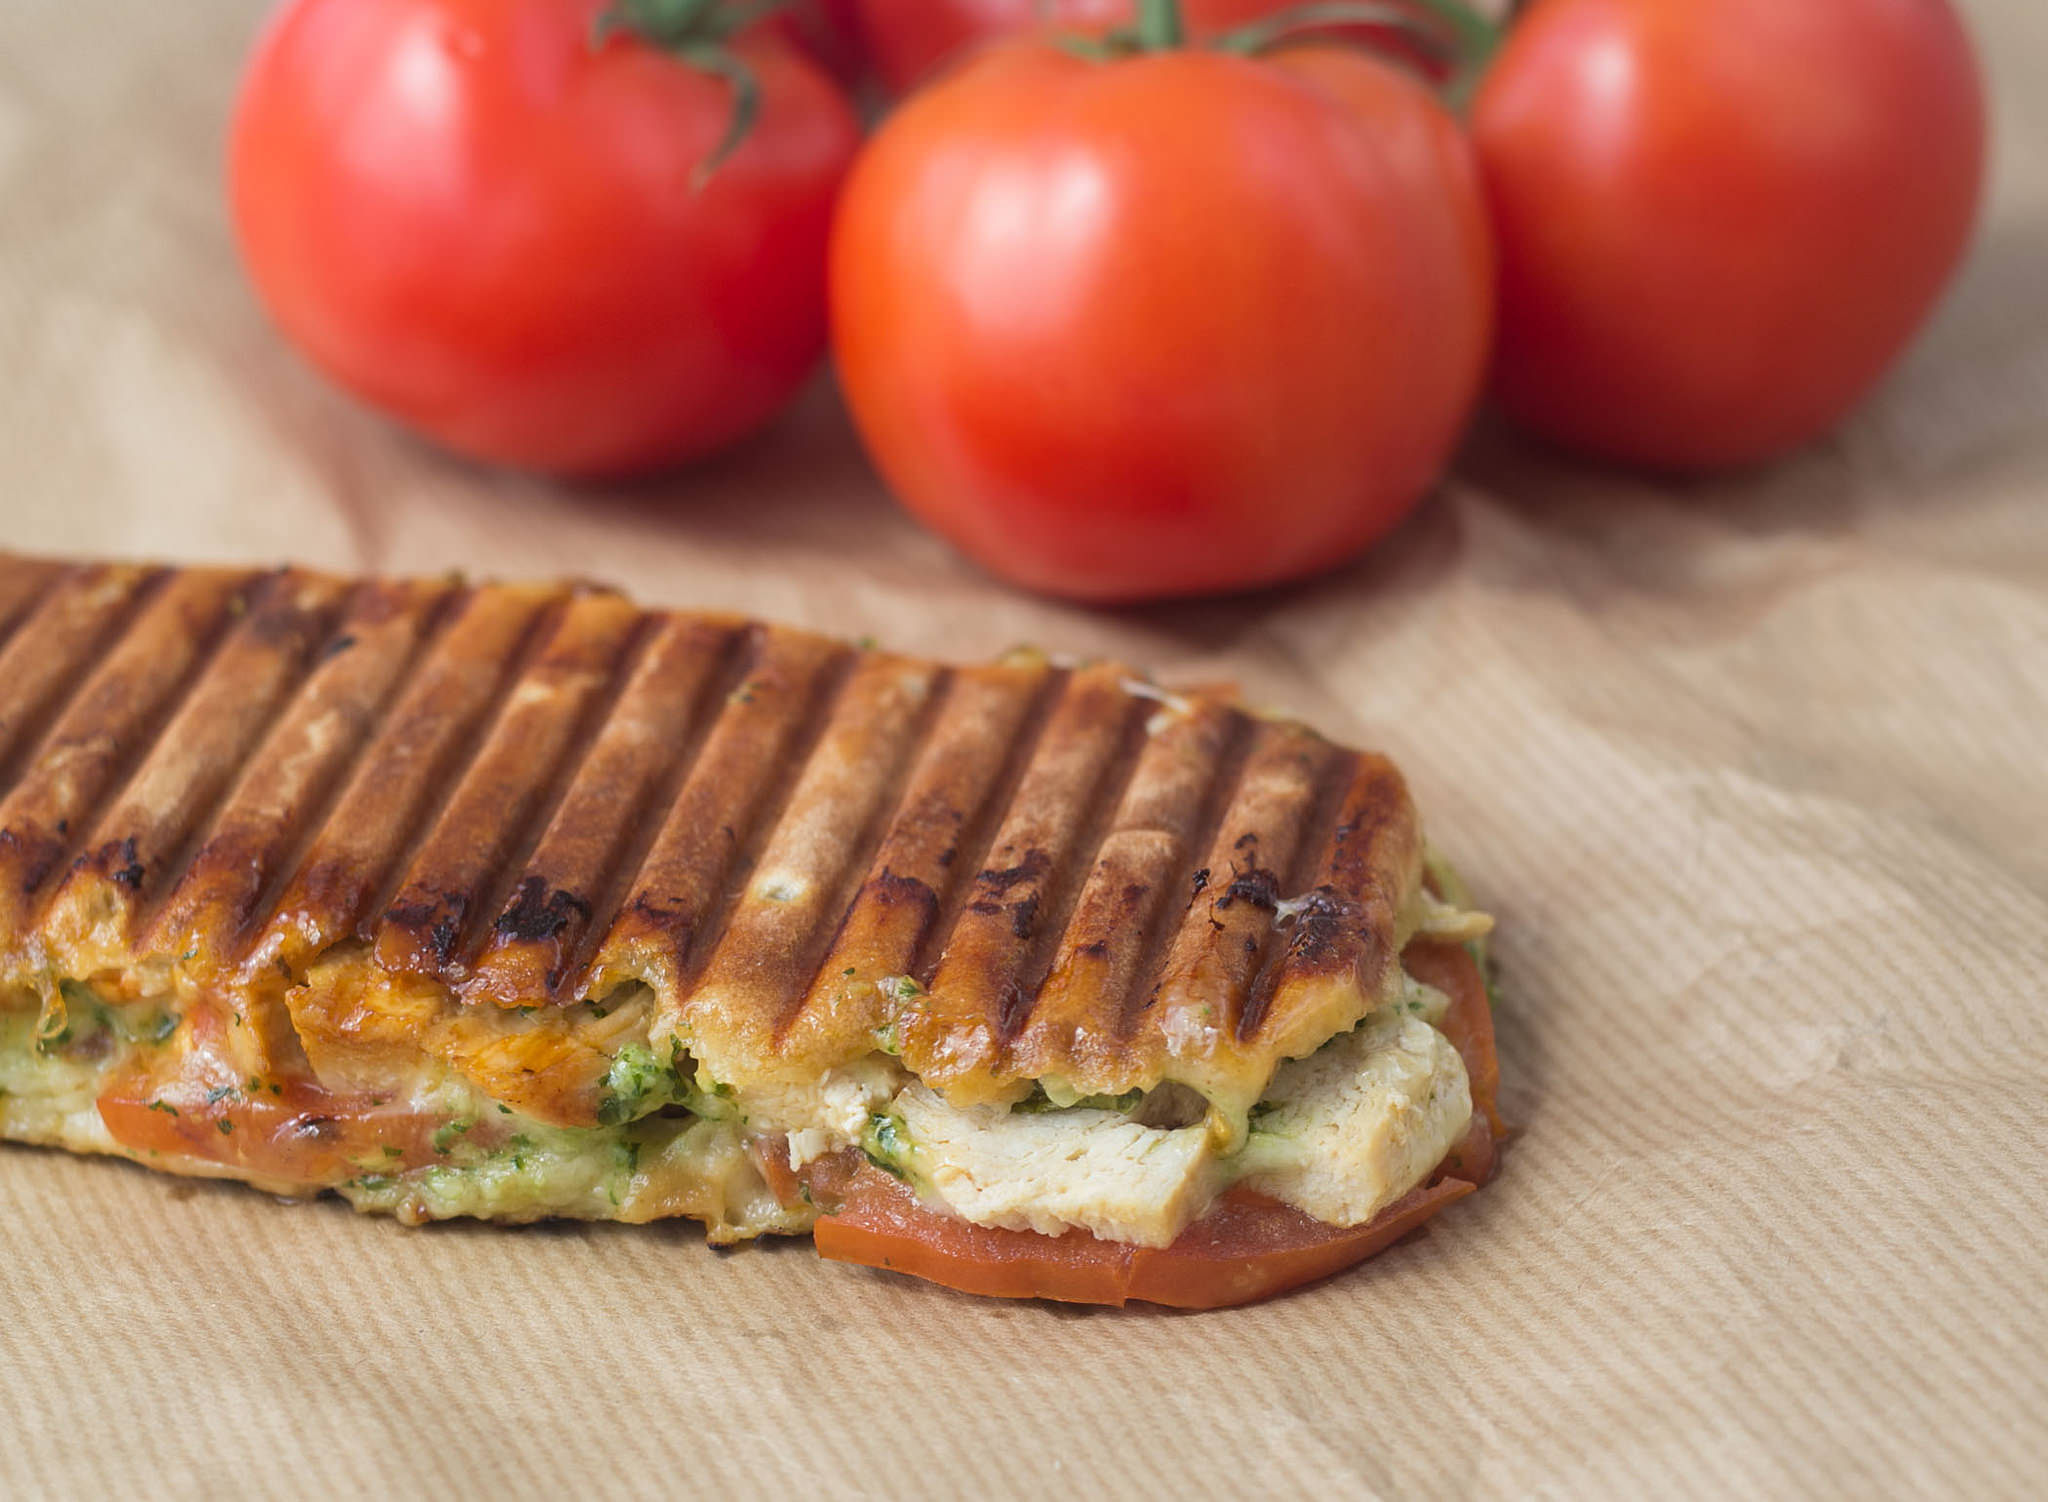
]]>The post Panini with Chicken, Pesto & Mozzarella appeared first on Nordic Food & Living.
]]>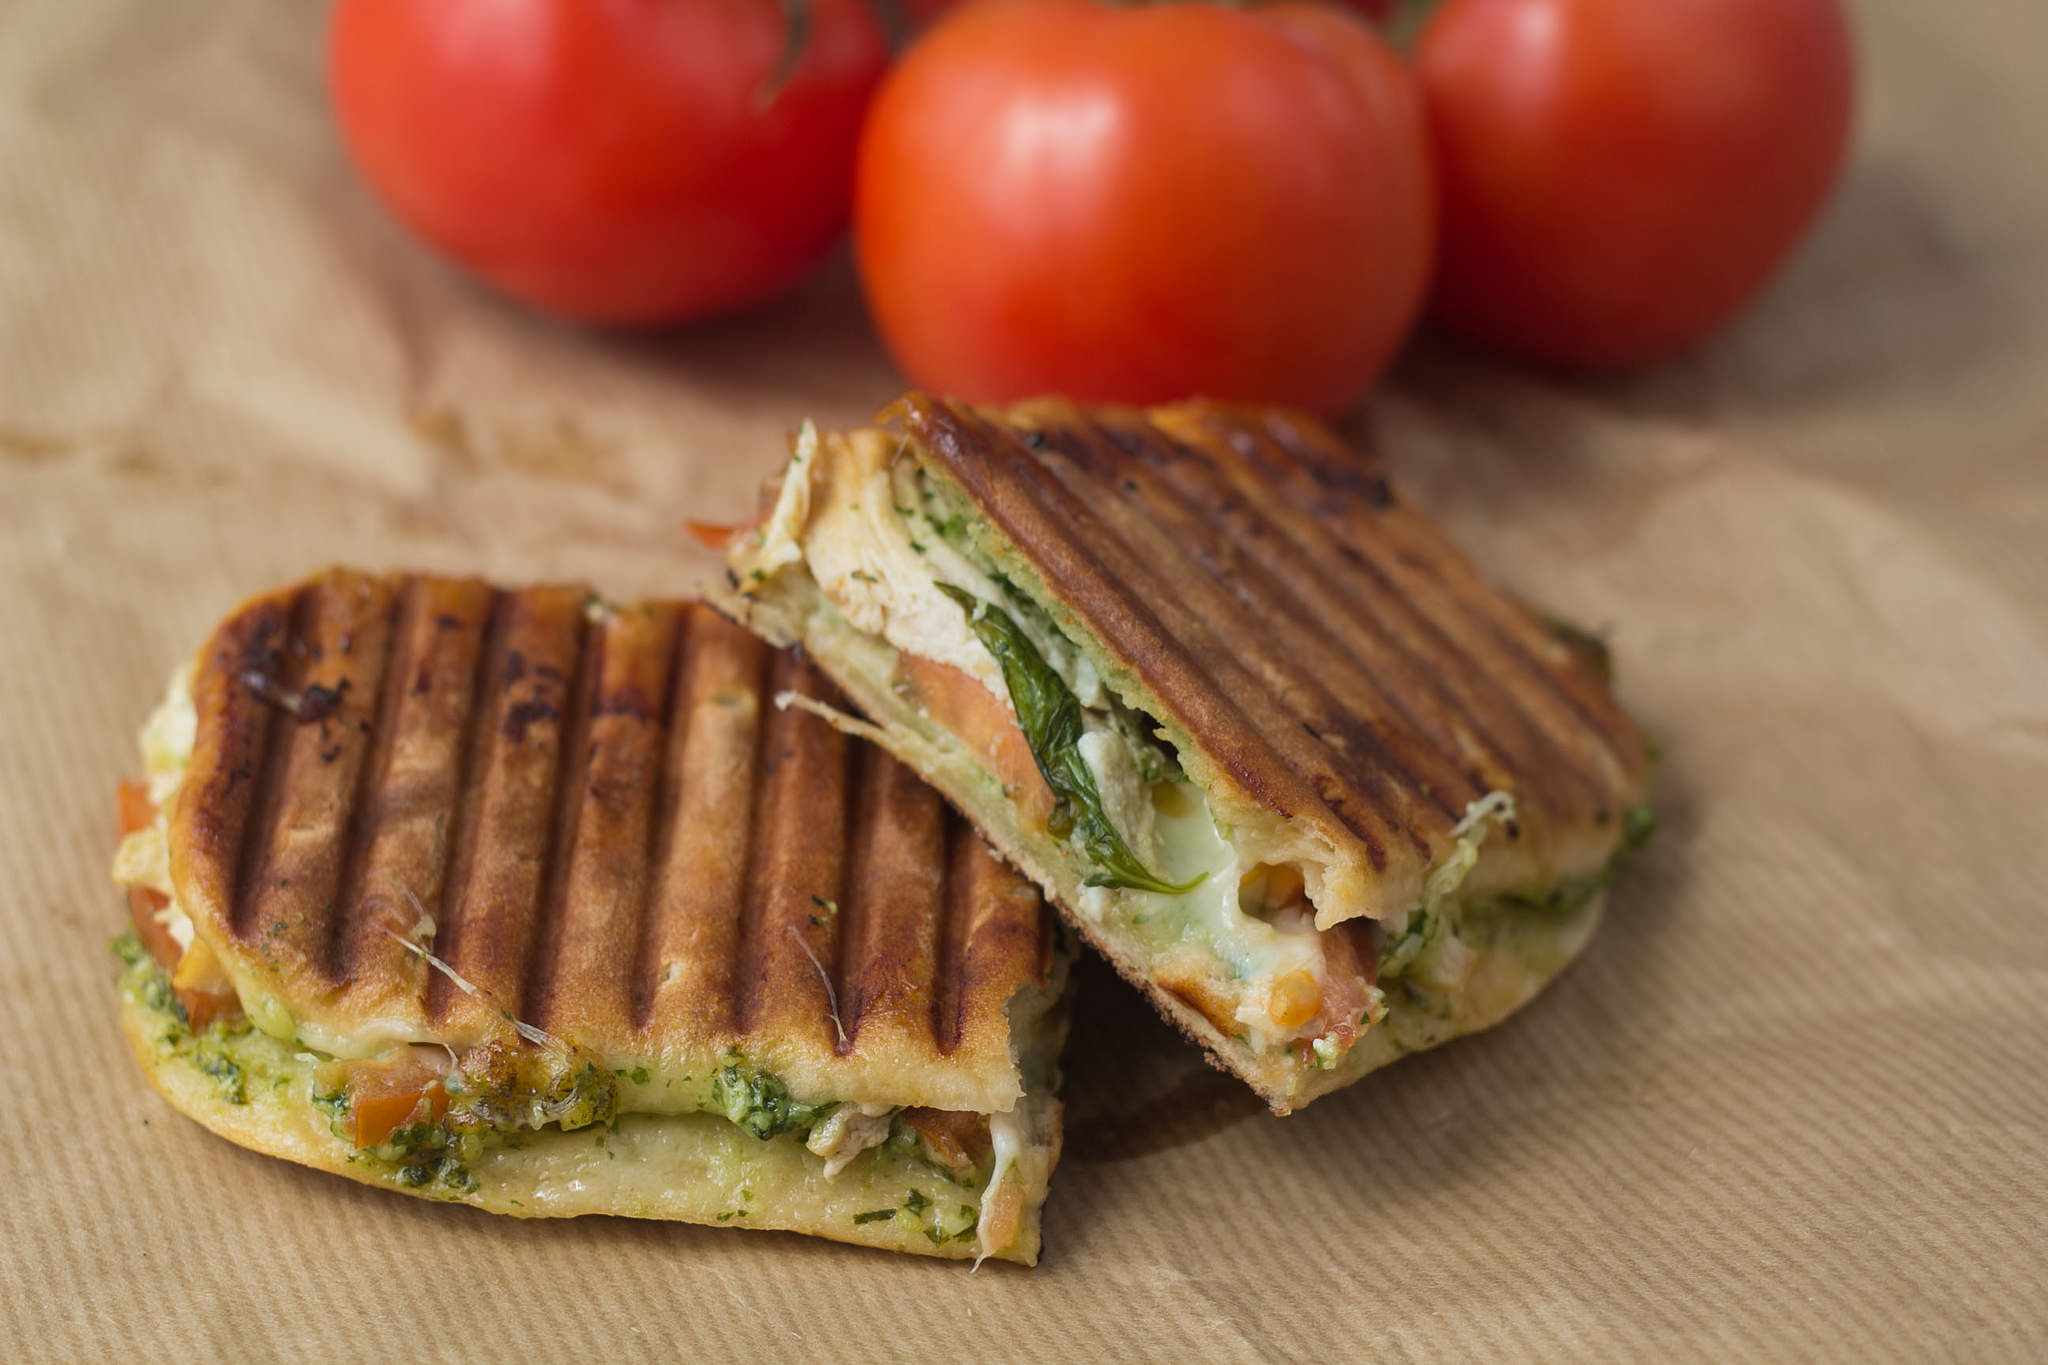
Panini can be varied in lots of ways. You can even make a delicious vegetarian version. Maybe one with avocado, mozzarella and tomato would be great too.
Panini with Chicken, Pesto & Mozzarella
2 panini
Preparation time: 15 minutes
Ingredients
2 panini bread or sandwich bread
1 chicken fillets
Basili pesto, maybe homemade
1 tomato
125 g (4.5 oz) fresh mozzarella
Preparation
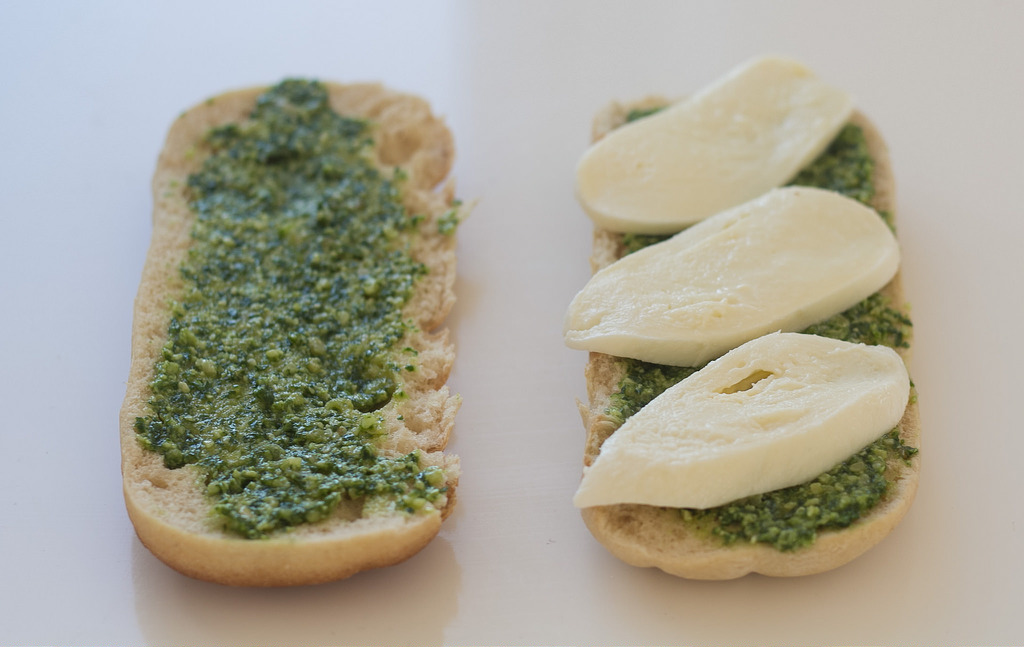
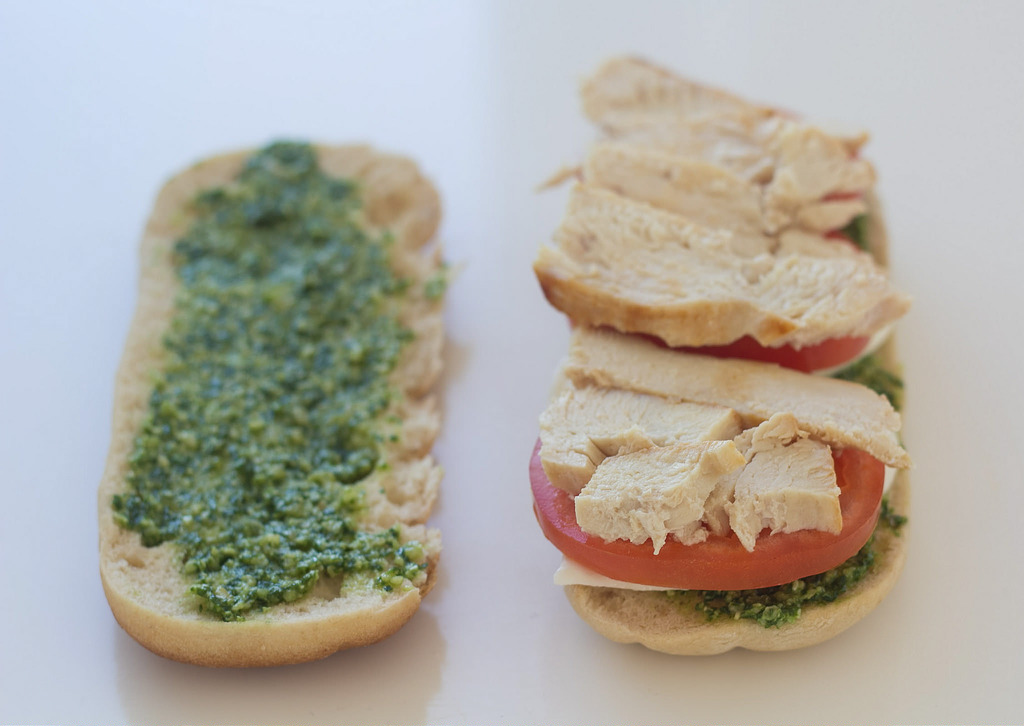
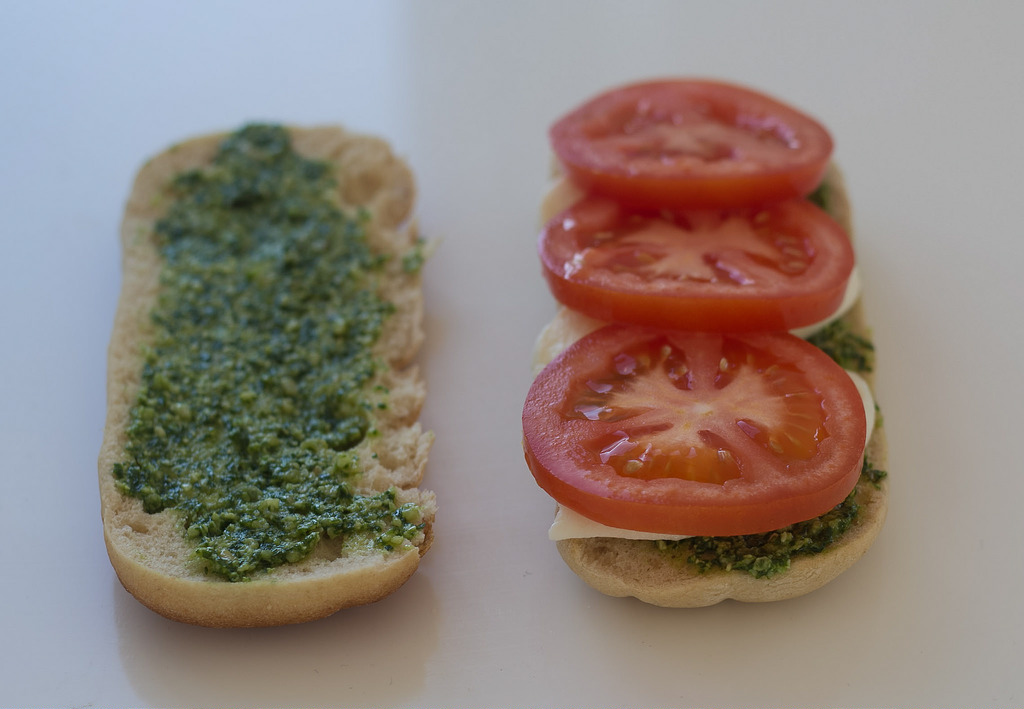
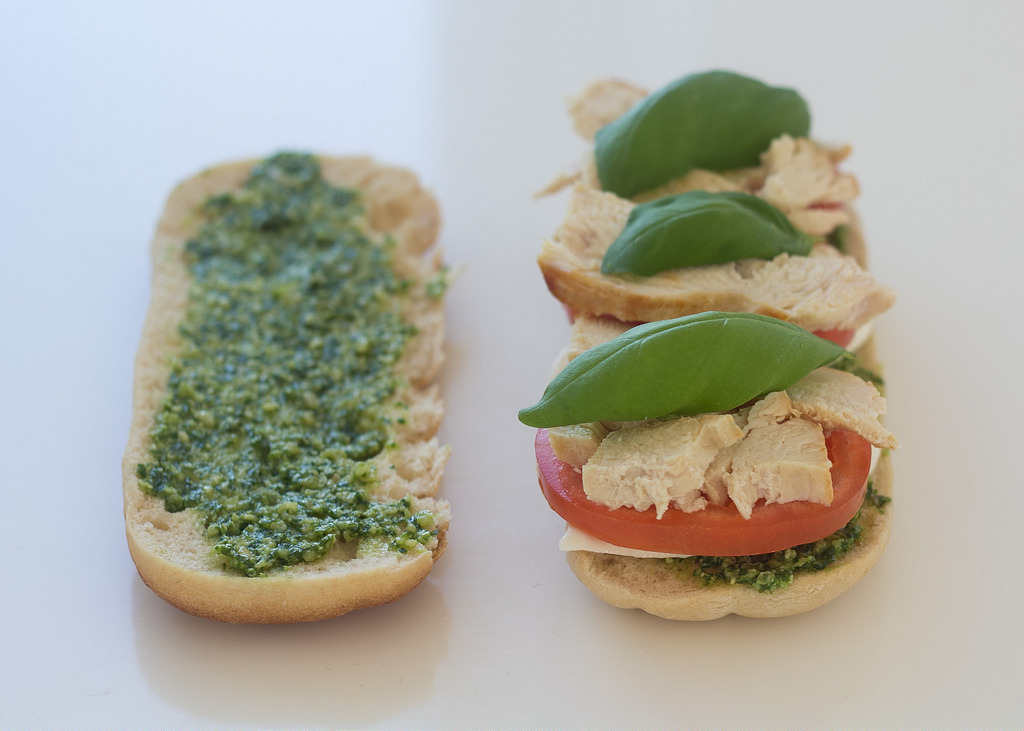
Step 1: Heat a pan with a little bit of oil. Season the chicken with a bit of salt and cook until the chicken is well done.
Step 2: Cut the fried chicken in slices.
Step 3: Slice the tomato.
Step 4: Slice the mozzarella.
Step 5: Slice the bread in half and spread pesto on the bread.
Step 6: Add the mozzarella slices, tomato slices and chicken slices on the bread and close the sandiwch.
Step 7: Place the sandwich in the panini grill and close the lid until the panini is done.


The post Panini with Chicken, Pesto & Mozzarella appeared first on Nordic Food & Living.
]]>The post Chicken Lasagna with Spinach, Cottage Cheese and Béchamel Sauce appeared first on Nordic Food & Living.
]]>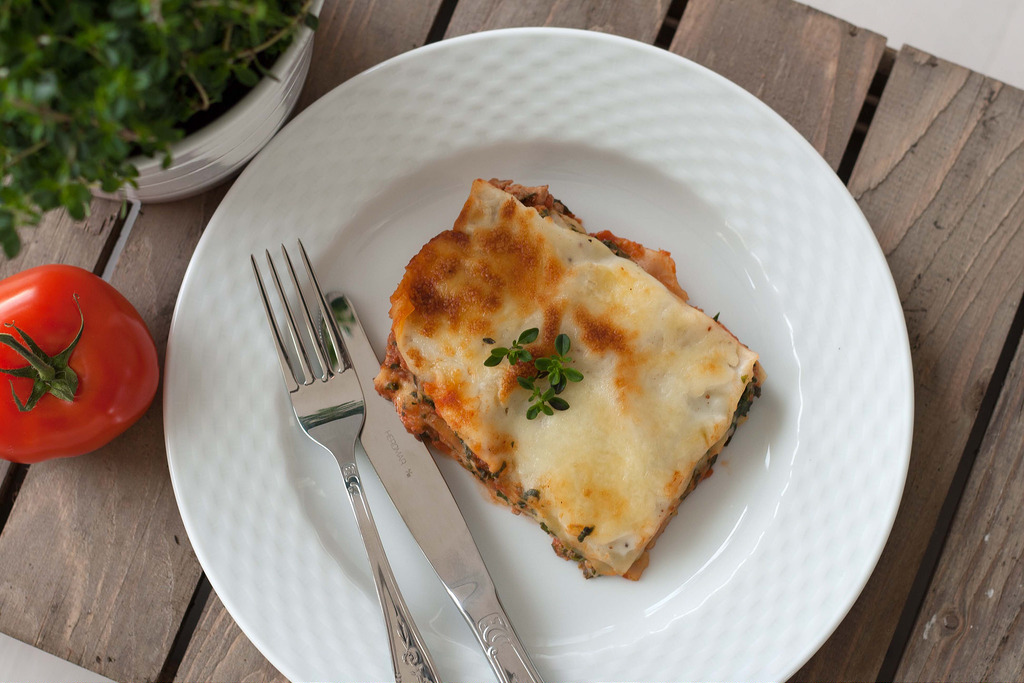
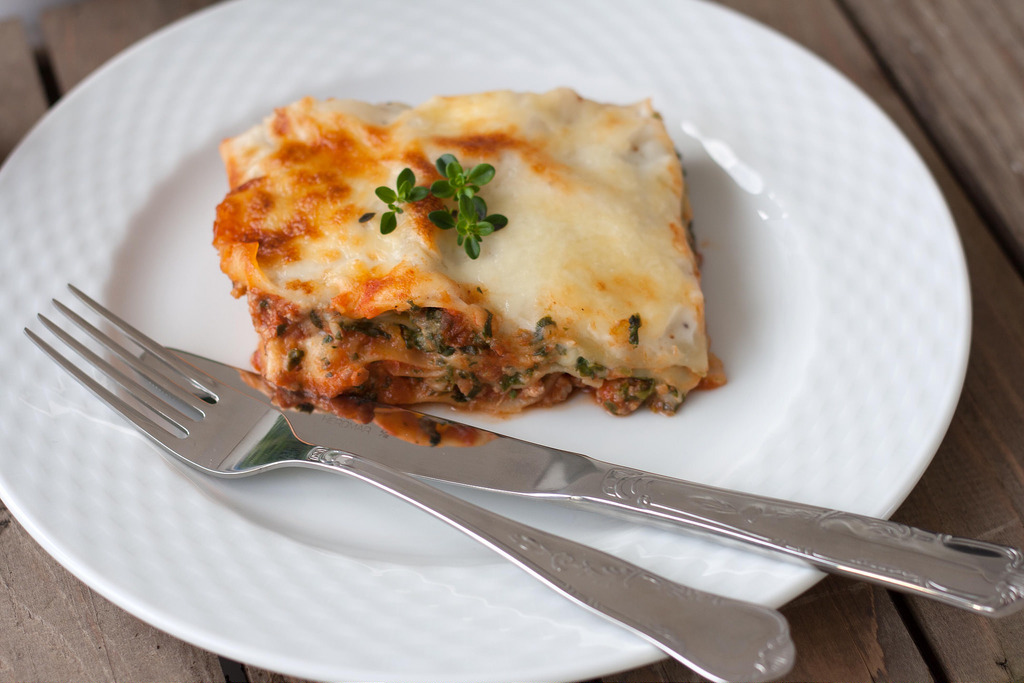
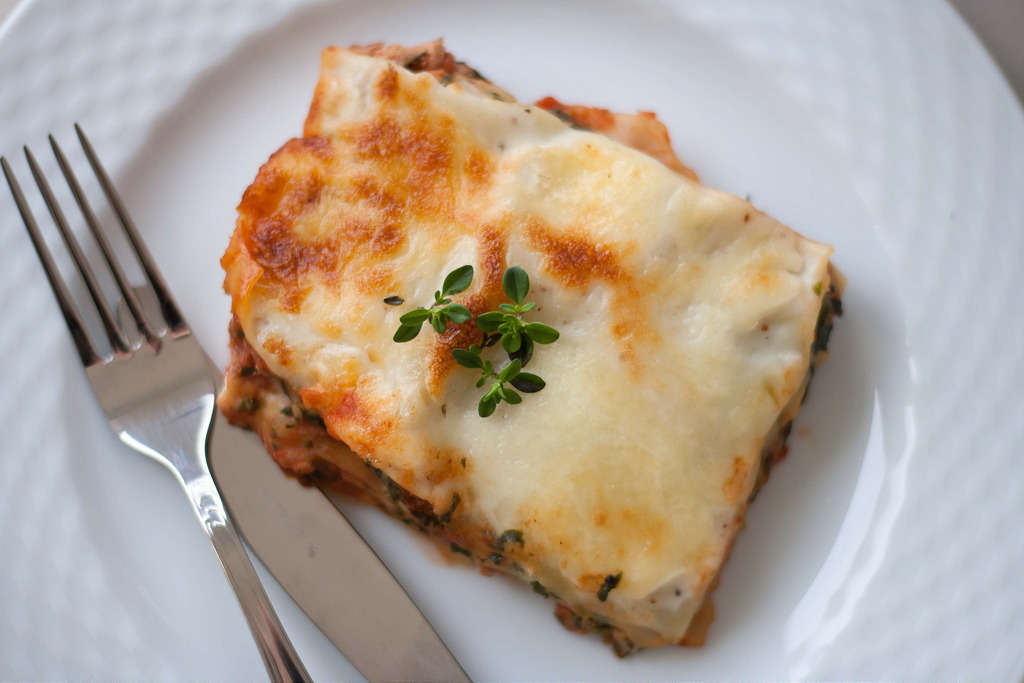
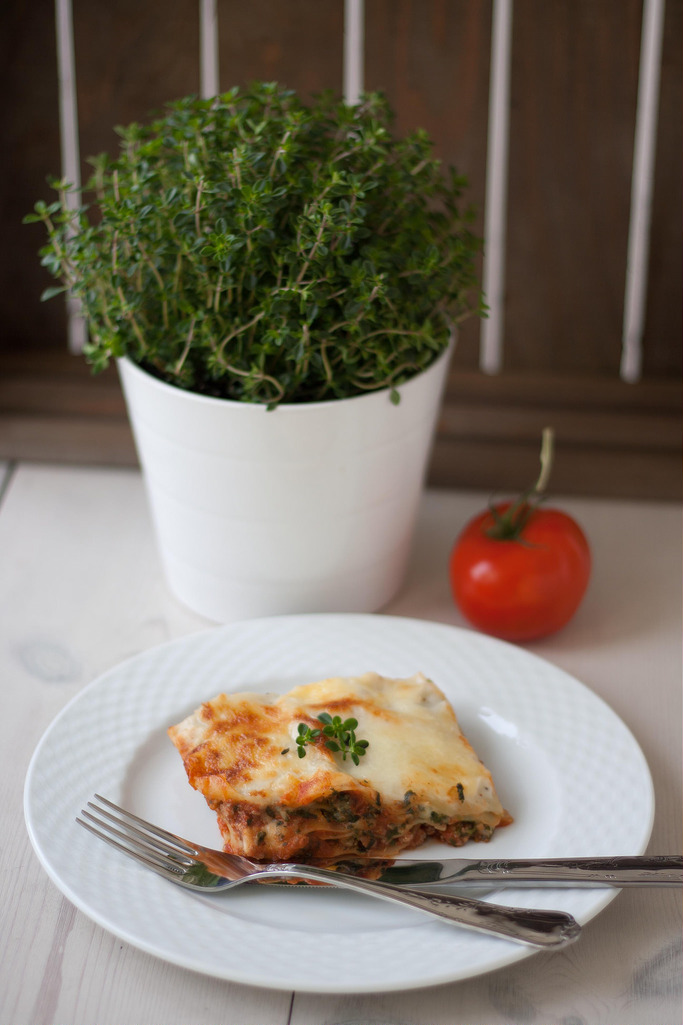
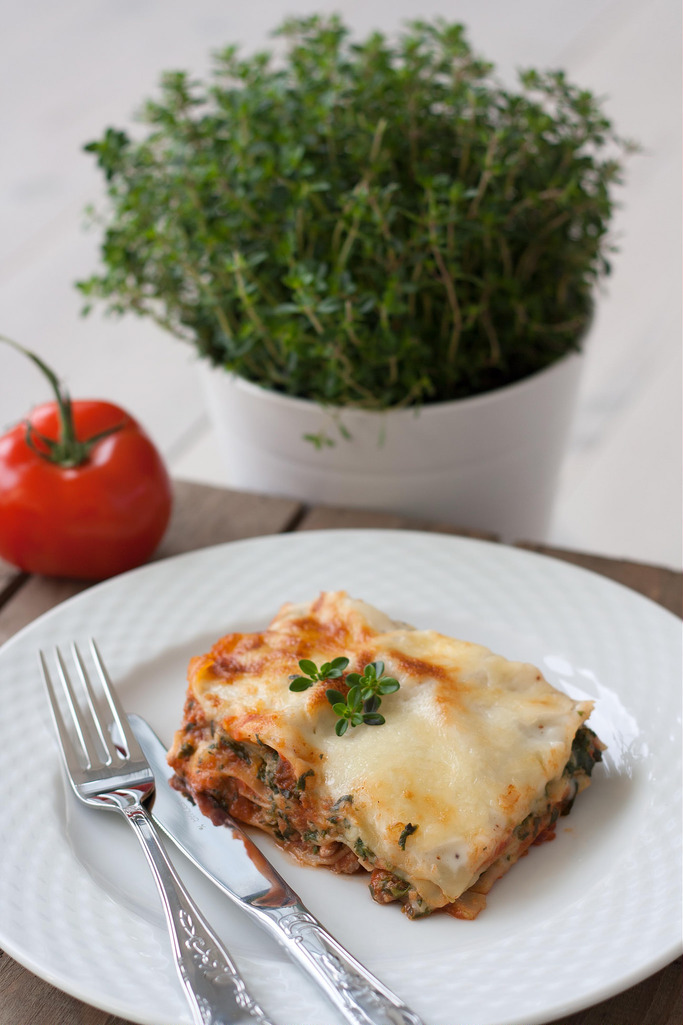
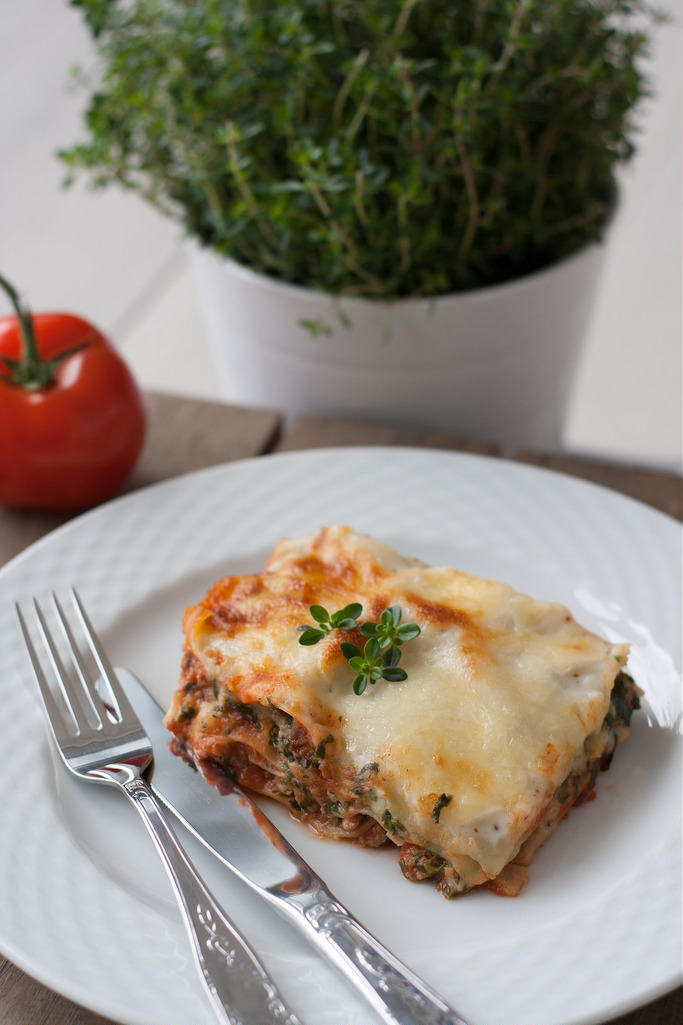
We love lasagna and we have it for dinner on a regular basis. For years we always had the regular lasagna with beef, which is very good, but at the long run we needed some change. This recipe for chicken lasagna with spinach, cottage cheese and béchamel sauce is now one of our favorite lasagna recipes. It is easy to make and has a super delicious taste.
We have served this lasagna for friends and family, each time with great success. We have also served it for kids who find it delicious even though it has spinach in it. We always make our lasagnas from the ground and we never use a lasagna powder mix where you only need to add water and meat. The time spent to make the lasagna is almost the same; however the one you make from fresh ingredients is just must better.
Chicken Lasagna with Spinach, Cottage Cheese and Béchamel Sauce
Ingredients
Chicken
- 400 g ground chicken
- 1 onion finely chopped
- 450 g cottage cheese
- 350 g frozen spinach (thawed)
- 1 can tomato paste (140 g / 5 oz)
- 1 can diced tomatoes
- 150 g grated cheese
- 1/2 tbsp thyme
- 1/2 tbsp and basil
- chicken stock powder
- salt
- pepper
- lasagna sheets
Bechamel Sauce
- 25 g butter
- 4 tbsp all-purpose flour
- 5 dl milk
- salt
- pepper
- grated nutmeg
Instructions
Spinach/cottage cheese mixture
- Mix the thawed spinach with cottage cheese. Season with salt and pepper.
Meat sauce
- Heat up some oil in a saucepan and fry the finely chopped onions and the chicken. Add the tomato paste, the diced tomatoes and some chicken stock powder. Let it simmer for about 15-30 minutes.
Béchamel sauce
- Melt the butter in a saucepan.
- Add the flour slowly while stirring and continue to stir for about 1 minute.
- Add the milk in three steps and whisk well in between.
- Let the sauce boil lightly for a couple of minutes and season with salt and pepper and some grated nutmeg, thyme and basil.
The lasagna
- Assemble the lasagna, start with a layer of meat sauce, a layer of lasagna sheets, a layer of béchamel sauce and a layer of spinach/cottage cheese. Repeat this step and finish off with a layer of lasagna sheets and béchamel sauce.
- Preheat the oven to 200 C (400F) and place the lasagna at the middle position and bake for about 15 minutes. Add a layer of grated cheese on top of the lasagna and bake for another 15 minutes.
- Take the lasagna out of the oven. It is preferred that the lasagna rest for about 20 minutes. However it can be served directly from the oven.
Notes
The post Chicken Lasagna with Spinach, Cottage Cheese and Béchamel Sauce appeared first on Nordic Food & Living.
]]>The post BBQ-Marinated Chicken Drumsticks appeared first on Nordic Food & Living.
]]>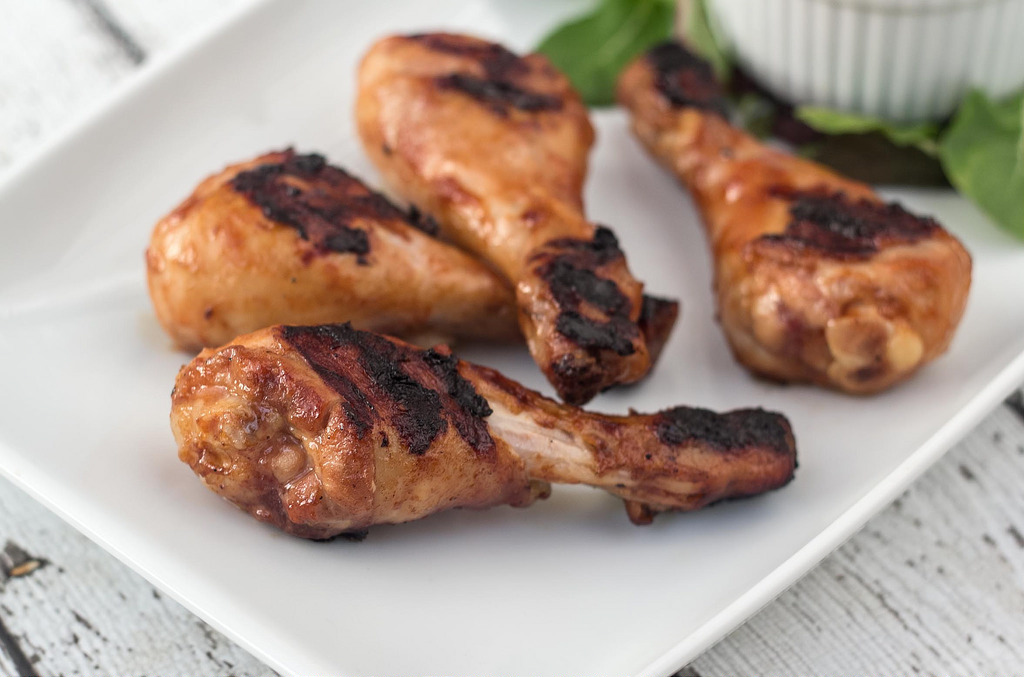
Sometimes the dinner just has to be easy and you don't want to spend the entire afternoon or evening preparing and cooking a dinner. In this case, this recipe for barbecue marinated chicken drumsticks is super easy to prepare and it's just perfect when you are looking for a very delicious dinner that doesn't take forever to make.
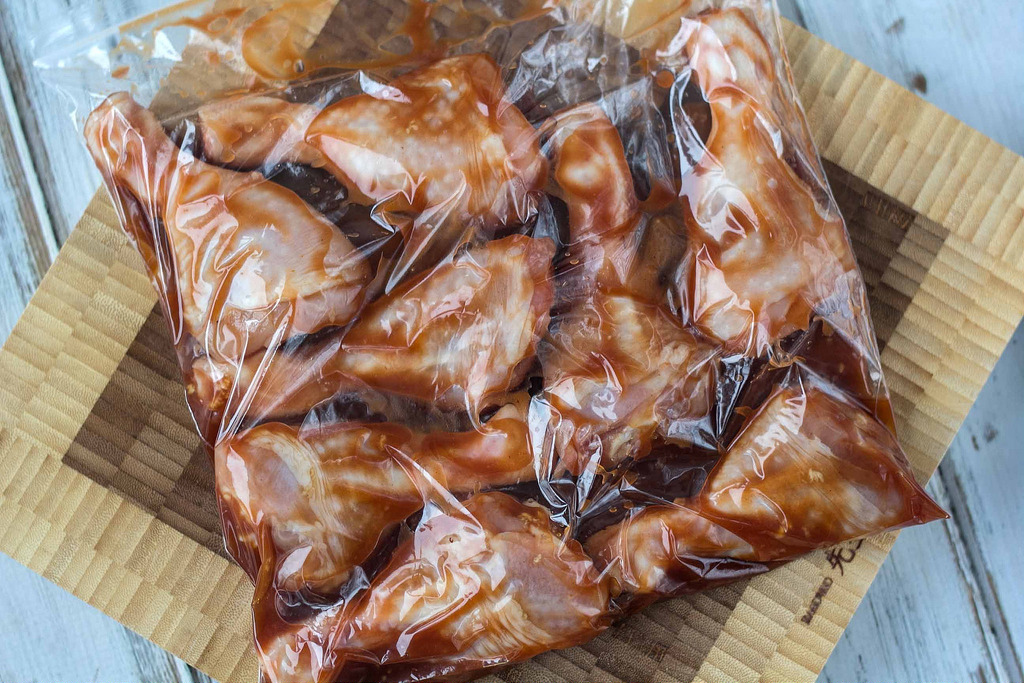
You simply just make a batch of homemade barbecue marinade and pour it into a plastic bag together with some chicken - then you let it marinate for some time and later grill it on your grill or in the oven.
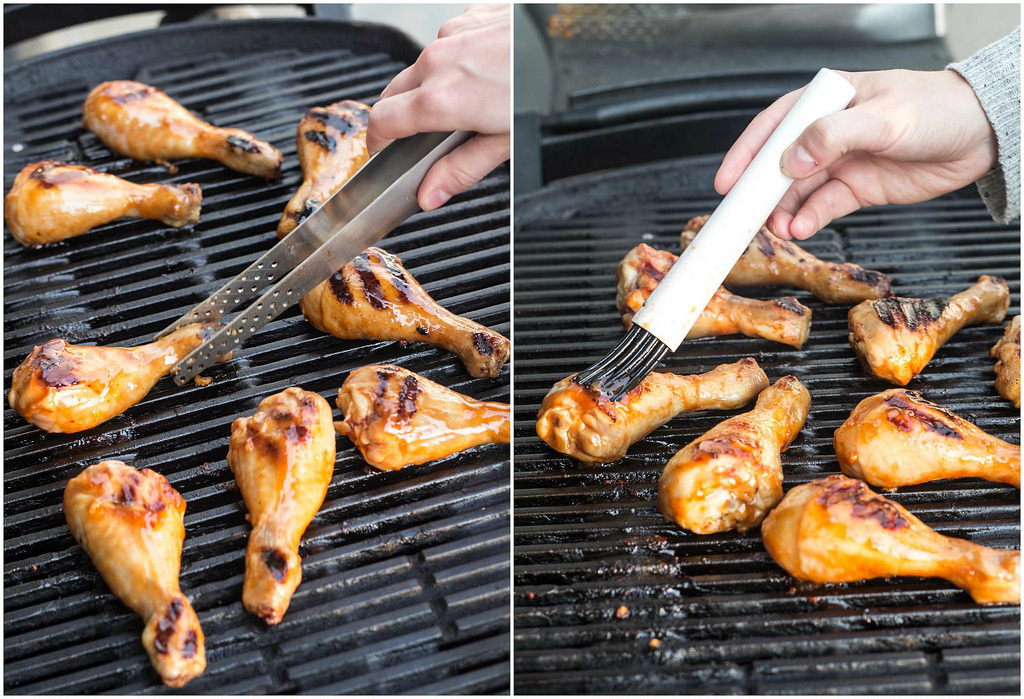
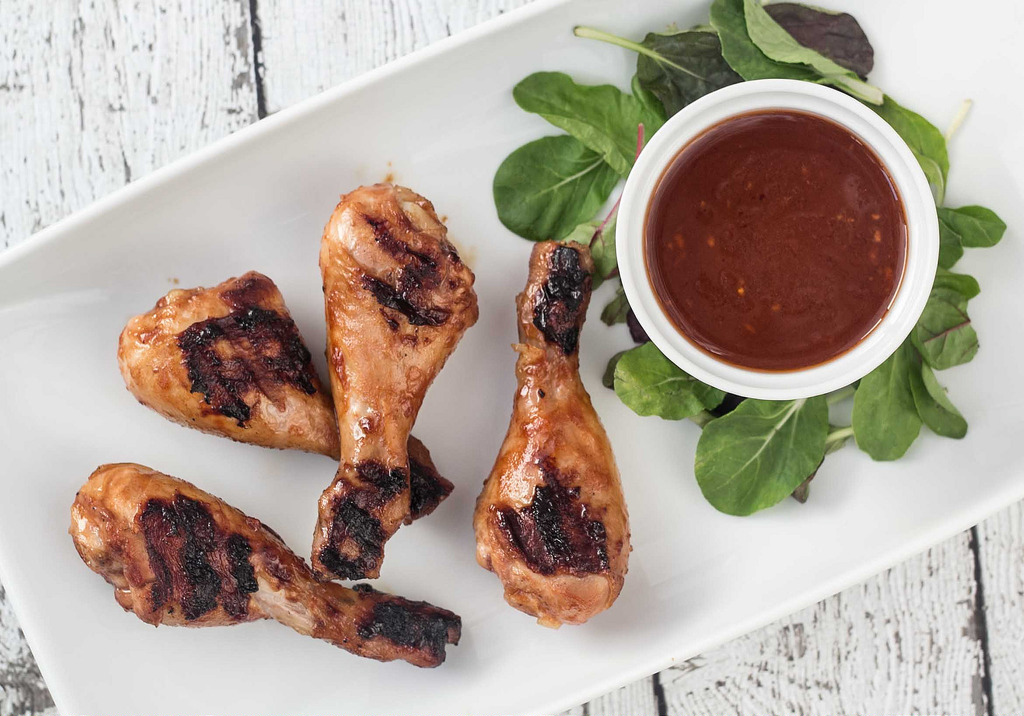
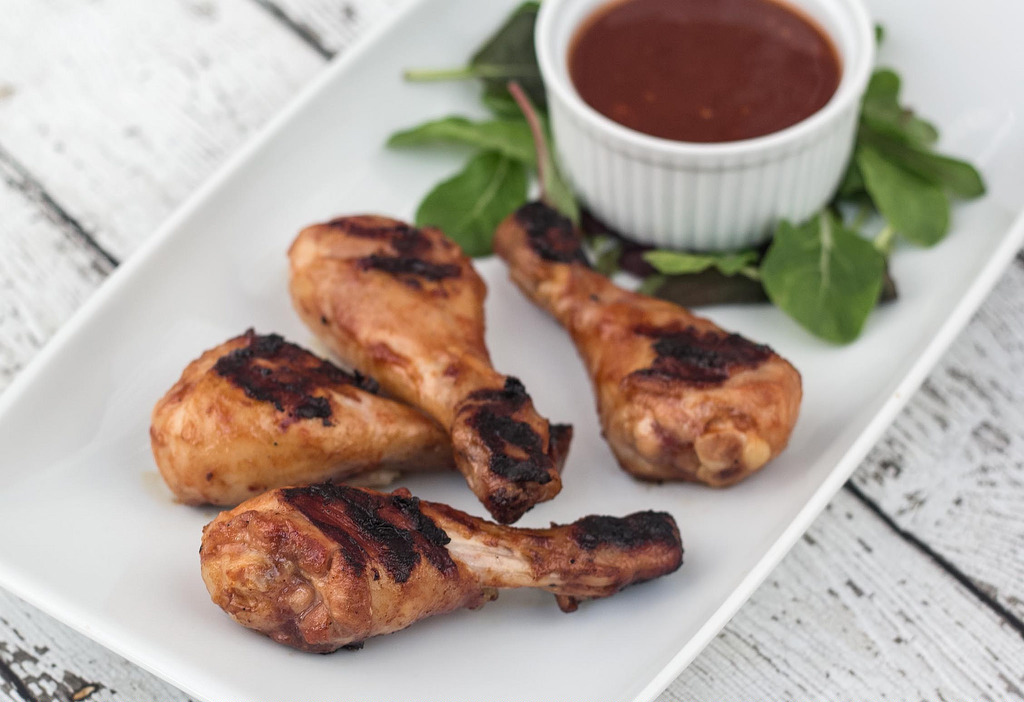
If you do know that you are going to have a busy day, you can easily prepare the barbecue and chicken the day in advance and let it marinate in the plastic bag overnight - this way the chicken only gets more juicy and tasteful. While the chicken is on the grill you can prepare a nice salad and then you have a healthy and delicious dinner in about 20 minutes - so there's no excuse to go and pick up junk at your local fast-food chain.

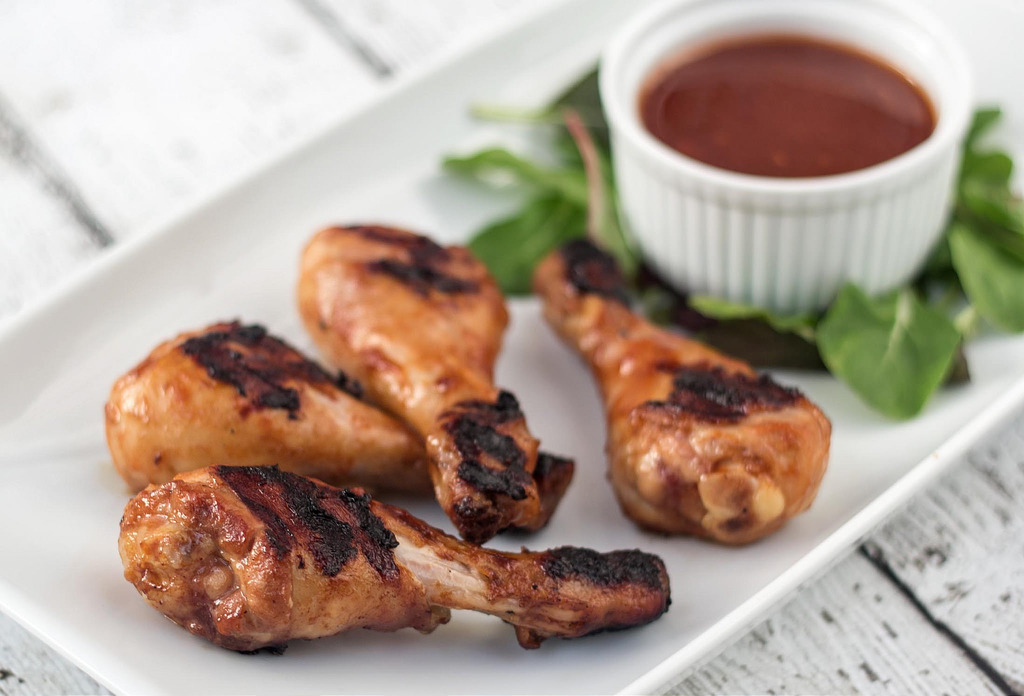
BBQ-Marinated Chicken Drumsticks
Ingredients
- 1 kg chicken drumsticks
- 1 portion BBQ marinade (Look up recipe at NordicFoodLiving.com)
Instructions
- Clean them drumsticks. Sometimes they have small pieces of bones and fat which you need to remove.
- Put all the drumsticks in a large plastic bag.
- Make a batch of BBQ marinade. We have made a very easy recipe for BBQ marinade which only requires a few and simple ingredients. Find it on our blog.
- Pour most of the barbecue marinade into the bag with the chicken. Save some of the marinade for later. Close the bag and shake it so that all the chicken is covered by marinade.
- Put the bag, with the chicken, in the fridge and leave it for a couple of hours - we normally prepare the chicken the day in advance so that it marinate for about 24 hours. If you are busy you can skip this step.
- Fire up the grill and grill the drumsticks for about 15-20 minutes. Pour the last of the barbecue marinade over the chicken. Alternatively, you can cook them in the oven at 200 C (400 F) for about 30 minutes.
Notes
The post BBQ-Marinated Chicken Drumsticks appeared first on Nordic Food & Living.
]]>